Map tips: each color represents a different day. Click a marker to learn more about the spot, and click the star in the map header to save the entire map under Your Places in Google Maps.
Guest post by dzr1107
Overall, a great, scenic trip that covers a lot of area and activities. The weather was perfect in October, I’d hesitate to do the trip in the summer heat. The Mighty 5, in order of my favorite: Zion, Canyonlands, Bryce, Arches, Capitol Reef.
Day 1: Vegas to Zion
- Johnson Mountain
- Zion Pizza & Noodle Co
We started our trip with an early morning flight to Las Vegas. We were surprised by the number of people already at the car rental center, but thankfully had reservations we could access at a kiosk. By using the Alamo kiosk, we probably saved at least an hour wait.
We hit a traffic slowdown on Rt 15 while still in Vegas, but once we cleared city limits it was easy driving for the 2.5 hour drive to Springdale, Utah. The entire drive to Springdale is pretty scenic, but our favorite part was the section of Rt 15 N in Arizona and then Rt 9 E from St. George to Springdale.
We stopped at Mesquite, NV, the last town before the Arizona border for lunch and grocery shopping at Walmart (right off the expressway) for breakfasts/lunches, water, and alcohol. Depending on your adult beverage intake, Utah has somewhat confusing liquor laws and you can only buy full strength beer while eating at a restaurant. We’re the type who like to indulge on a more flexible schedule, so we stocked up before hitting the state line. If this is not your fancy, the town of Hurricane, UT is much closer to Springdale and has a Walmart/several stores.
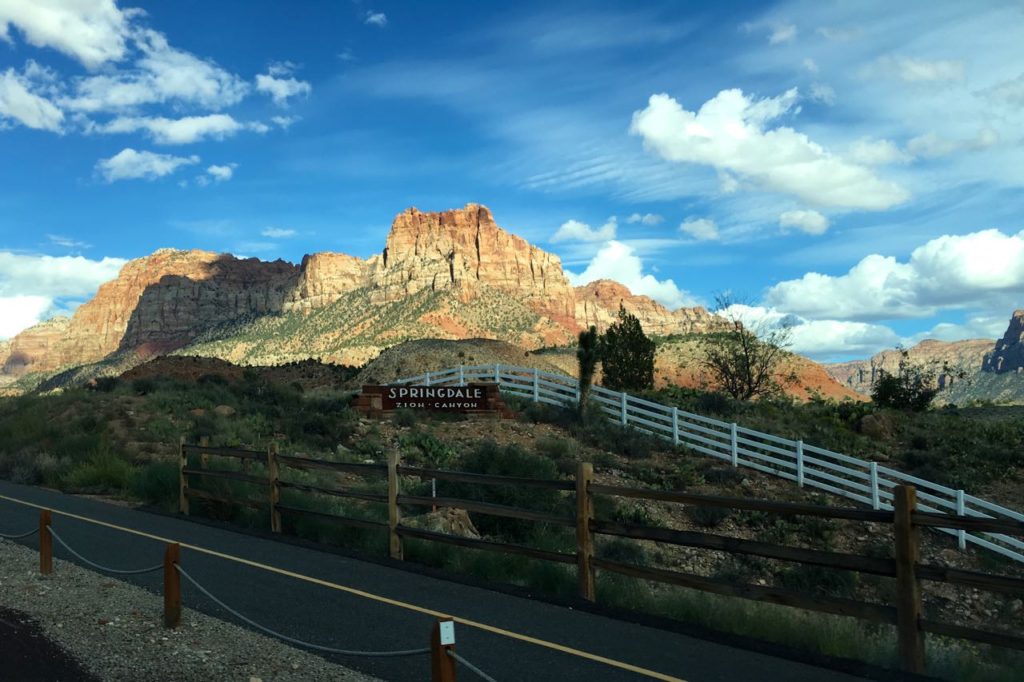
The town of Springdale seems to essentially center along Rt 9, with several shuttle stops that will take you to Zion National Park visitor center. We rented a lovely home off of VRBO next to a shuttle stop. From the back of the house, there was access to public trails on the lower section of Johnson Mountain. We hiked these for a stunning sunset view of The Watchman. I did notice several animal tracks on the trail, but couldn’t place if it was coyote, fox, or my favorite, mountain lion prints. For dinner, we got take out at the Zion Pizza and Noodle, which has fabulous pizza. It seems that most of the town comes alive in the evening, with stores open late and several people out walking.
Day 2: Zion
- The Narrows
- Big Bend
- Weeping Rock
- Zion Lodge
- Lower Emerald Pool
Aside from Rt 9, which cuts through the lowest section of Zion (for $30/week), and Zion Lodge (via permit), no cars are allowed in Zion National Park. From Springdale, you can either drive to the visitor center or take a shuttle. We opted to drive and always found parking before 9 am. I would imagine this is not always the case, especially in summer months or holidays. This option requires paying a fee. I am not sure if taking the town shuttle would bypass the entrance fee. The 9 am shuttle was fully seated, with only a handful of people standing. In this timeframe, most people are either going to Angels Landing, Observation Point, or the Narrows.
We stayed on until the Temple of Sinawava, which is a 30-35 minute shuttle ride and the last stop. From the stop, we hit the running water bathrooms, and hiked the mile paved Riverside Walk to the beginning of the Narrows. The Riverside Walk is very scenic and family friendly. It was not crowded at 9:30 am, but was very crowded on our return hike around 1 pm. The trail abruptly ends with some stairs down to a small sandy/rocky beach filled with forgotten walking sticks and dry shoes.
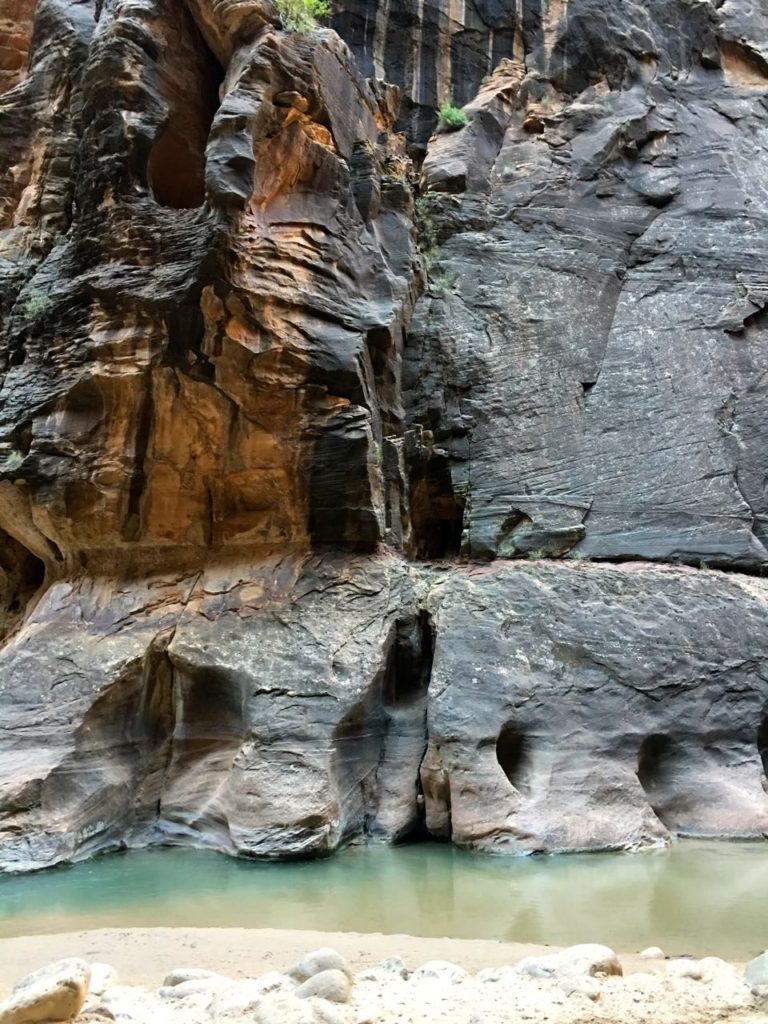
We were not sure what to wear to hike the Narrows in October. You can rent items in town, but I don’t think that’s entirely necessary for this time of year, you just need shoes with a sturdy sole to help navigate the river rocks. The house we rented had hiking sandals and sneakers we were allowed to borrow. At the time, it seemed like a perfectly good idea to wear borrowed shoes for a long hike in a river.
Spoiler, the blisters and cuts I have a month later suggest otherwise. Aside from ill-fitting shoes, we had hiking sticks, which saved each of us from toppling into the river more than once. We wore shorts with fashionable fleece jackets and were sufficiently warm. By sufficiently, I mean the first two steps into the freezing cold water made us second-guess our entire day and sanity. However, after a few minutes our body adjusted (ie, our feet went numb) and we were comfortable for the duration of the hike.
The Narrows is a must-do if at Zion, partially because of the uniqueness of river hiking and partially because the views and experience is gorgeous (and fun!). The entire Narrows is something like 16 miles, but if you start at the bottom, as we did, you can turn around at any point. We hiked up the Narrows for about 2 hours with several picture stops and did not encounter any water beyond knee-high. I estimate this was about 4 miles round trip. I don’t think we made it to Wall Street, but I don’t feel like we missed out.
There were always people around, and the crowd grew more significant the later it got in the day. We saw several small children in the Narrows, which I don’t I recommend but it is clearly doable. I would also pay attention to the flash flood predictor at the beginning of the Riverside Walk. If there is potential for a flash flood, do not enter any small slot canyons and think twice about hiking the main section of the Narrows. After we dried off, we had a packed picnic lunch along the river, just off of the bus stop. We boarded the shuttle to head down the canyon, stopping at Big Bend, Weeping Rock, and the Zion Lodge.
Big Bend was pretty and with a zoom lens, you could see people hiking the ridge to Angels Landing. However, if you’re short on time you can skip this stop.
Weeping Rock is worth the stop. This stop is the start of several longer trails, but also a short 0.5 mile uphill walk to a view point under a rock wall, with water flowing out from it. It’s a pretty view back into the valley, so I think it’s worth the time.
Zion Lodge was very crowded, with a lot of people outside eating, waiting in line for ice cream, in the gift shop, and in line for the bathrooms. We are not crowd people so we did not stay long and opted for the 1.2 mile round trip to the Lower Emerald Pools. This hike disappointed us. It might be better early in the year when there’s more water, but we essentially hiked a crowded trail to get to an oversized puddle. The best part about this hike was the bridge crossing the Virgin River. You can get some very pretty pictures looking each way into the canyon.
After the Emerald Pools, we had to wait for the second shuttle bus because the first shuttle bus was maxed out. We probably would have stopped at additional southern stops, but the shuttles were so full we didn’t think we’d be able to get back on them. I would hate to see the crowds in the July/August heat.
Many restaurants seem to close on Sunday in Springdale. We had a delicious meal at Jack’s Sports Grill (next to the more fancy Switchback Grill) before calling it a night.
Day 3: Zion
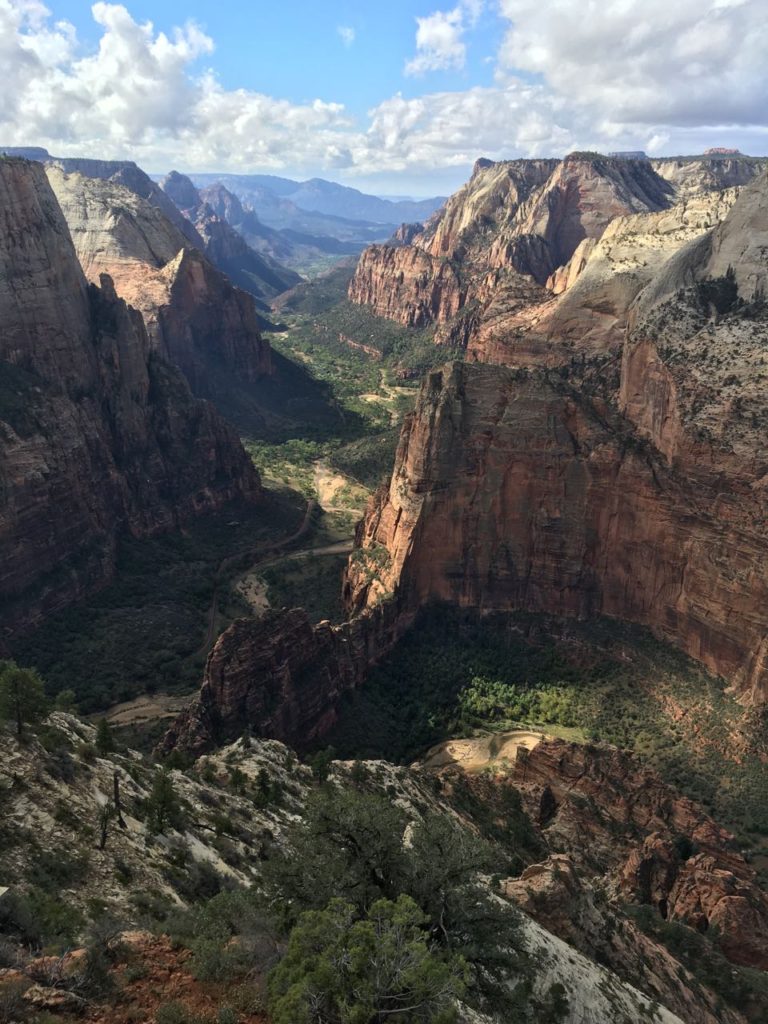
- Observation Point Trail: 8 mile RT, 2100’ elevation gain
We caught the 9 am shuttle and enjoyed 20-25 minutes of sit down relaxation before getting off at the Weeping Rock shuttle stop. At the stop, there are pit toilets and several trailheads. The East Rim, Hidden Canyon, and Observation Point Trails all share a common trail before splitting off at various points. At the start of this trail there’s a map with cautionary statements such as “This is a long strenuous trail, with many steep sections and unprotected drop-offs. Not for anyone who is out of shape, or has a fear of heights.” If you are like me, you’ll pause, read it, and think smugly to yourself, “Baha! I am IN shape. The elliptical is my therapist! I voluntarily lift heavy things! I even slap some balls around on a tennis court! This clearly does not apply to me!” and continue on your way.
The trail starts with a set of switchbacks with scenic views of Angels Landing. If you do not know what a switchback is, do not hike this trail. After the first mile, I’d like to tell you the switchbacks end, but they don’t. Instead, this is where the earlier smugness starts to waiver and I started to remember that the last few times I was on the elliptical I was also drinking an adult beverage, and that it really had been a few weeks since I lifted anything remotely heavy, and tennis, well, really that was playing doubles once three months ago. But right when you reach 1.5 miles and you’ve convinced yourself the only shape you are in is the creamstick donut you had for breakfast, the trail levels out and you begin to have a glimmer of hope for your little donut legs.
The trail continues for a mile or so in a beautiful, cool, slot canyon. It is magical. So magical that by the time you exit on the other side, you’ve already repressed the 1.5 mile of switchbacks.
The rest of the trail is the secondary set of switchbacks. The magic of the slot canyon, the beauty of the trail, and the false sense of accomplishment of the first set of switchback will fuel you a good way up the switchbacks. These are steeper and harder than the first set of switchbacks in addition to the higher altitude. They also feel like they never end and left me questioning everything I know in life and calculating exactly how someone would rescue me if I just held an impromptu strike/sit-in on the trail. However, like everything in life, they do not last forever. The trail levels out to a nice, easy, walk along the rim to Observation Point.
Once you get to Observation Point, every doubt you had on the trail is gone. It is surreal, gorgeous, and I’d wager one of the best views in all of Zion. There are several areas to sit down, relax, eat some food (donuts, perhaps?), and really revel in the beauty of the world. The predominate view is down the canyon, but you can cut over several areas and see 270 degrees, including the top of the Narrows, Big Bend, Angels Landing, the Lodge, etc. We made it to the point around noon and were still able to get great photographs. Earlier or later would probably be better for photography, though. Despite all of my earlier complaining, this hike is amazing. I will do it every time I visit Zion from here on out.
Going back down the trail is very easy in comparison. However, it took us longer to go down because we stopped for so many pictures to try and capture all the beauty we could. We reached the end of the trail around 3pm. We were surprised to see so many people starting up the trail. It is not one I’d feel comfortable doing at night. I also should be fair, and let you know that while I felt the burn of the switchbacks, we were passed by a dozen or so twisted people running the trail. If you are one of these twisted people, please bring donuts to pass out while you fly by our gasping little “in shape” bodies.
The rest of the day we took relatively easy. Celebrated our last full day in Zion with Zion Pizza and Noodle deliciousness.
Day 4: Bryce Canyon
- Sunrise Point
- Sunset Point
- Boulder Mountain Lodge
We left early morning and drove 2 hours from Springdale to the second of The Mighty 5: Bryce Canyon National Park. We took Rt 9 to Rt 89 to Rt 12. If we had more time, I would have taken a side detour south on 89 to the Best Friends Animal Sanctuary north of Kanab.
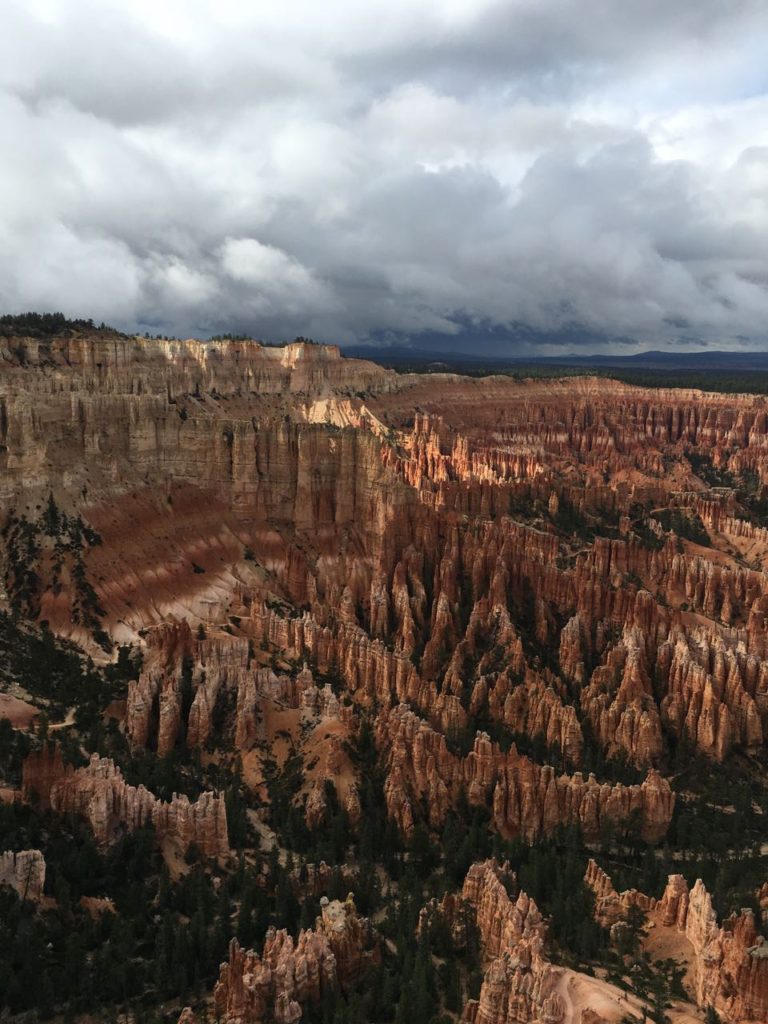
The weather was pretty questionable all day, so we didn’t get to fully appreciate the awe and wonder of Bryce. We started at the very crowded visitor center. Then took a short mileish hike from Sunrise Point to Sunset Point. This area was also crowded, but otherwise the park was not that crowded. We also drove the length of the park road to Rainbow and Yovimpa Points. There is a shuttle that runs from May to September, but we had no issues with parking at any stops. This might have been because we could not see anything at most of the stops with the rain.
The weather did break when we reached Bryce Point, and there were spectacular views. This is a must-see for anyone who visits the park. If we had more time and better weather, we would do the Queen’s Garden and Navajo Loop trail to get down into the canyon. I’ve heard nothing but good things about it, but we couldn’t fit it in this trip.
After our cloudy adventure at Bryce, we continued on Rt 12 for another 2 hours to Boulder, UT. There is very little civilization in this area, but the views are phenomenal. It’s worthy of a park status in some areas. There is not much in Boulder. We stayed at Boulder Mountain Lodge and ate a nice pricey organic dinner at Hell’s Backbone Grill.
Day 5: Capitol Reef
- Scenic Byway 12
- Capitol Reef National Park Visitor Center
- Hickman Bridge Trail
- Milt’s Stop & Eat
We continued north on Scenic Byway 12 to Torrey and then turned east on Rt 24. This drive lives up to its “scenic” status and we enjoyed gorgeous views and open range cattle who prefer roads to grass. Even though we live in Ohio and see cows all the time, we still stopped to take pictures of these spiffy cows.
Capitol Reef was the third of The Mighty 5. It’s a relatively new national park and I think it was established more for geological preservation than scenic views. I do not grasp geology as well as I should because after a few thousand years I lump everything into “very old.” However, if you have better comprehension than I do, you’d probably get more out of this park. We explored the very northern section of the 100 mile waterpocket fold, or a little wrinkle in the Earth’s crust.
There are a few stops right off the side of Rt 24 before you reach the visitor center. The visitor center is pretty small. There’s historic fruit trees and buildings around the visitor center, but we did not stop at any of these. Instead we continued down the Scenic Drive. There is a little spot to pull off and pay a visitor fee for the drive, but no official tollbooth. I found the views to be better coming back (ie, south to north), but I think you need to hike a few trails to make this drive (and park) worthwhile.
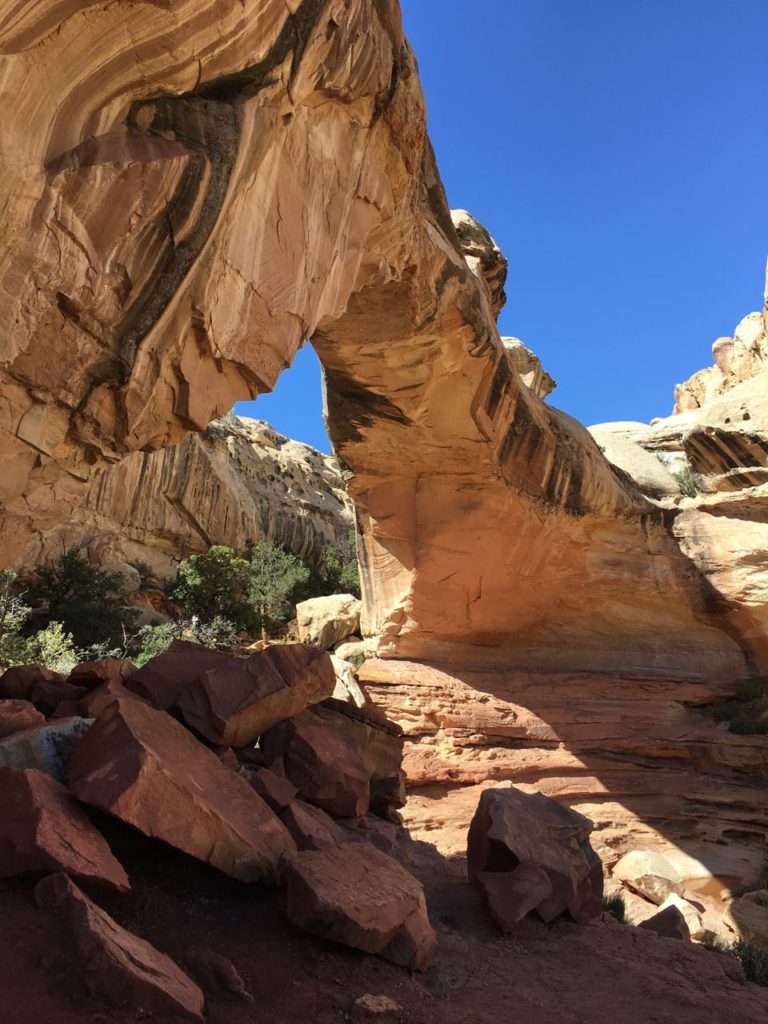
Once back on Rt 24, we did stop for the Hickman Bridge hike. There is a large parking lot with pit toilets. Hickman Bridge is a 2-mile roundtrip hike. There are a few areas of the hike that provide a bit of a workout, but anything seems easy after Observation Point (Zion, Day 3). This trail was not crowded and provided pretty, secluded views before opening up to a large arch. It was our favorite part of Capitol Reef.
We then continued east on Rt 24 to Rt 70 to Rt 191. There was nothing special about this drive, aside from vast emptiness and 80 mph speed limits. We spent the night in a VRBO rented condo just south of the craziness of Moab. For dinner we had a delicious burger and shake at Milt’s.
Day 6: Canyonlands and Arches
- Island in the Sky
- Mesa Arch Trail
- Upheaval Dome
- Dead Horse Point State Park
- Balanced Rock
We started our day around 8:30 am and drove 40-50 minutes to the 4th of The Mighty 5: Canyonlands National Park. The park is divided into three sections: Island in the Sky, The Needles, and The Maze. The Maze is accessible only by off road vehicle, the Needles is pretty far south of Moab, but Island in the Sky is easy to get to and thus the most popular. Even as the most popular section, there were not many people in the park. The lack of people, along with the lack of any running water in the park, helps make Canyonlands feel the most remote and natural of the Big 5 parks. It is probably best explored by 4-wheel vehicle or bike with lots of water.
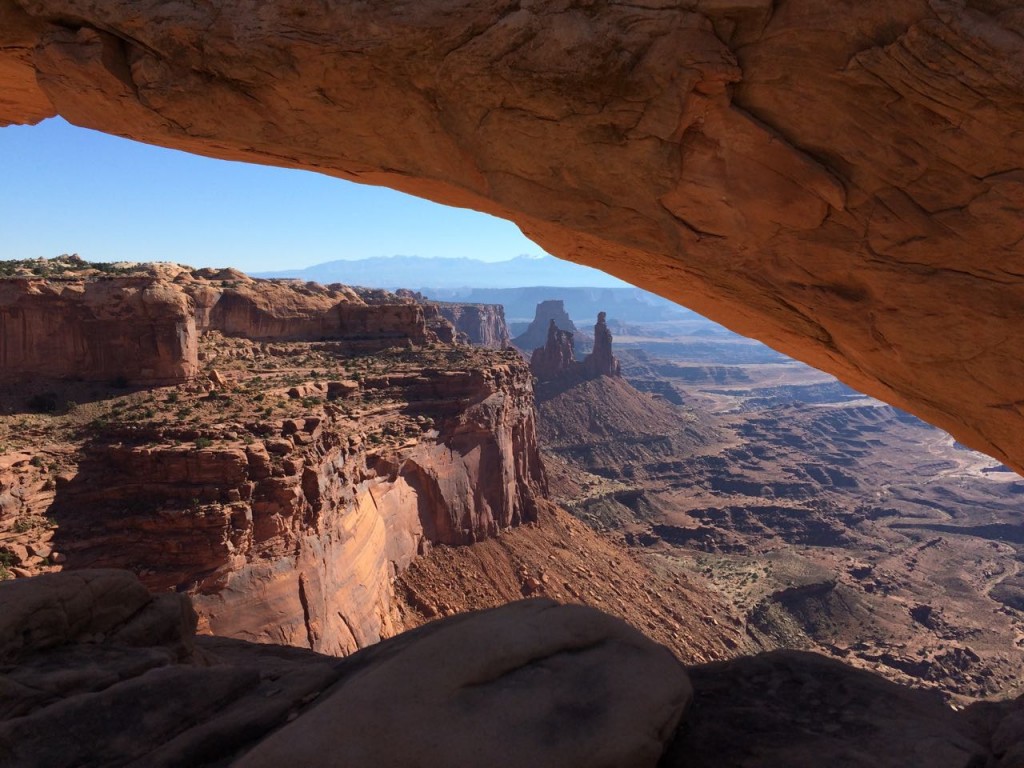
We started with a quick and easy half-mile loop trail to see Mesa Arch. It is well worth it, and a good first stop because of all the areas, this seemed the most crowded. After a quarter of a mile, you turn the corner and see the arch. Make sure you go right up to the arch and look under for a phenomenal canyon view of the Colorado River and distant La Sal Mountains. The trail continues walking up to the left of, and then behind the arch, but many people turn around and go back the way they came. We did the loop.
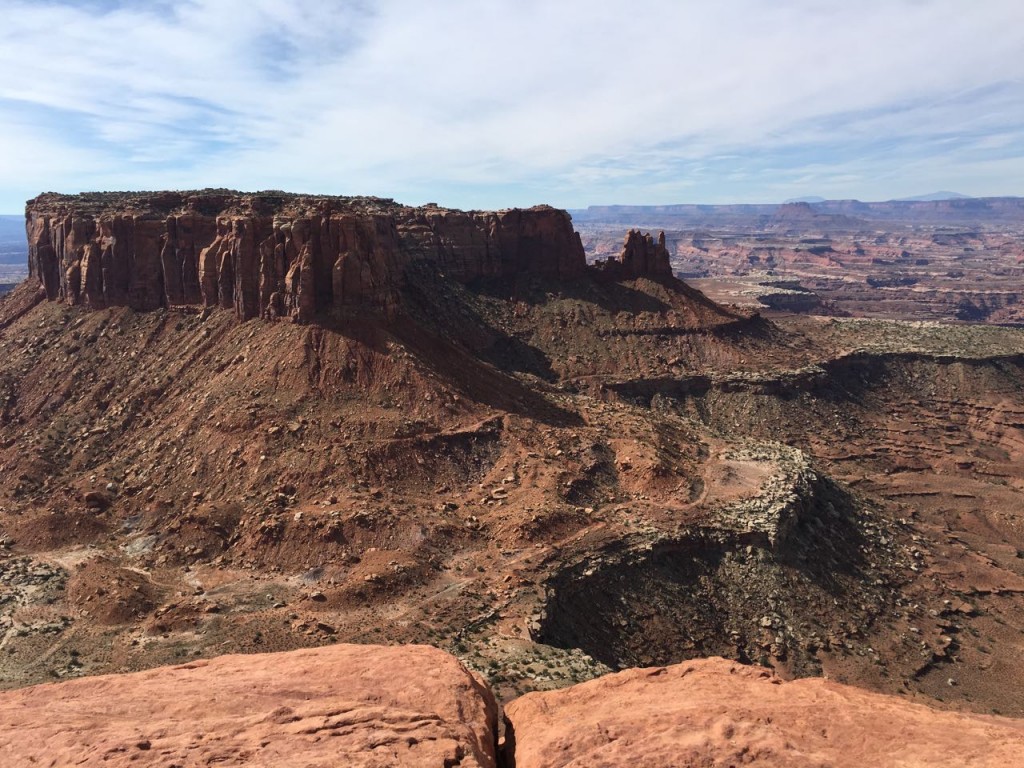
We then drove down to the Grand View Point Overlook. If we did this again, I think we should have gone to the Upheaval Dome first for better photography lighting, but either way our pictures turned out. At the Grand View Point, you can walk a mile (one way) flat trail along the rim. It is worth it and really made me fall in love with this park. Along the way you can peer down onto another level and see the White Rim Road, and then down another level and see the Colorado River. At the end of the trail, you are greeted with a surreal intersection of the Colorado River (and Meander Canyon) and the Green River (and Stillwater Canyon). This view is when I decided I like this park better than the Grand Canyon. It is my hidden national park gem.
A quick side note on the White Rim Road- it’s reserved for 4 wheel vehicles and is a 100 mile loop that takes a few days to finish. I am not a “Jeep girl” and my idea of “roughing it” is spending a night in a Motel 6 or sleeping on a couch in a friend’s well heated, enclosed, apartment with running water. However, I want to rent a 4 wheel vehicle and legitimately camp just so I can travel this road and maybe make it to The Maze section of the park. Once I find a sucker to go with me, it’s on.
After the Grand View Point Overlook, we drove up to Upheaval Dome and hiked to the first and second viewpoints. The first viewpoint is only a 10-15 minute walk with a little bit of climbing. Upheaval Dome itself is essentially a giant mystery. It’s a round jagged circle filled with what looks like a mini salt mountain. It makes you feel like you’re on another planet and little green spacemen might jump out at you.
The second viewpoint takes longer to get to and provides mostly the same view (it IS a circle). However, the trail is super fun. You get to scamper up and down sandstone with very little guidance aside for cairns and occasional small steps chiseled into the rock. If you have bad knees or are not in shape, I’d pass. If you’re an adult who secretly loves to scamper on rock like a 5 year old, do it. I still giggle like a child every time I think of this trail.
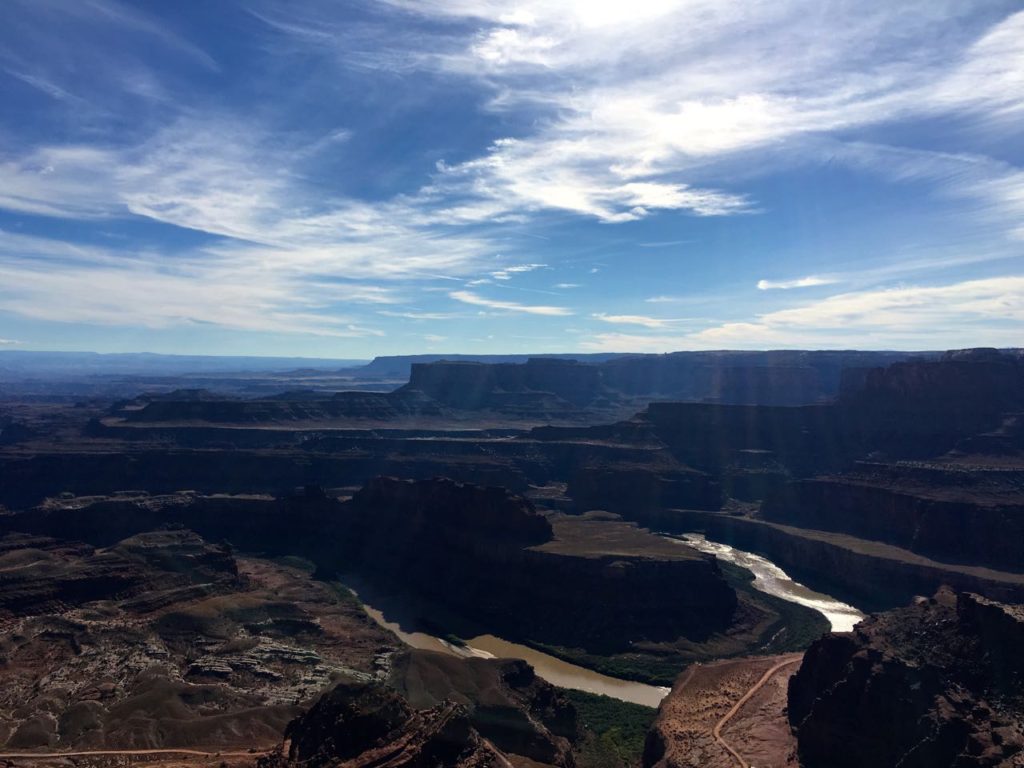
From the Upheaval Dome, we next stopped at Green River Overlook. Then we left Canyonlands and drove to the nearby Dead Horse State Park. This park is a must, if and only for the Dead Horse Point view. This view focuses on a horseshoe bend in the Colorado River and is just breathtaking. This is the only thing we did at the park, and felt it was well worth our $10 entrance fee.
At this point, it was 4:30 in the afternoon and the sun had us pretty tuckered out. But, we decided to stop in Arches on our way back to Moab. Arches was the 5th and last of The Mighty 5. Since it was so late, many people were leaving the park. We could easily get the essential tourist picture of the welcome sign. We then stopped at each pull off up to Balanced Rock. The lighting of the setting sun made each stop seem very impressive and we got some awesome photos.
After dinner and a shower, we went back to Arches for the famed night sky. A park ranger had told us earlier that anything beyond Park Avenue will show impressive skies, so we drove the La Sal Mountain pull off. If we did it again, we’d probably drive further in the park, but I would still hesitate to do any long hikes. It is very dark.
Day 7: Arches
- Fiery Furnace
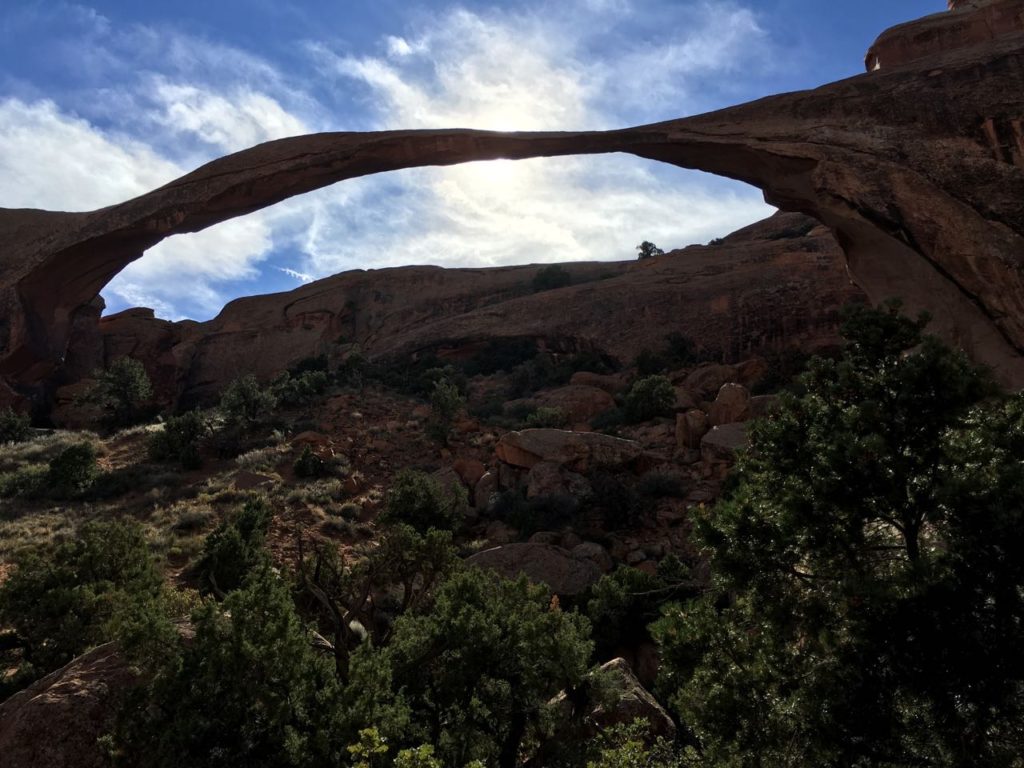
- Landscape Arch
- Delicate Arch Trail
- Double Arch
We contracted with Deep Desert Expedition for a guided tour of the Fiery Furnace. This area of the park is accessible by permit only (125 per day). We figured we would get away from any crowds and get a unique Arches experience. We were right. Deep Desert Expedition led a fantastic 4-hour hike for our family and another couple. It was very cool to be walking in such old structures and it was a lot of fun to do some baby rock climbing. It was also very interesting to have the geological uniqueness of the park and area explained. If you have more than a day to spend at Arches, I’d recommend this. It was the highlight of our Arches trip.
From the Fiery Furnace, we continued up to Devils Garden Trailhead. Had a picnic lunch before hiking to the Landscape Arch. This entire area was pretty crowded, so we turned back after the Landscape Arch. Headed to the next tourist hot-spot, the Delicate Arch Viewpoint. We originally were going to hike Delicate Arch, but it’s a longer hike than we thought and from talking with locals we got the impression it may be overrated. Instead we hiked an ATV path from the viewpoint to get a nice clear view of the arch.
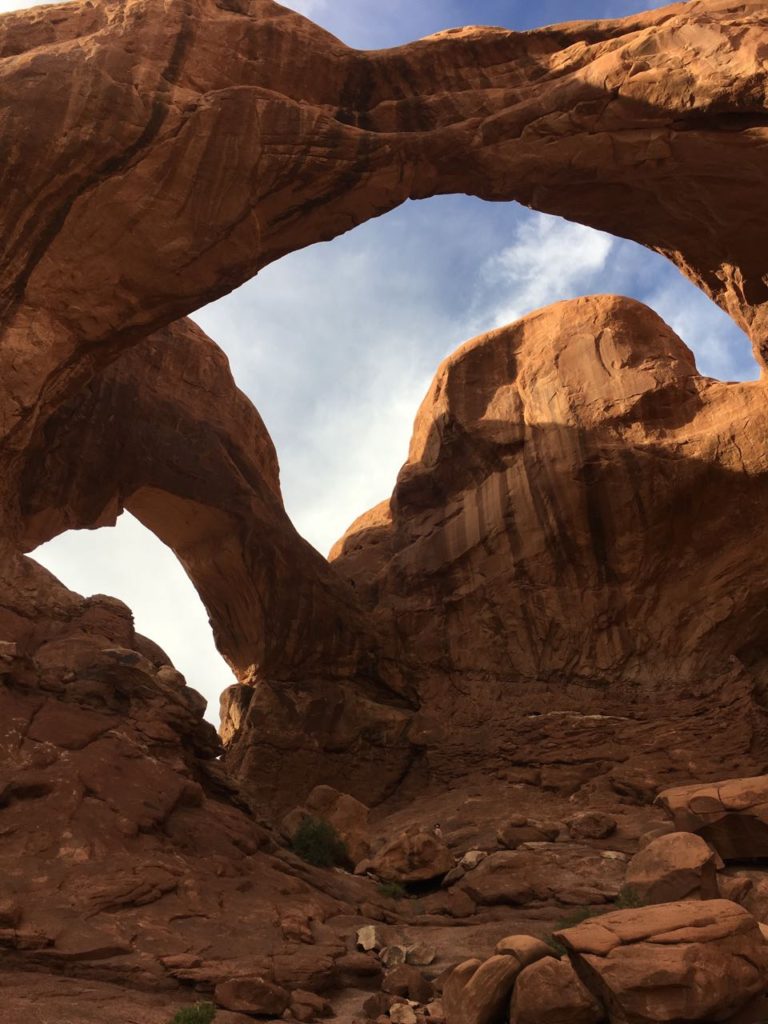
We stopped at the Windows Section, another crowded area, and hiked up to the Double Arch and North and South Window. The Double Arch was pretty cool, but it was hard to get pictures without a lot of strangers crawling all over the rocks.
Going into the trip, I expected to like Arches the best of the five national parks but I didn’t. I thought there would be more arches (sort of like, here’s an arch, there’s an arch, everywhere there’s an arch), but that’s not the case. It’s also very crowded which quickly takes away from my overall enjoyment of a place. However, the guided hike of the Fiery Furnace was quite a highlight and made me glad we spent a solid full day at Arches.
Day 8: Moab to Las Vegas
It is a 6.5-7 hour drive from Moab to Las Vegas via Rt 70 and Rt 15. The drive itself is pretty scenic, although nothing specifically stands out aside from 80 mph speed limits and rest areas that are really just pit toilets.
Once in Vegas, we caught the Mirage’s Beatles LOVE show. It was quite a crowd pleaser and a good note to end a memorable and epic trip.
Traveled in October 2017
Leave a reply