The most important thing on this page: please follow the 7 principles of Leave No Trace whenever hiking (and all the time, actually – most are pretty good general life tips, too).
- Plan ahead and prepare
- Travel and camp on durable surfaces
- Dispose of waste properly
- Leave what you find
- Minimize campfire impacts
- Respect wildlife
- Be considerate of other visitors
Now, on to Cadini di Misurina. Here are the quick facts:
- Where: Dolomites, northern Italy
- More specifically, where: the trail starts at Rifugio Auronzo, 40 minutes northeast of Cortina d’Ampezzo
- Distance and elevation: 2 miles (3.2 km) roundtrip with 300 feet (90) of elevation gain
- Highest point: 7,685 feet (2,340 meters)
- Why you should hike this trail: see some of the most dramatic, jagged mountain peaks in the world
- Fee or permit? yes – 30 Euros to drive to and park at Rifugio Auronzo (it’s worth it)
- Best time of year: June – October
- Closest commercial airport: Venice, Italy is a 2.5 hour drive
Tips
- Best viewed at sunset
- Scope out your favorite view of the Cadini viewpoint while others are on it
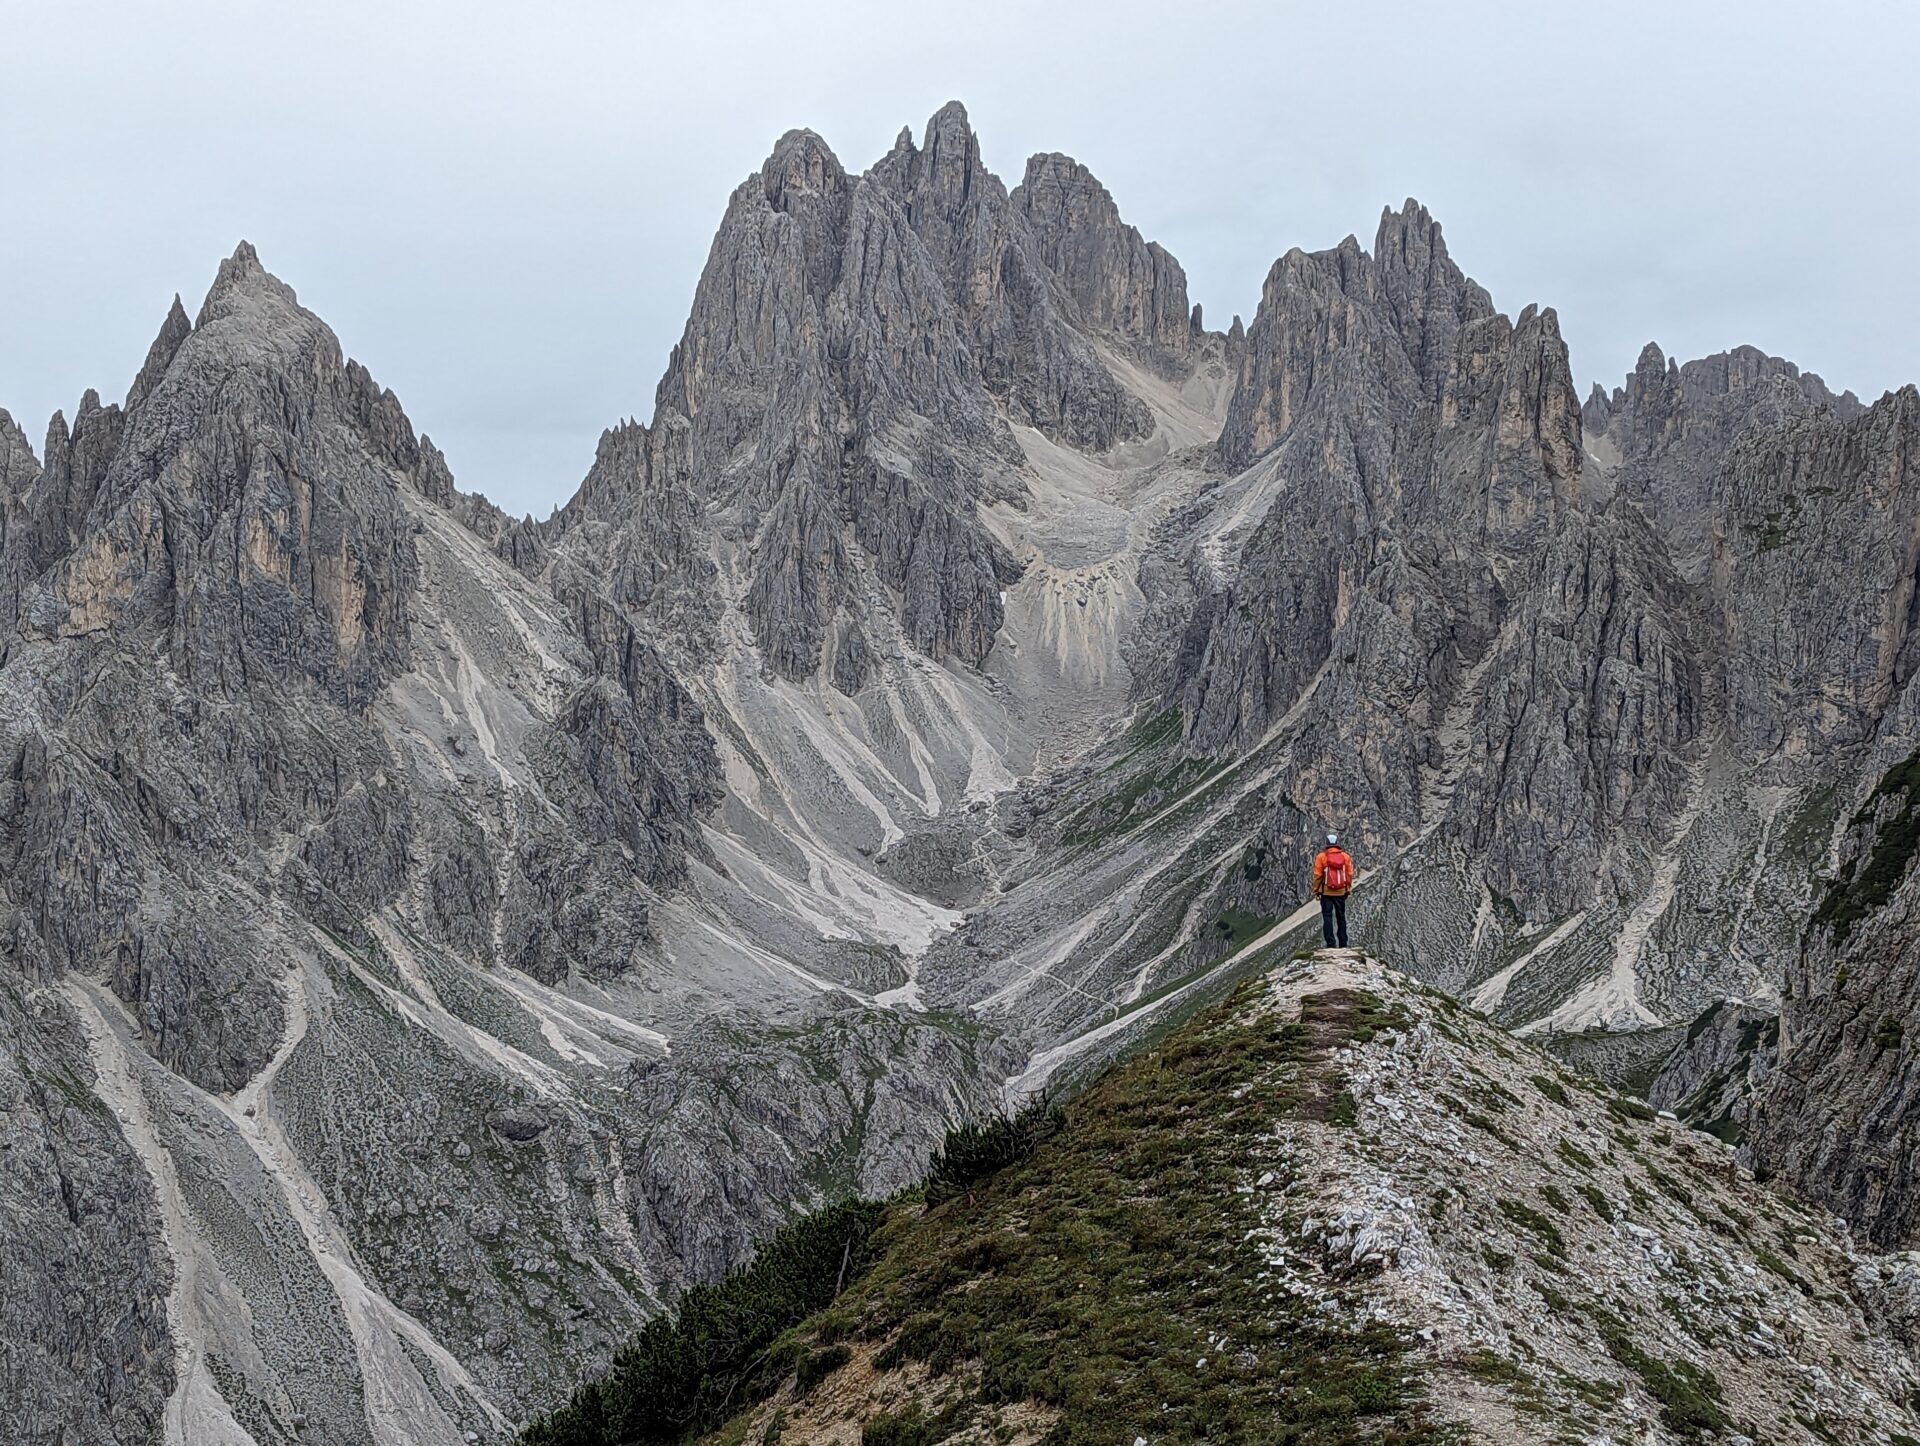
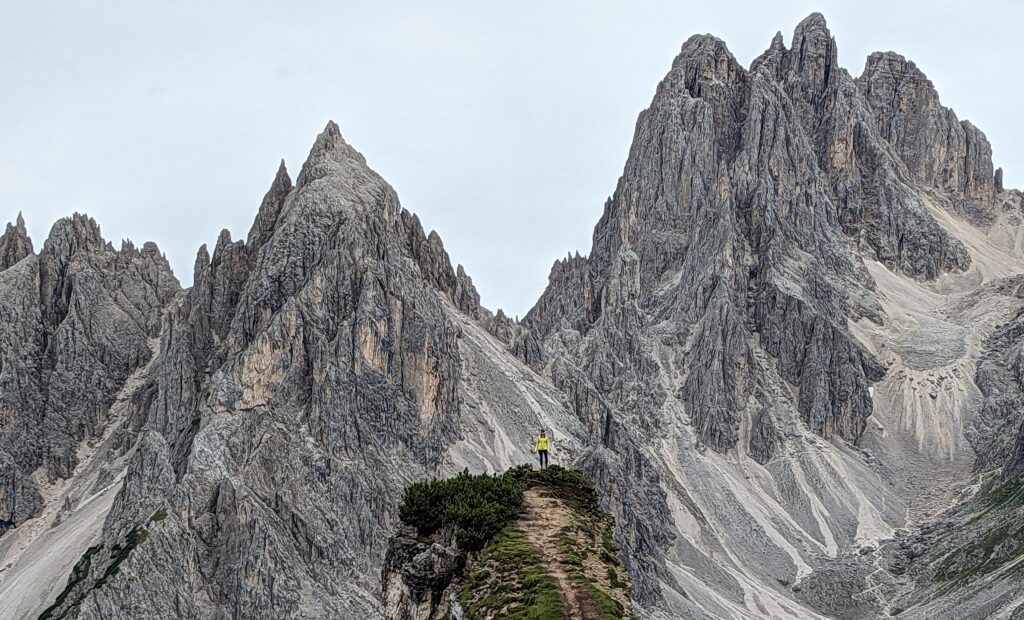
- You’ll likely be very small in pictures, so wear a “loud” red, orange, or green shirt
- You may need to wait in line to get your picture at the viewpoint – it’s no longer a secret
- Do the Tre Cime hike, which also starts at Rifugio Auronzo, on the same day. Hike Guide for that trail here.
- Lago di Misurina and Lago d’Antorno are both on the drive to Rifugio Auronzo, so make sure to at least stop for a minute to take a picture.
Getting there
There are countless places to stay in the Dolomites, so I’ll detail this as coming from Cortina d’Ampezzo, the closest “bigger” town. The road to Rifugio Auronzo (a rifugio is a mountain hut) branches off from Strada Provinciale 49 di Misurina, right by Lago di Misurina. Shortly after turning down the dead-end road, you’ll pass Lago d’Antorno then come to a pay station which will display how many parking places are available. There are hundreds of spots and while quite rare, it can fill up in the middle of the day.
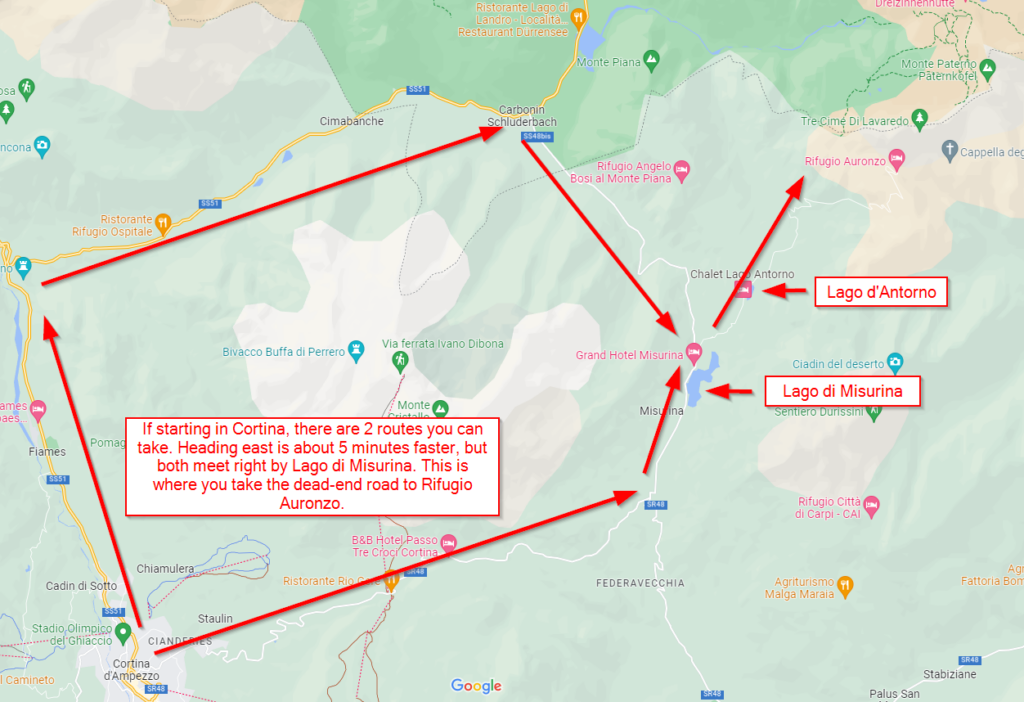
After parking at the rifugio, you may have a decision to make if you’re planning on doing Tre Cime (which you must). The trails are in opposite directions so you have to pick which one to do first.
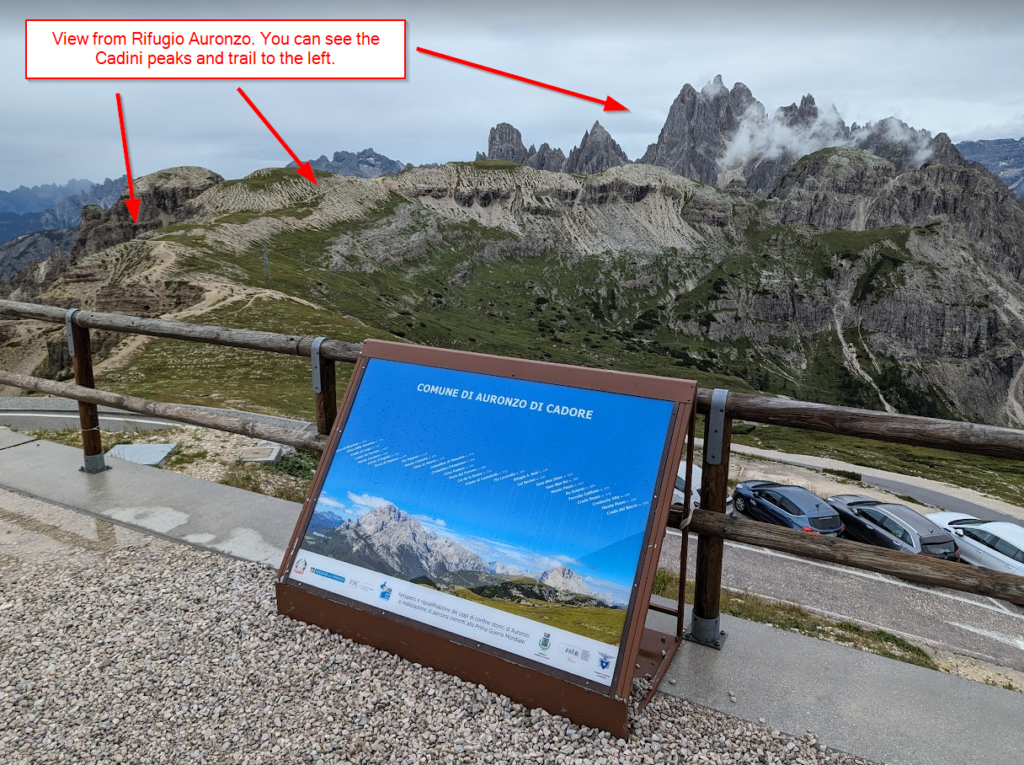
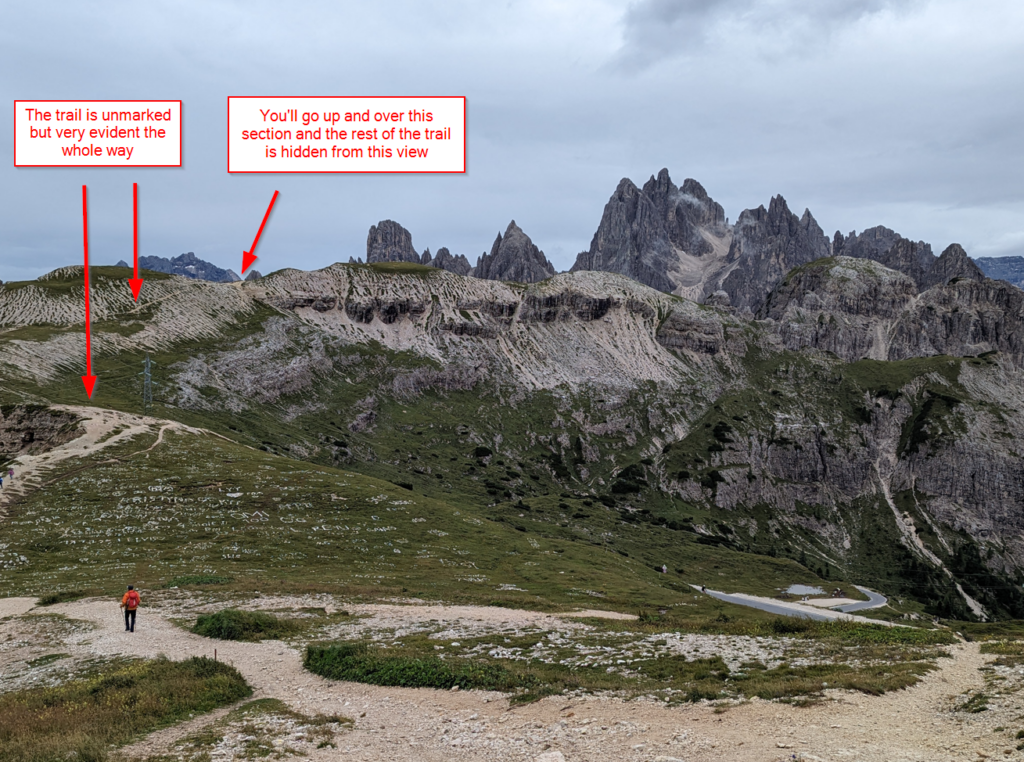
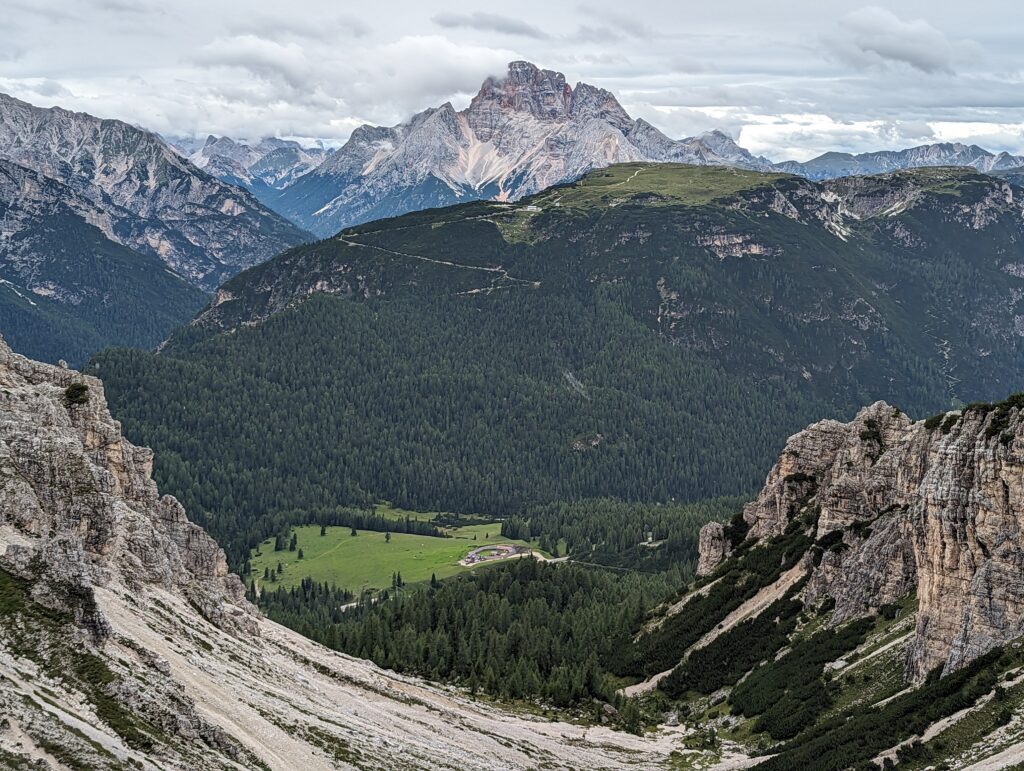
Cadini di Misurina was our priority so we went there first when we saw all the peaks were visible. Even though it’s best at sunset, the weather was not in our favor and we didn’t want to take a chance at things getting worse. You can see the distinctive peaks and trail right from Rifugio Auronzo to help you decide on the spot.
You’ll first head downhill from the hut on a wide trail that narrows as it goes back up to crest a small hill.
While the views looking back at the rifugio will be in front of you on the way back, it’s worth turning around several times.

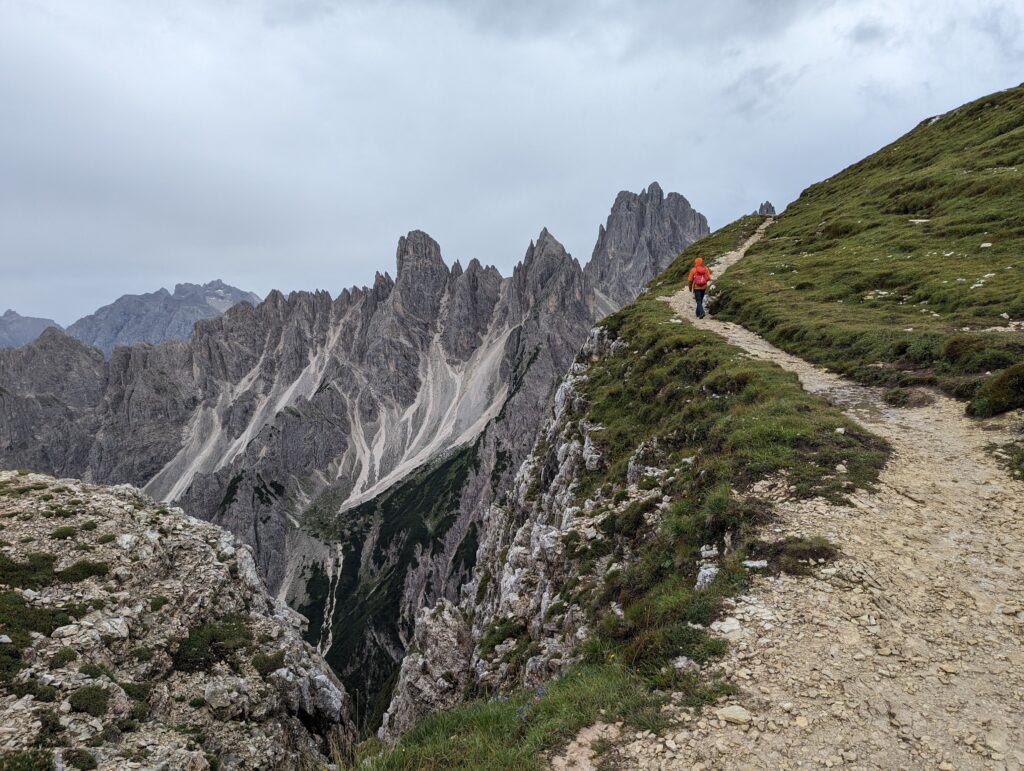
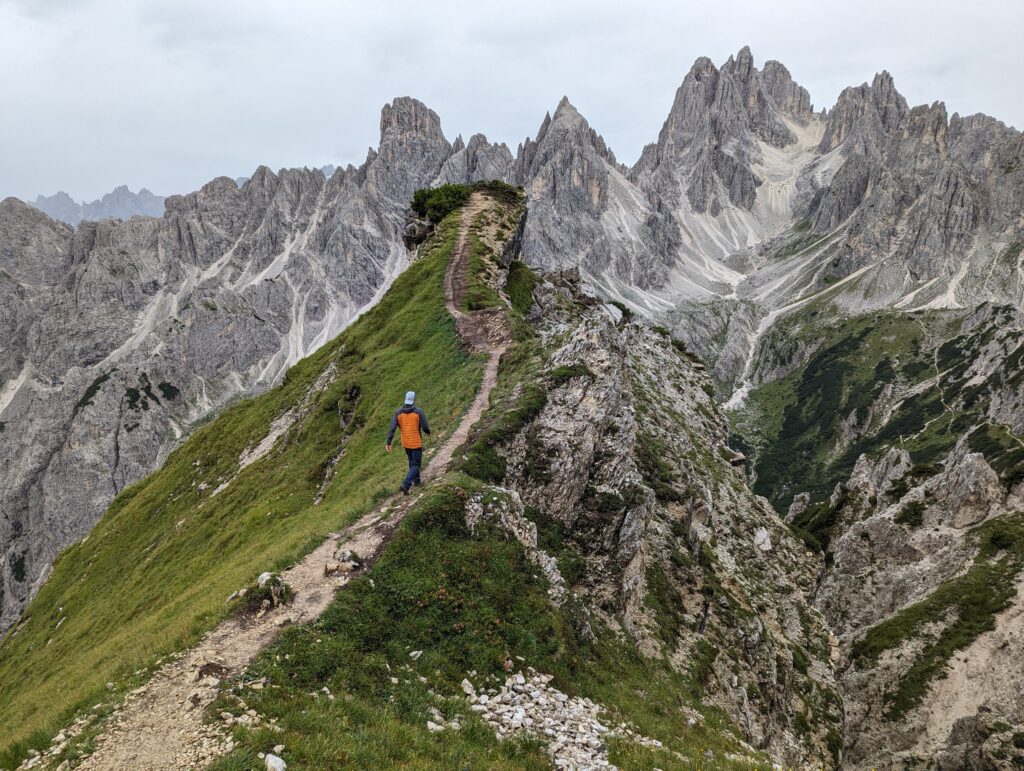
Once you go up and over the hill and see the other side, you’ll loop around in a counter-clockwise direction on a somewhat-perilous path. It isn’t that exposed, but it may be sketchy for some.
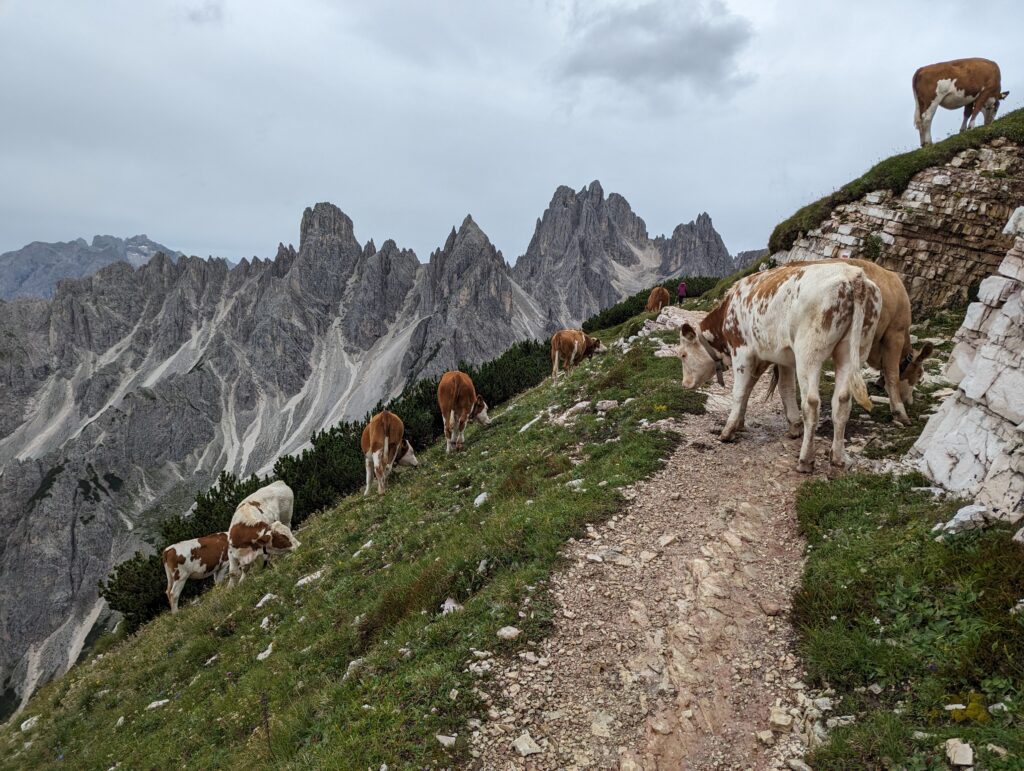
As we curled around, we ran into some unexpected traffic.
The view opens up around the bend in the picture above and all the trails are laid out before you.
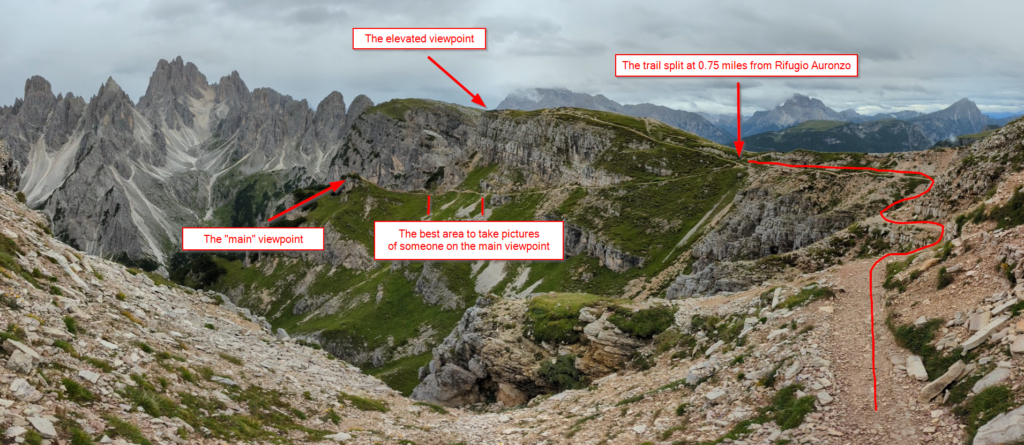
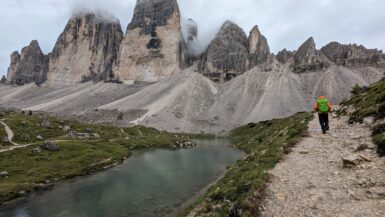
After about 0.75 miles is a trail split. Going to the right will lead to a dead-end, elevated view of the Cadini group and viewpoint. You can take pictures of the viewpoint from here, but a person will look very small. Amanda went to the viewpoint and I went to the elevated view. I didn’t think it was worth it to be honest.
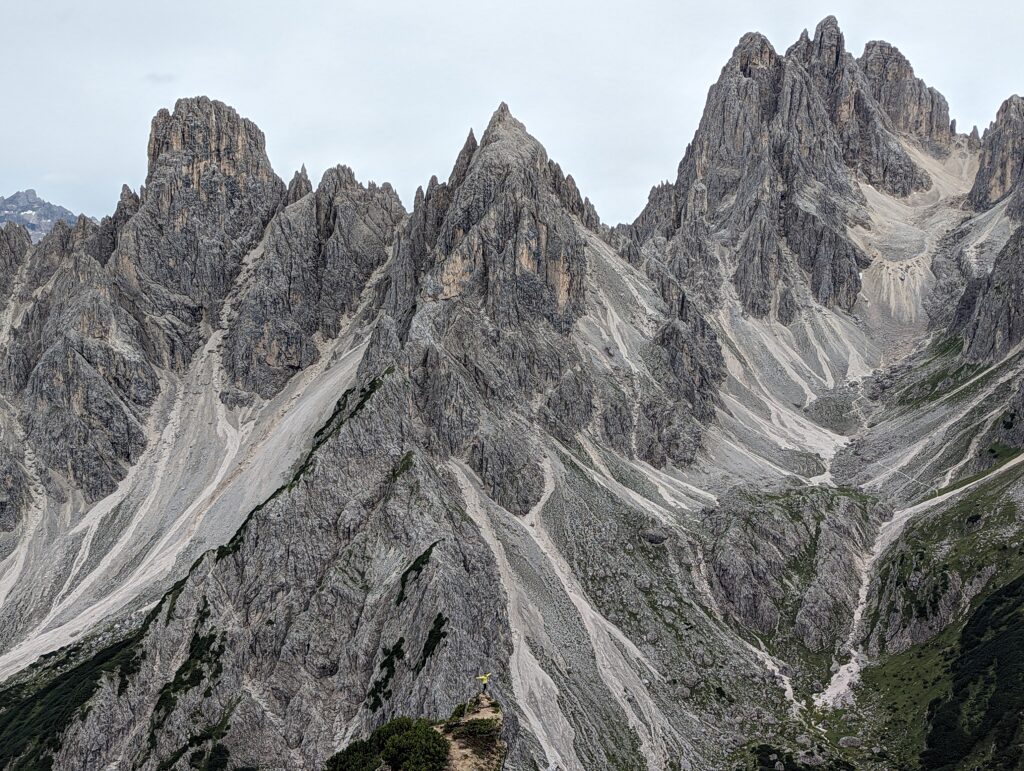
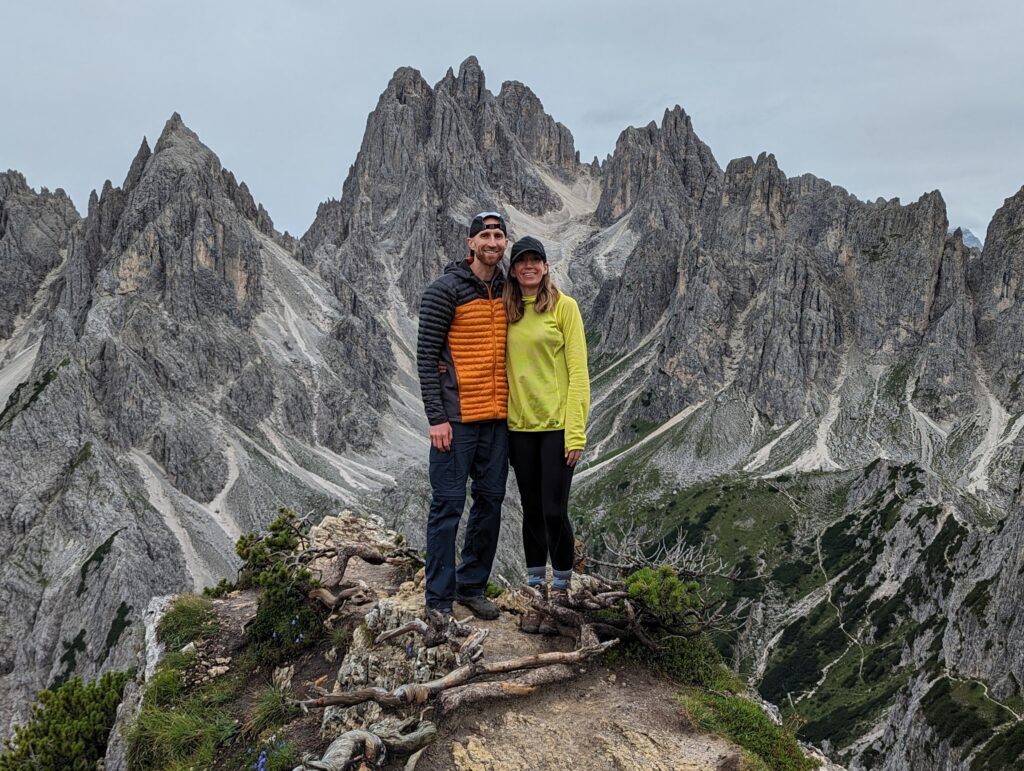
Going to the left at the trail split leads directly to the viewpoint of Cadini di Misurina that you’ve probably seen on social media. Even though the weather was bad and there were still hundreds of open parking spaces, we had to wait a little bit to get our pictures on the outcropping. I imagine the line could be very long in good weather/peak times. This is the view from where you’d wait to go out to the viewpoint.
You don’t want to get a picture of yourself on the viewpoint from here; you want the picture to be taken from further away, backtracking on the path. You’ll either need to split up, if in a group, or ask someone to take your picture while you go to the viewpoint. Here’s a close-up using a tripod while on the viewpoint:
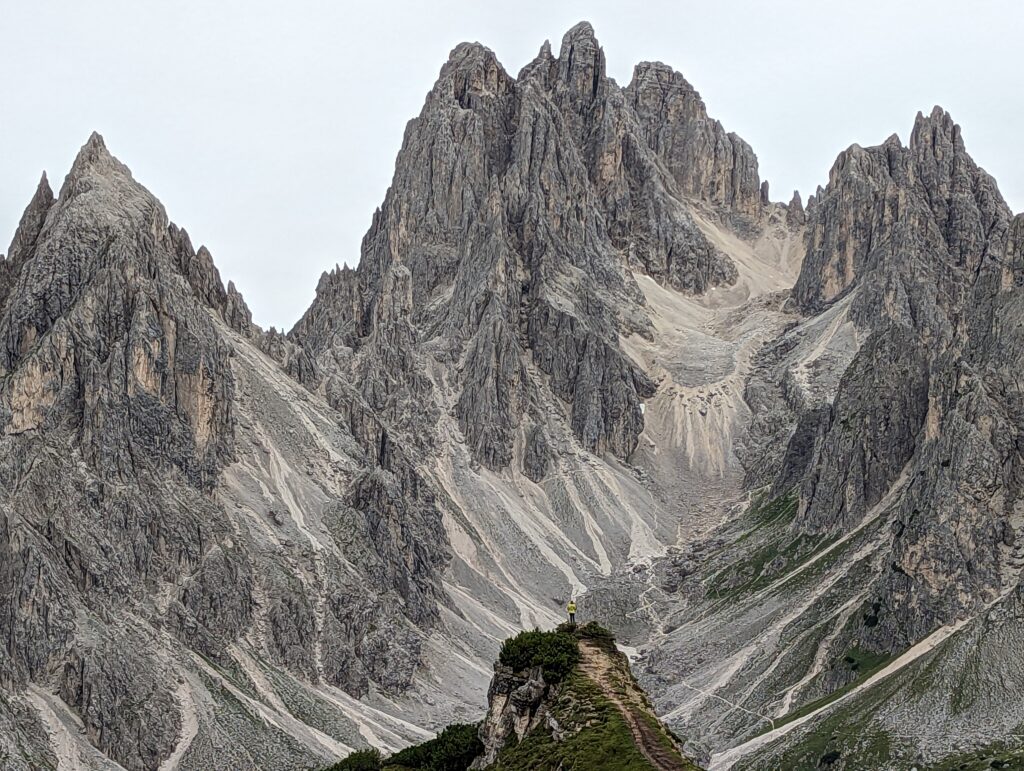
And here’s probably the best view, taken from further back along the trail. You’ll pass this spot on your way, so you should be able to figure out exactly where your favorite vantage point will be. Unfortunately, you can barely see Amanda. Positioning and clothing color are key.
After going to the viewpoint and coming back to the “main” trail, make sure to take a left instead of heading right to go back. There’s a short chain on a narrow section underneath a rock outcropping and it only takes a few minutes to get more amazing views. Most people think since they’ve done the viewpoint then there’s nothing else to see, but these were just as good, if not better.

The view immediately above is where to turn around. There really isn’t anywhere to go but down a steep embankment, so just retrace the same steps back to Rifugio Auronzo.
That’s it! Have you ever done this hike, or have questions? Please leave a comment below.

Is the road open during month if May?
Hello! It usually opens around the end of May, but the exact date depends on the weather. It can be late June if it was a heavy snow winter. This site has good info: https://www.south-tirol.com/useful-information/toll-road-auronzo-hut. Hope you get to make it there!