The most important thing on this page: please follow the 7 principles of Leave No Trace whenever hiking (and all the time, actually – most are pretty good general life tips, too):
- Plan ahead and prepare
- Travel and camp on durable surfaces
- Dispose of waste properly
- Leave what you find
- Minimize campfire impacts
- Respect wildlife
- Be considerate of other visitors
Now, on to Blue Lakes and Mount Sneffels. Here are the quick facts:
- Where: Ridgway, Colorado
- More specifically, where: turn down County Road 7 from Route 62 and drive for 9 miles
- Distance and elevation: ~13.5 miles (21.75 km) roundtrip with 5,000 feet (1,525 meters) of total elevation gain
- Highest point: 14,150 feet (4,310 meters) at the summit of Mount Sneffels
- Why you should hike this trail: summit the highest peak in the (immediate) range with no climbing equipment. You’ll also pass several unbelievably blue lakes along the way.
- Fee or permit? no, but told by a Ranger that permit system is being discussed
- Cell service? only on the peak of Sneffels with Verizon
- Best time of year: mid-June – September
- Closest commercial airports: Montrose, Colorado (1 hour 15 minutes if driving straight to trailhead). Driving from Denver will take a little over 6 hours.
Tips
- Get there early – there is limited parking at the trailhead and this hike has grown exponentially in popularity.
- Hiking poles and crampons were very helpful in multiple spots.
- You can save mileage and elevation loss and re-gain by climbing the ridge directly from Blue Lakes Pass to Mount Sneffels, but it is at least Class 3 and not exactly clear where the best route is.
- Don’t underestimate the difficulty of or time needed for this hike – some of the terrain will take longer than you hoped.
- County Road 7 is rough. There were some sedans in the parking lot but it took about 45 minutes in an SUV and I would not feel comfortable in a low-clearance vehicle.
- While it can be done as a day hike, this would be an excellent overnight camping trip and there are no fees or permits (for now). There are plenty of spots around Lower Blue Lake, but Middle or Upper will offer more solitude and put you closer to the summit.
Getting there
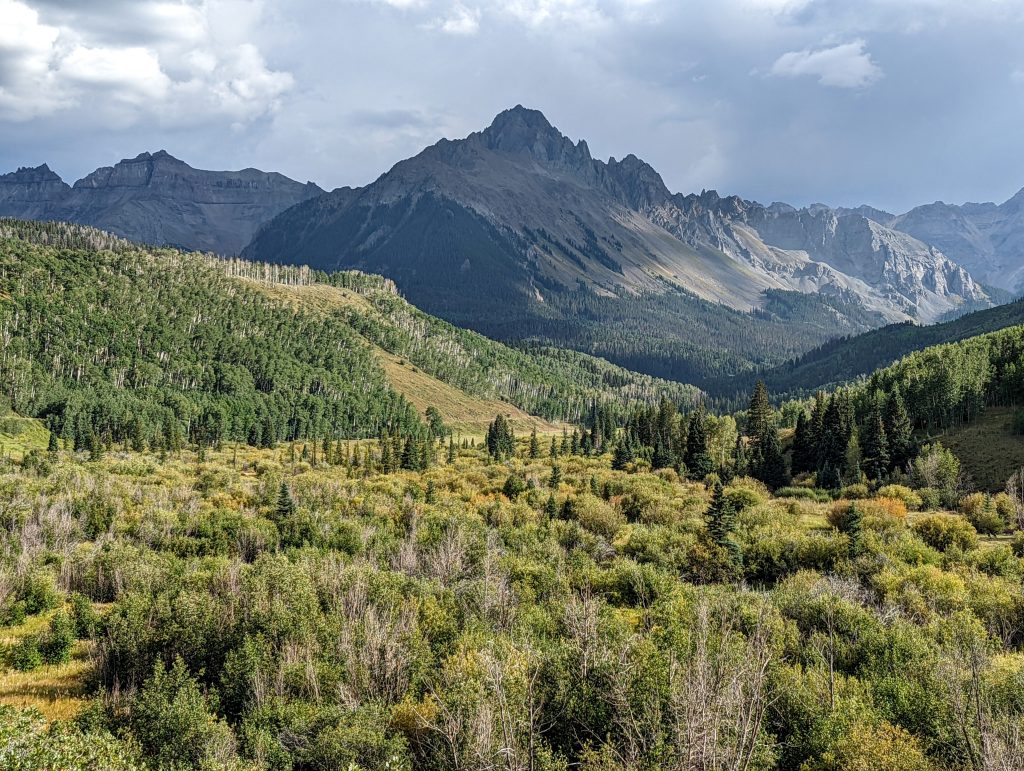
About 5 minutes west of Ridgway, along Route 62, is the easy-to-miss County Road 7. The road only goes one direction (south) and gets consistently rough after a few minutes. It took longer than I anticipated as there are lots of potholes and rocks. There are also some forks in the road but there is signage to help you navigate to the trailhead. Here are the one-way drive times to the trailhead from the popular towns in the area:
- Ridgway: 40 minutes
- Ouray: 55 minutes
- Montrose: 1 hour 15 minutes
- Telluride: 1 hour 15 minutes
- Silverton: 1 hour 30 minutes
- Durango: 2 hours 30 minutes
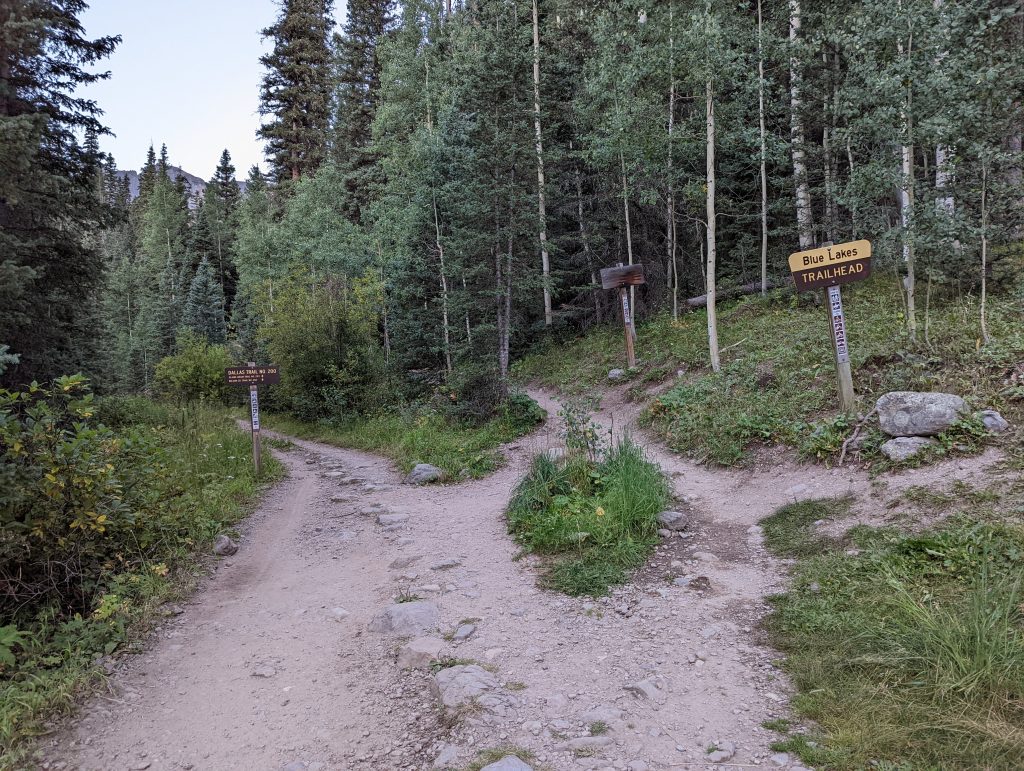
There is room for about 8 cars right by the trailhead but you can (respectfully) park along the road in the immediate area leading up to it. There is a hut with one primitive toilet at the trailhead, which sits at about 9,300 feet. I got to the trailhead at first light, right around 6:30, and got one of the spots right by the trailhead. This was on a weekday in September, however, so you’ll probably want to get there even earlier during busy seasons/days.
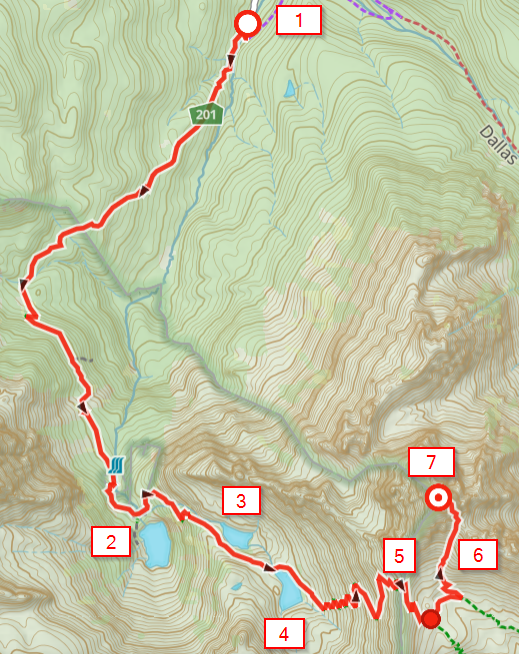
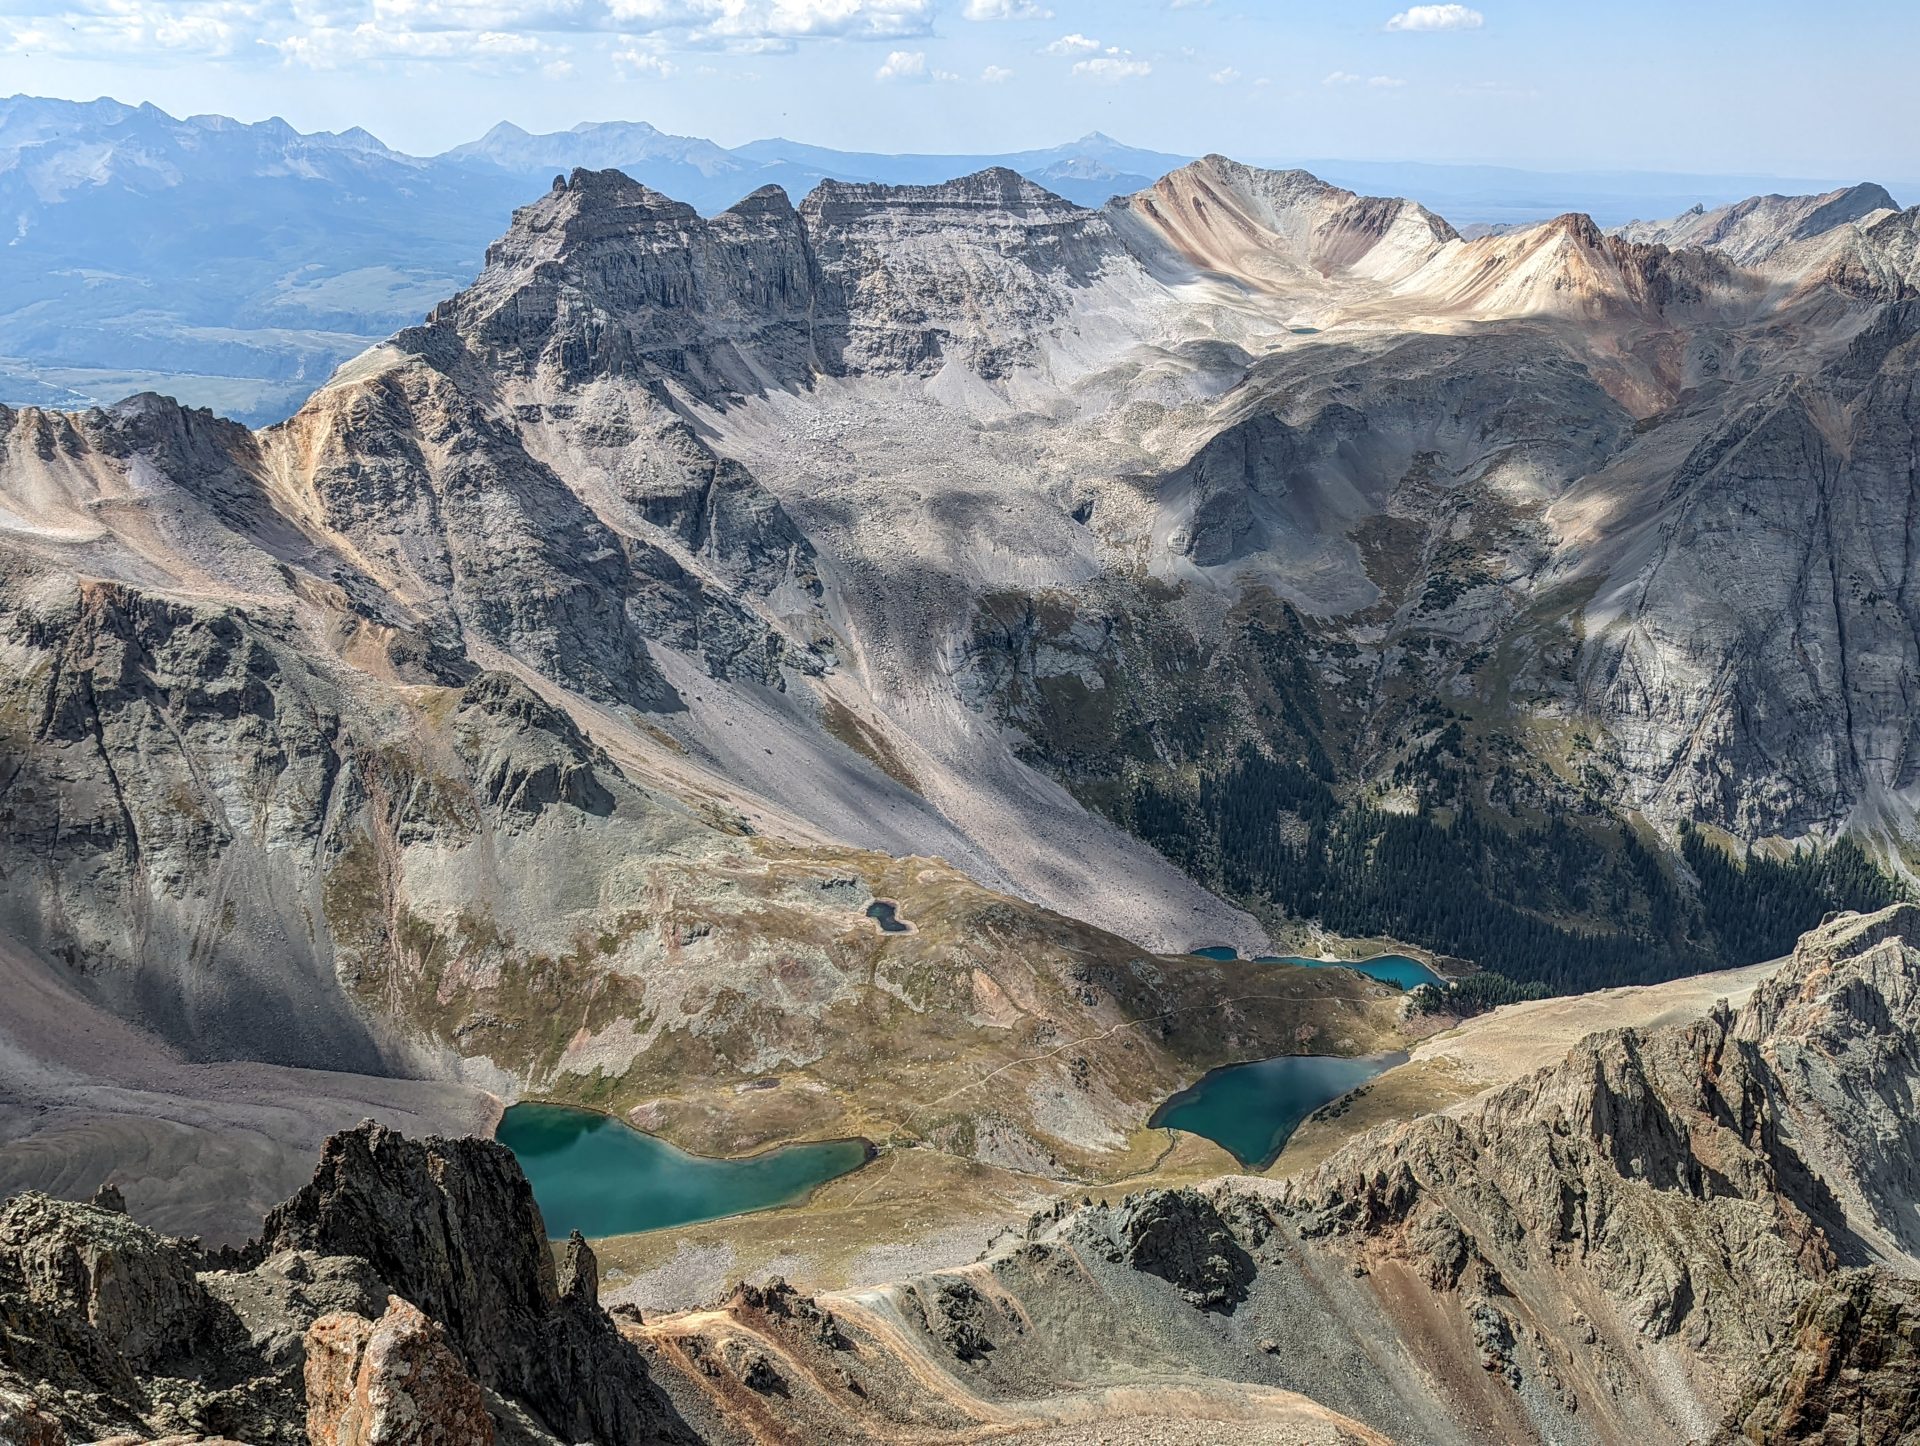
Map key for Blue Lakes to Mount Sneffels trail:
1 - Trailhead
2 - Lower Blue Lake
3 - Middle Blue Lake
4 - Upper Blue Lake
5 - Blue Lakes Pass
6 - The gully and the chute
7 - Mount Sneffels summit
Trailhead to Lower Blue Lake (3.3 miles)
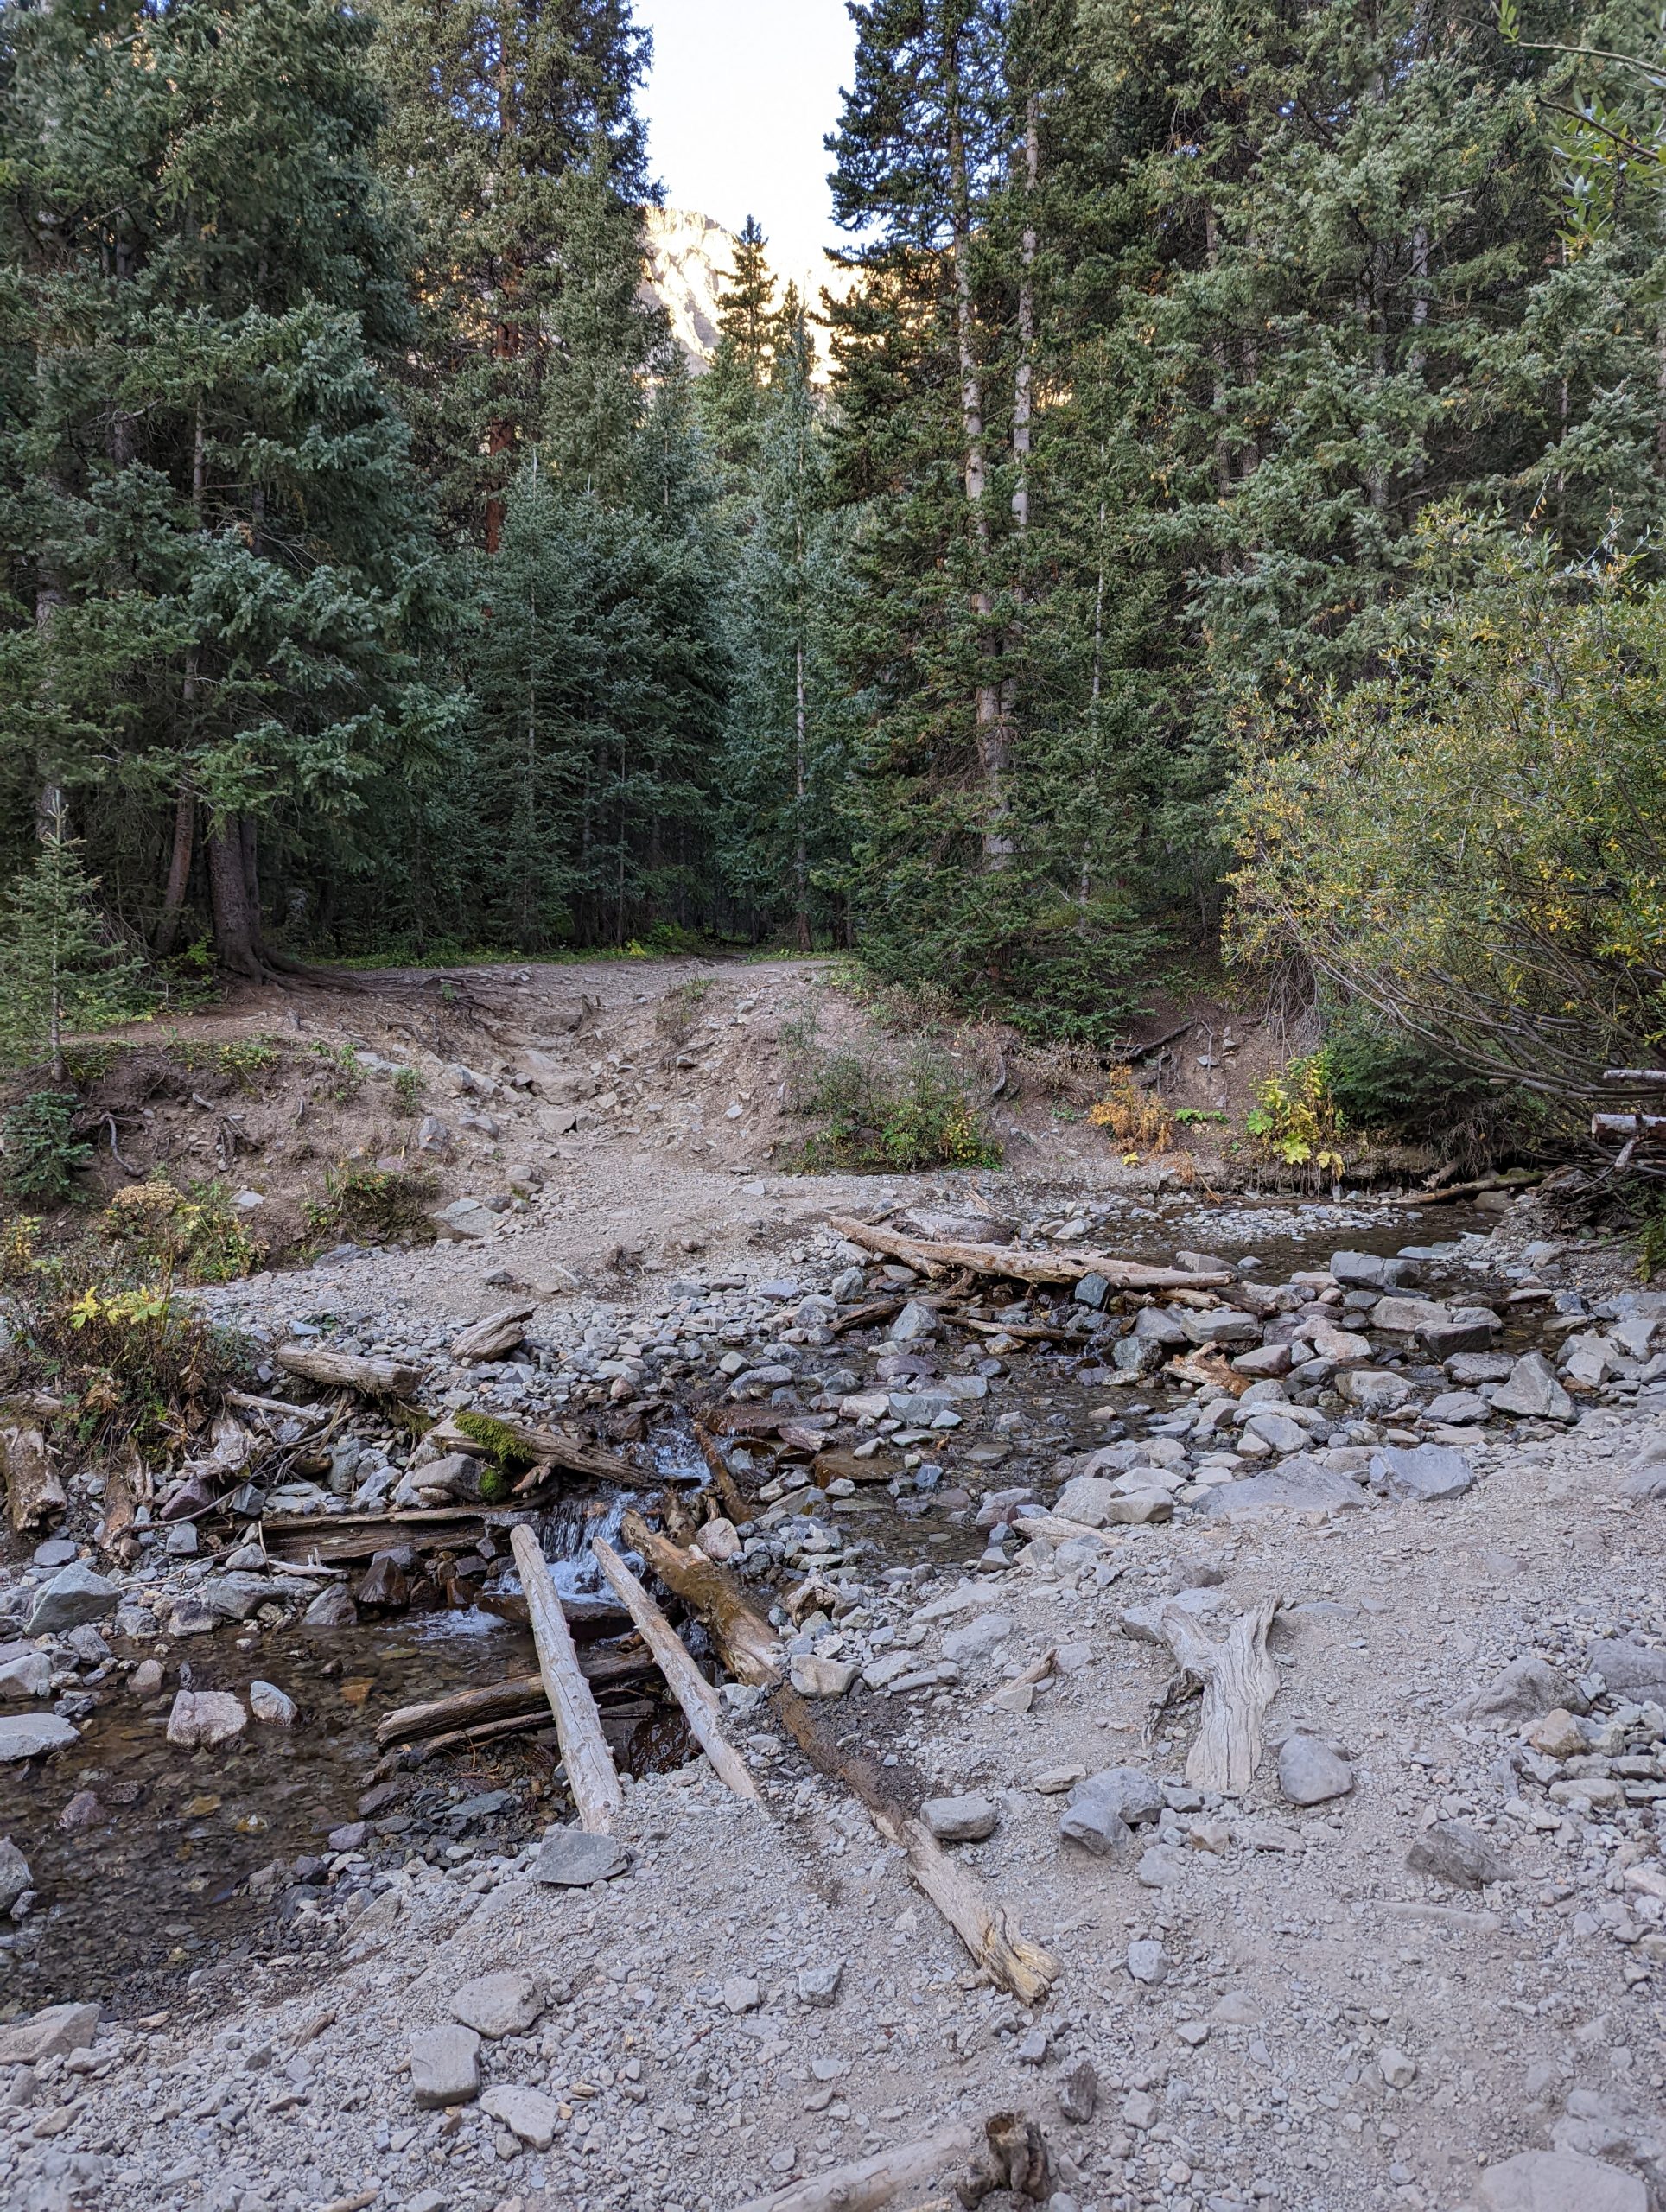
You’ll set out through the woods initially and be gaining elevation consistently the whole way to Lower Blue Lake. For those that dislike switchbacks, enjoy this part as there really aren’t any. There are a few flatter stretches but they don’t last very long. There’s also a stream crossing, which was basically nothing in September but could be something to consider earlier in the summer when the snowmelt is in full effect.
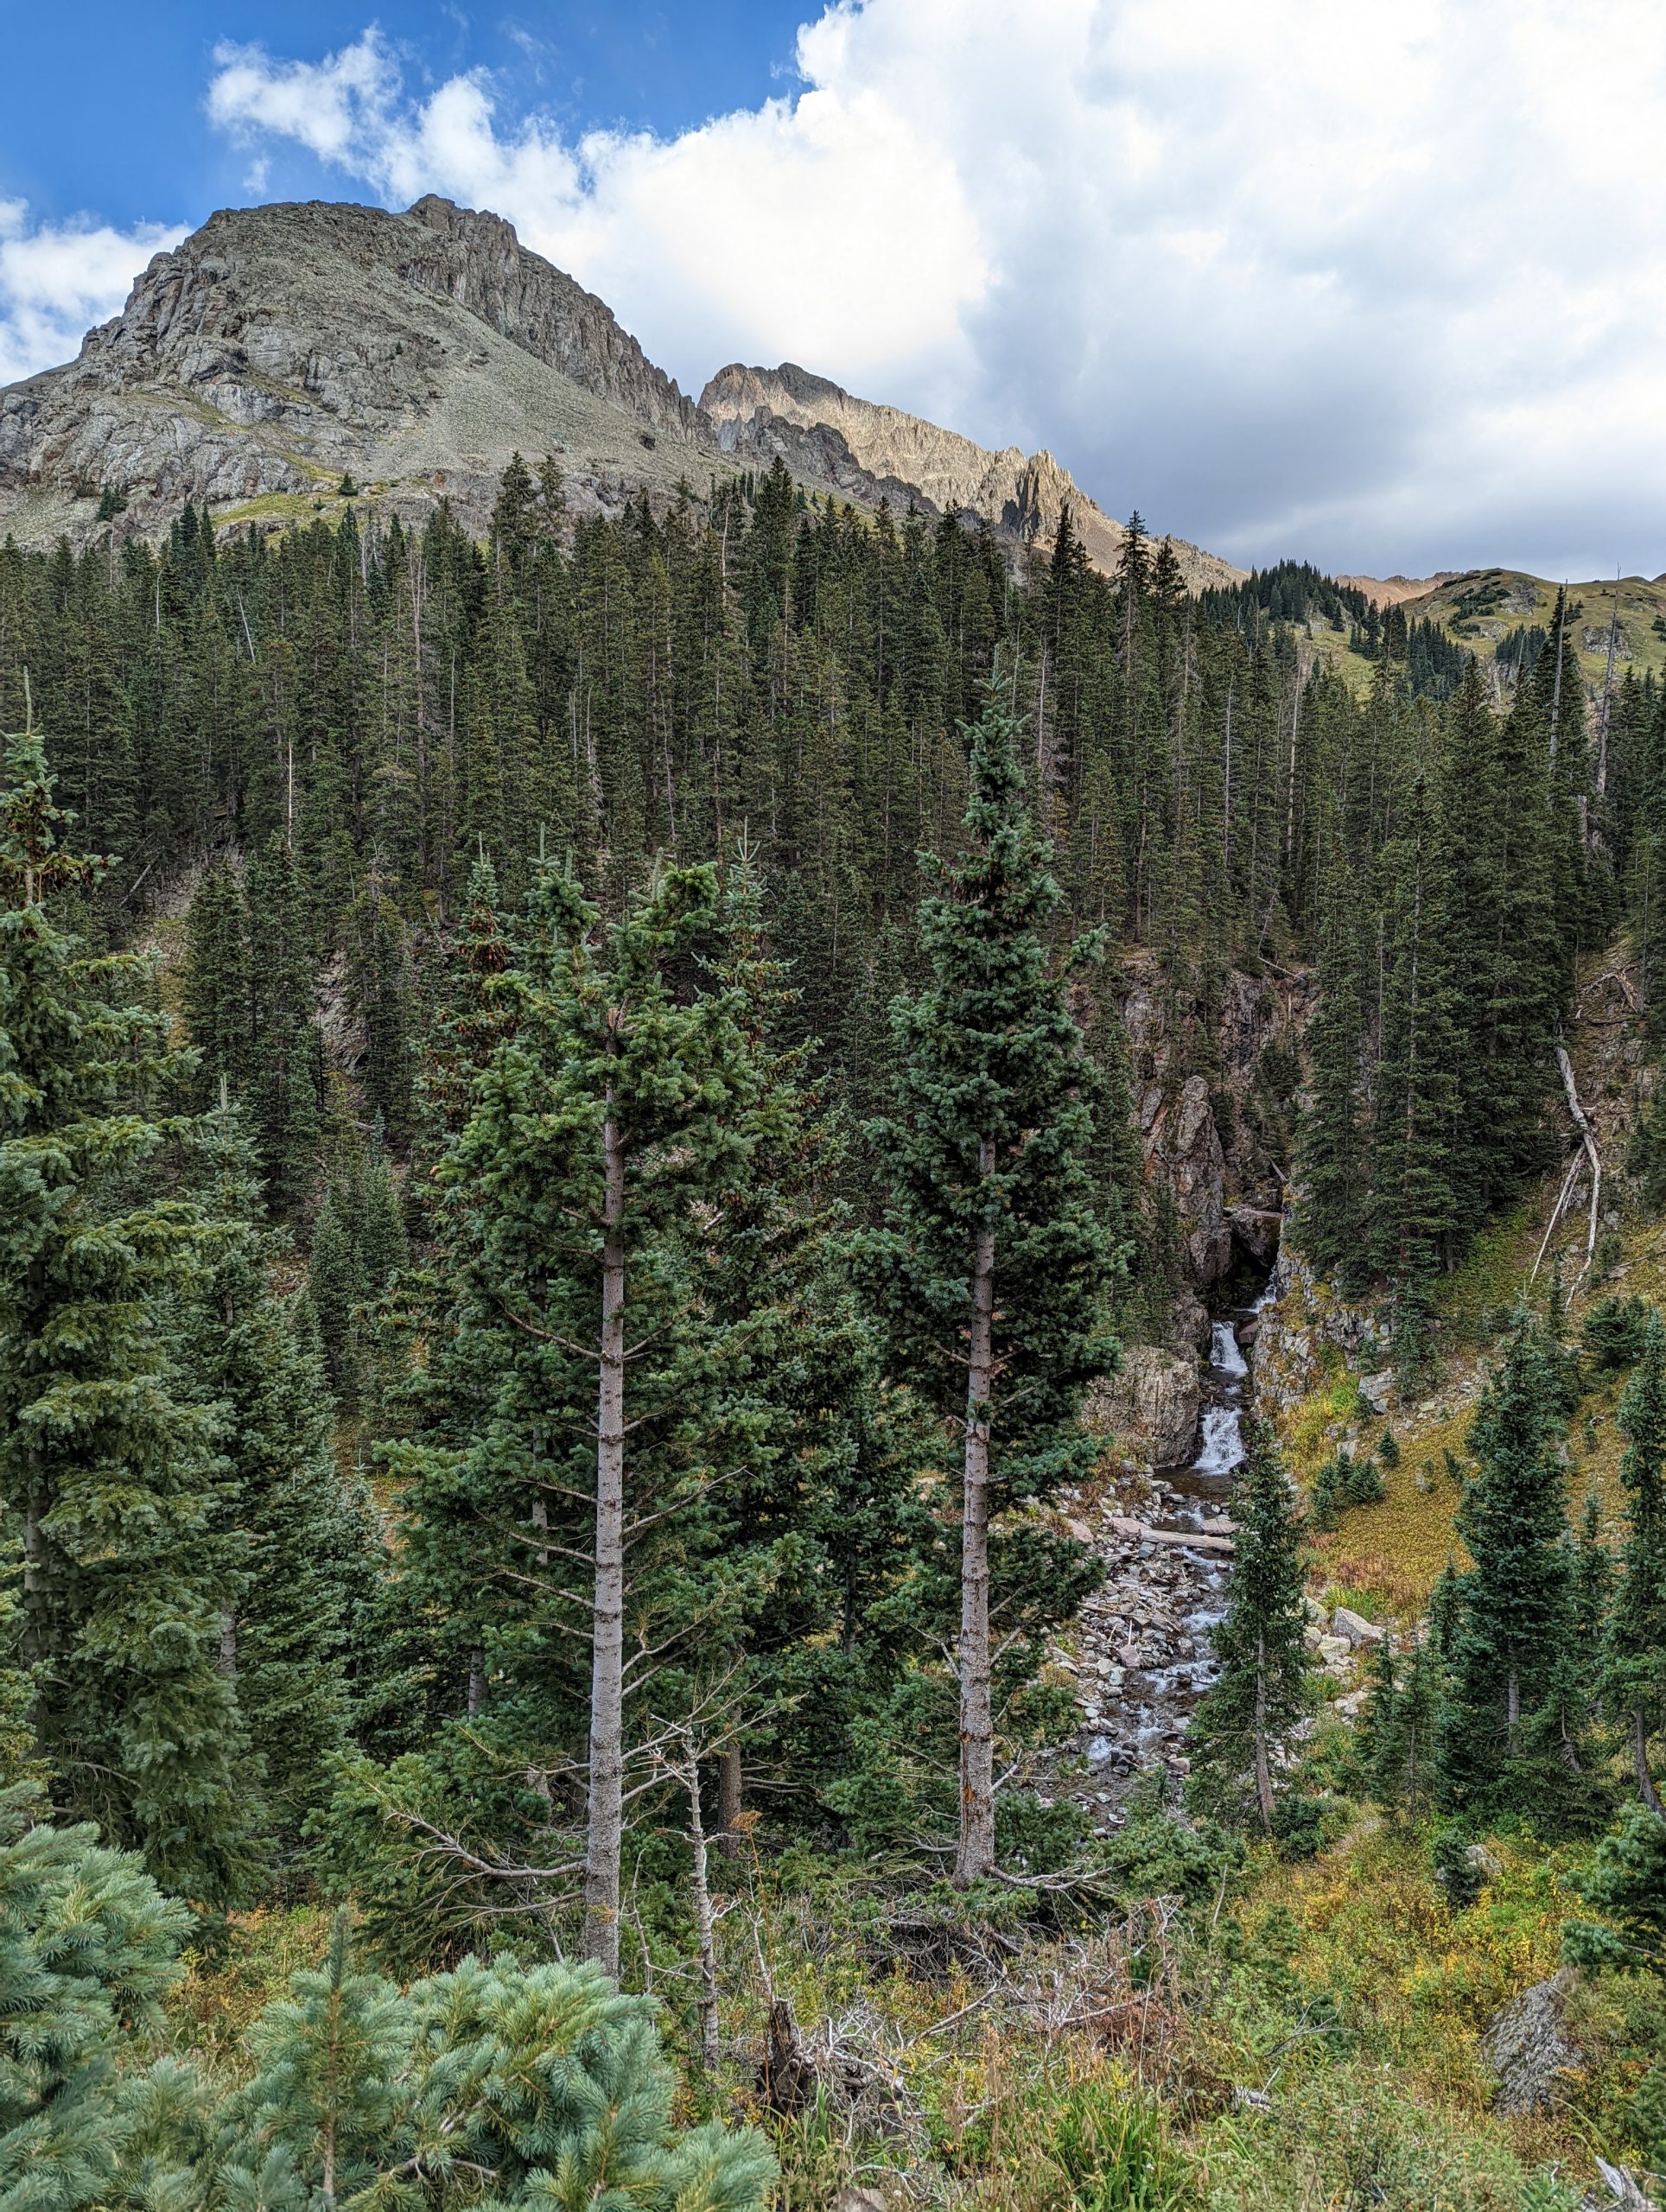
You’ll catch glimpses of mountaintops at times throughout the first mile and eventually the views will open up about halfway to the first lake. Then the view really opens up and you can see a waterfall to the left across the valley. That’s your cue to know you’re about 5-10 minutes from the lake.
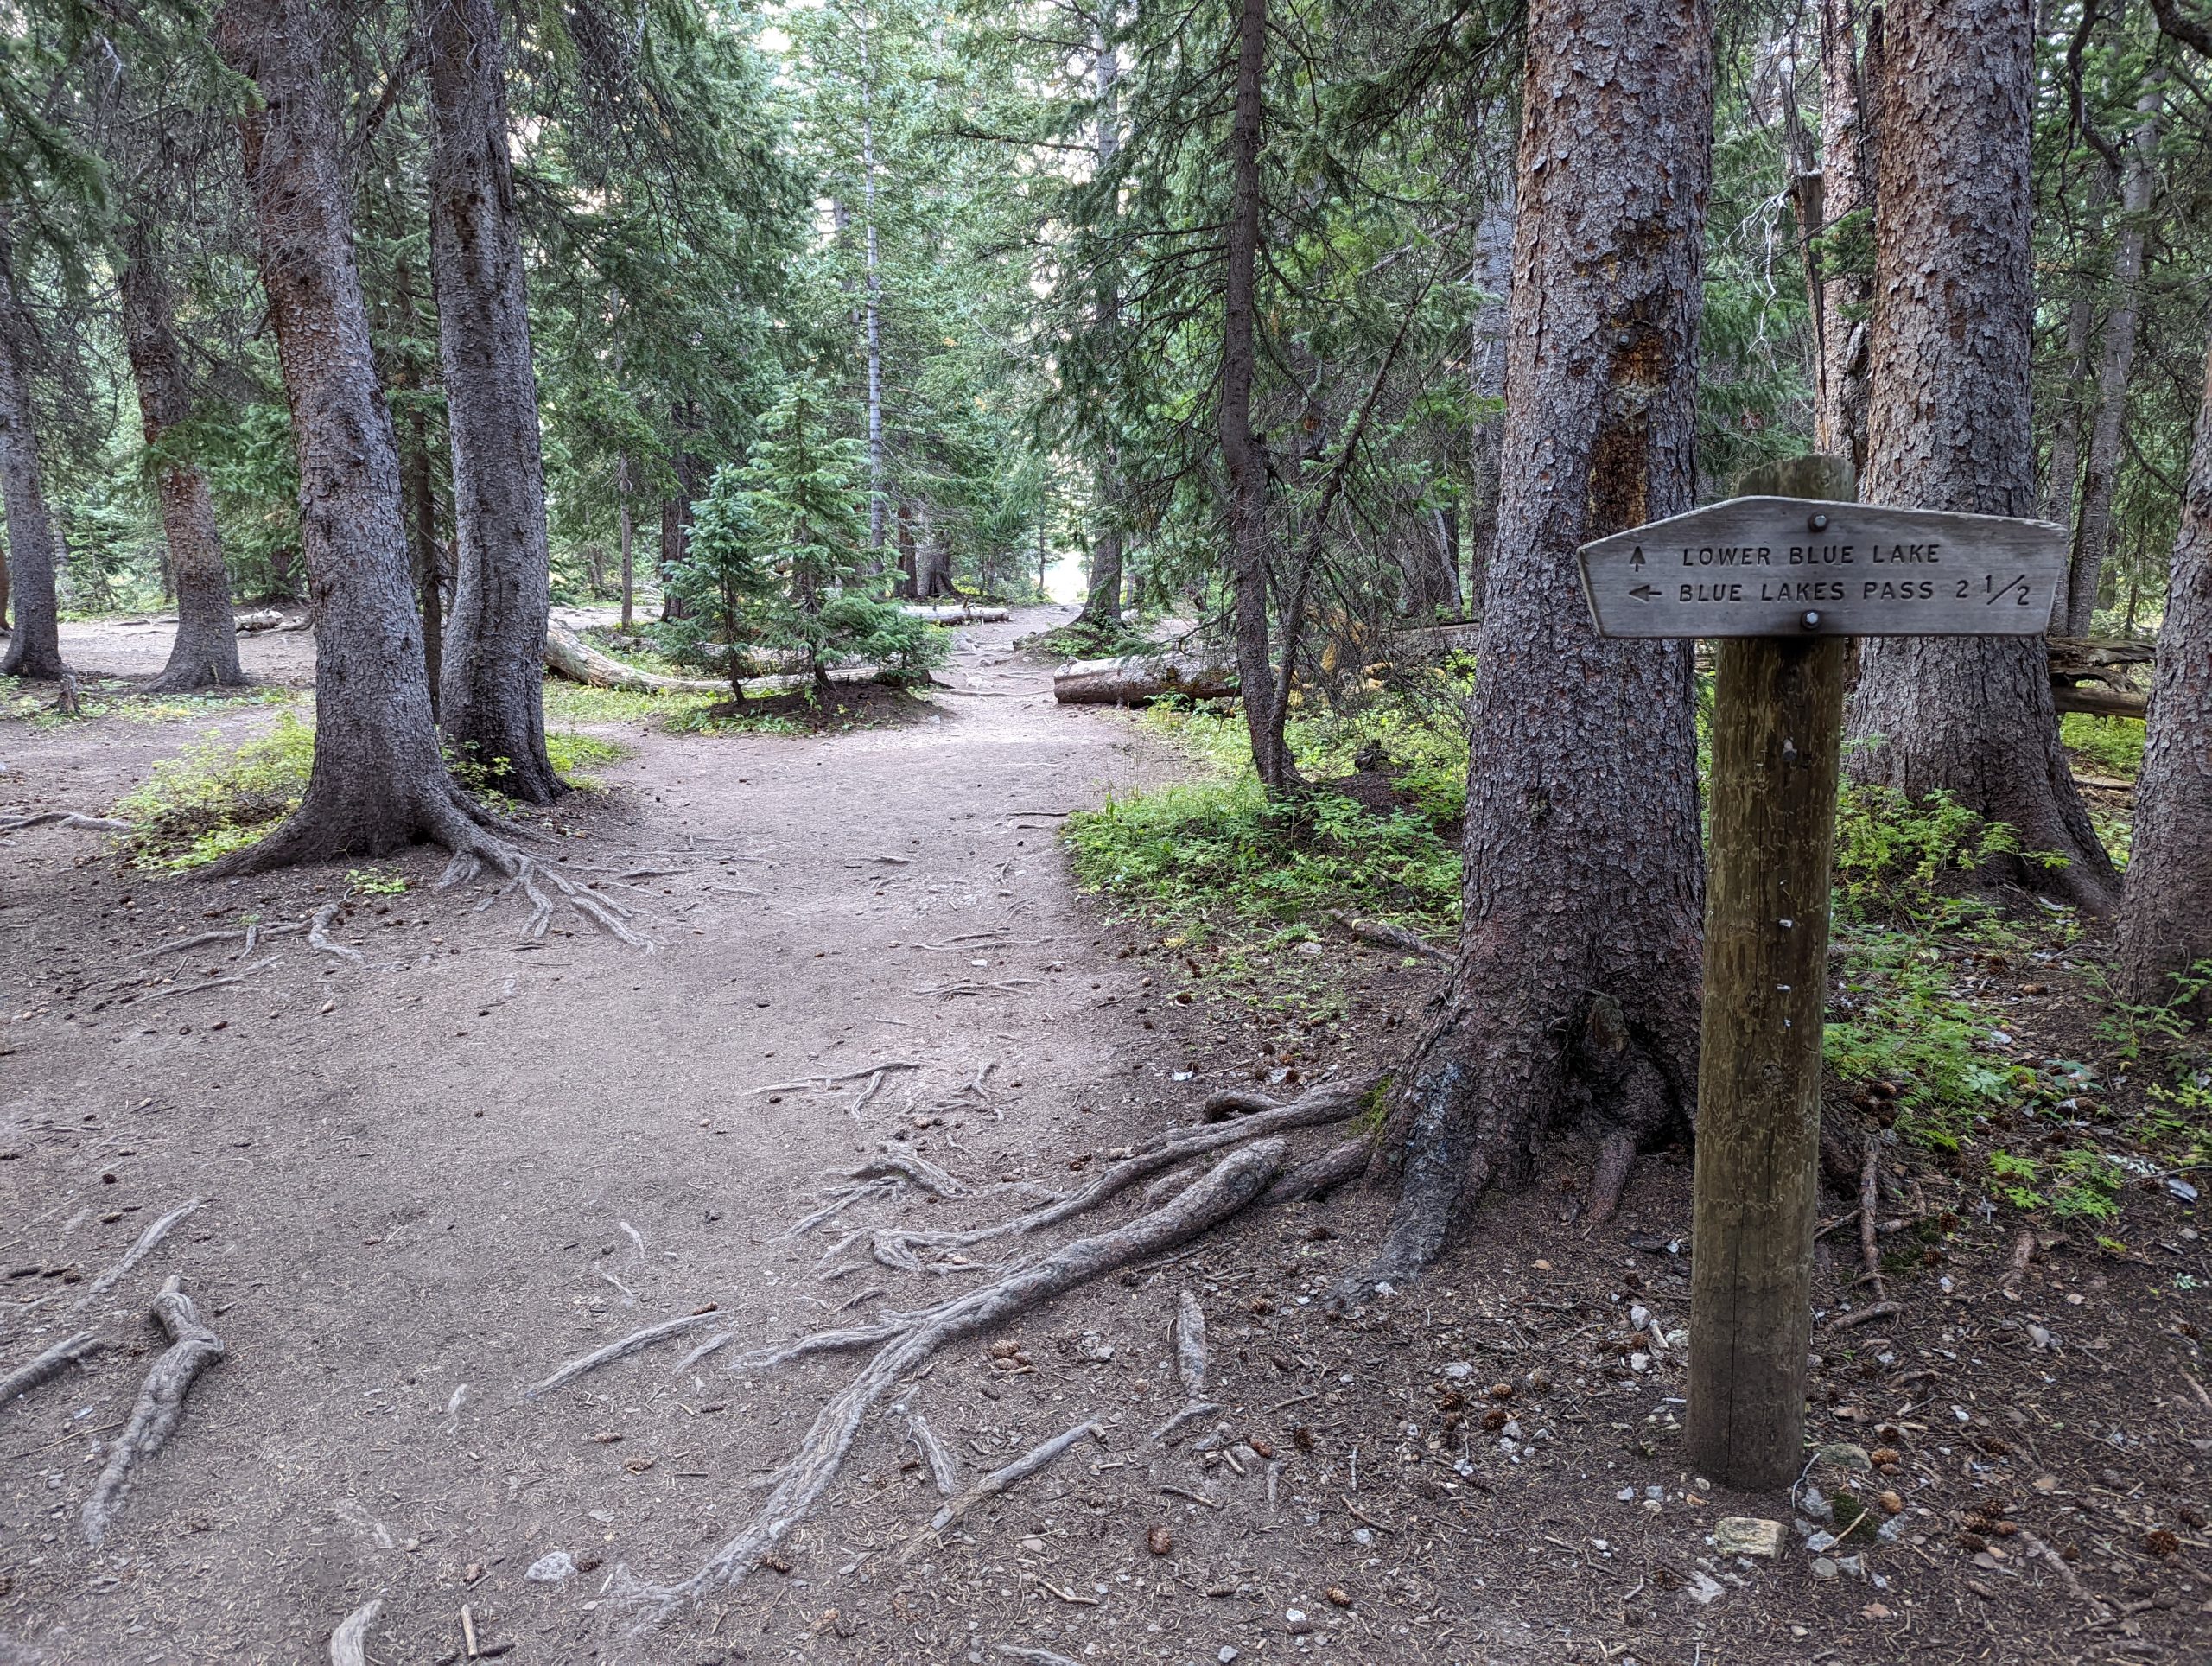
You’ll go back into the woods and see a sign that points to the left for Blue Lakes Pass and straight for Lower Blue Lake. There are lots of social trails in this area but you’ll want to retrace your steps back to this sign when you’re ready to continue on to Middle Blue Lake.
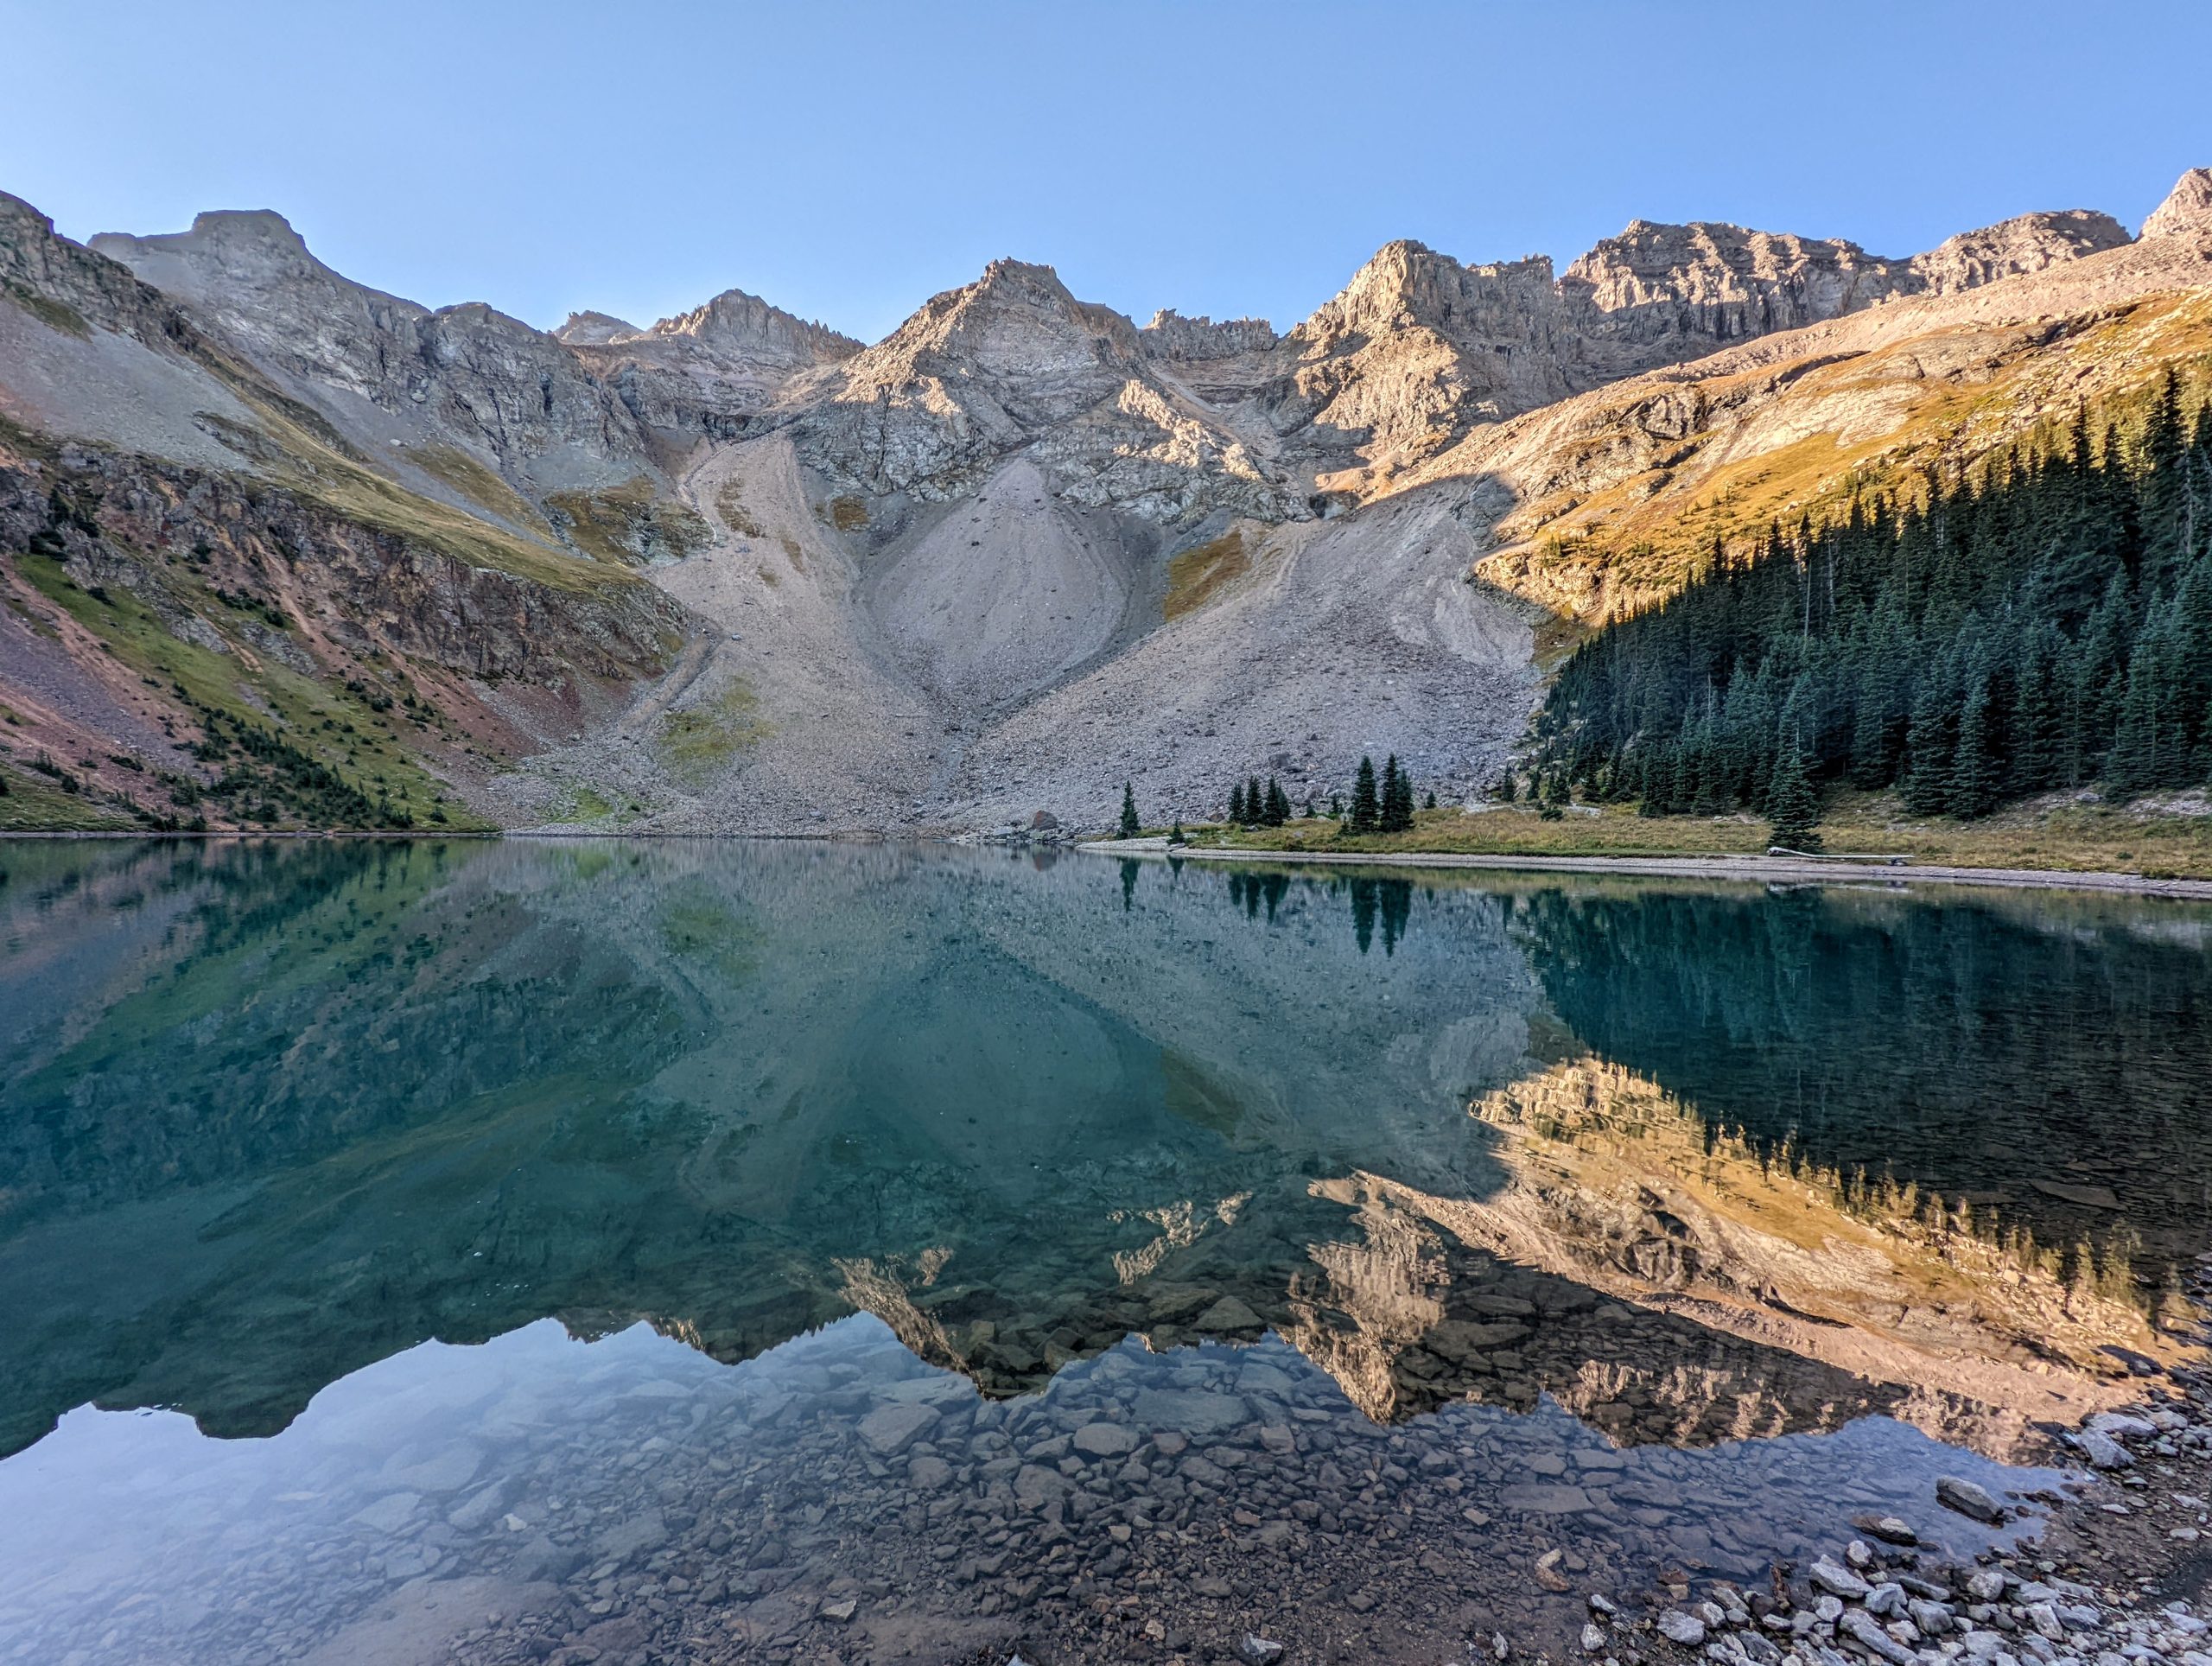
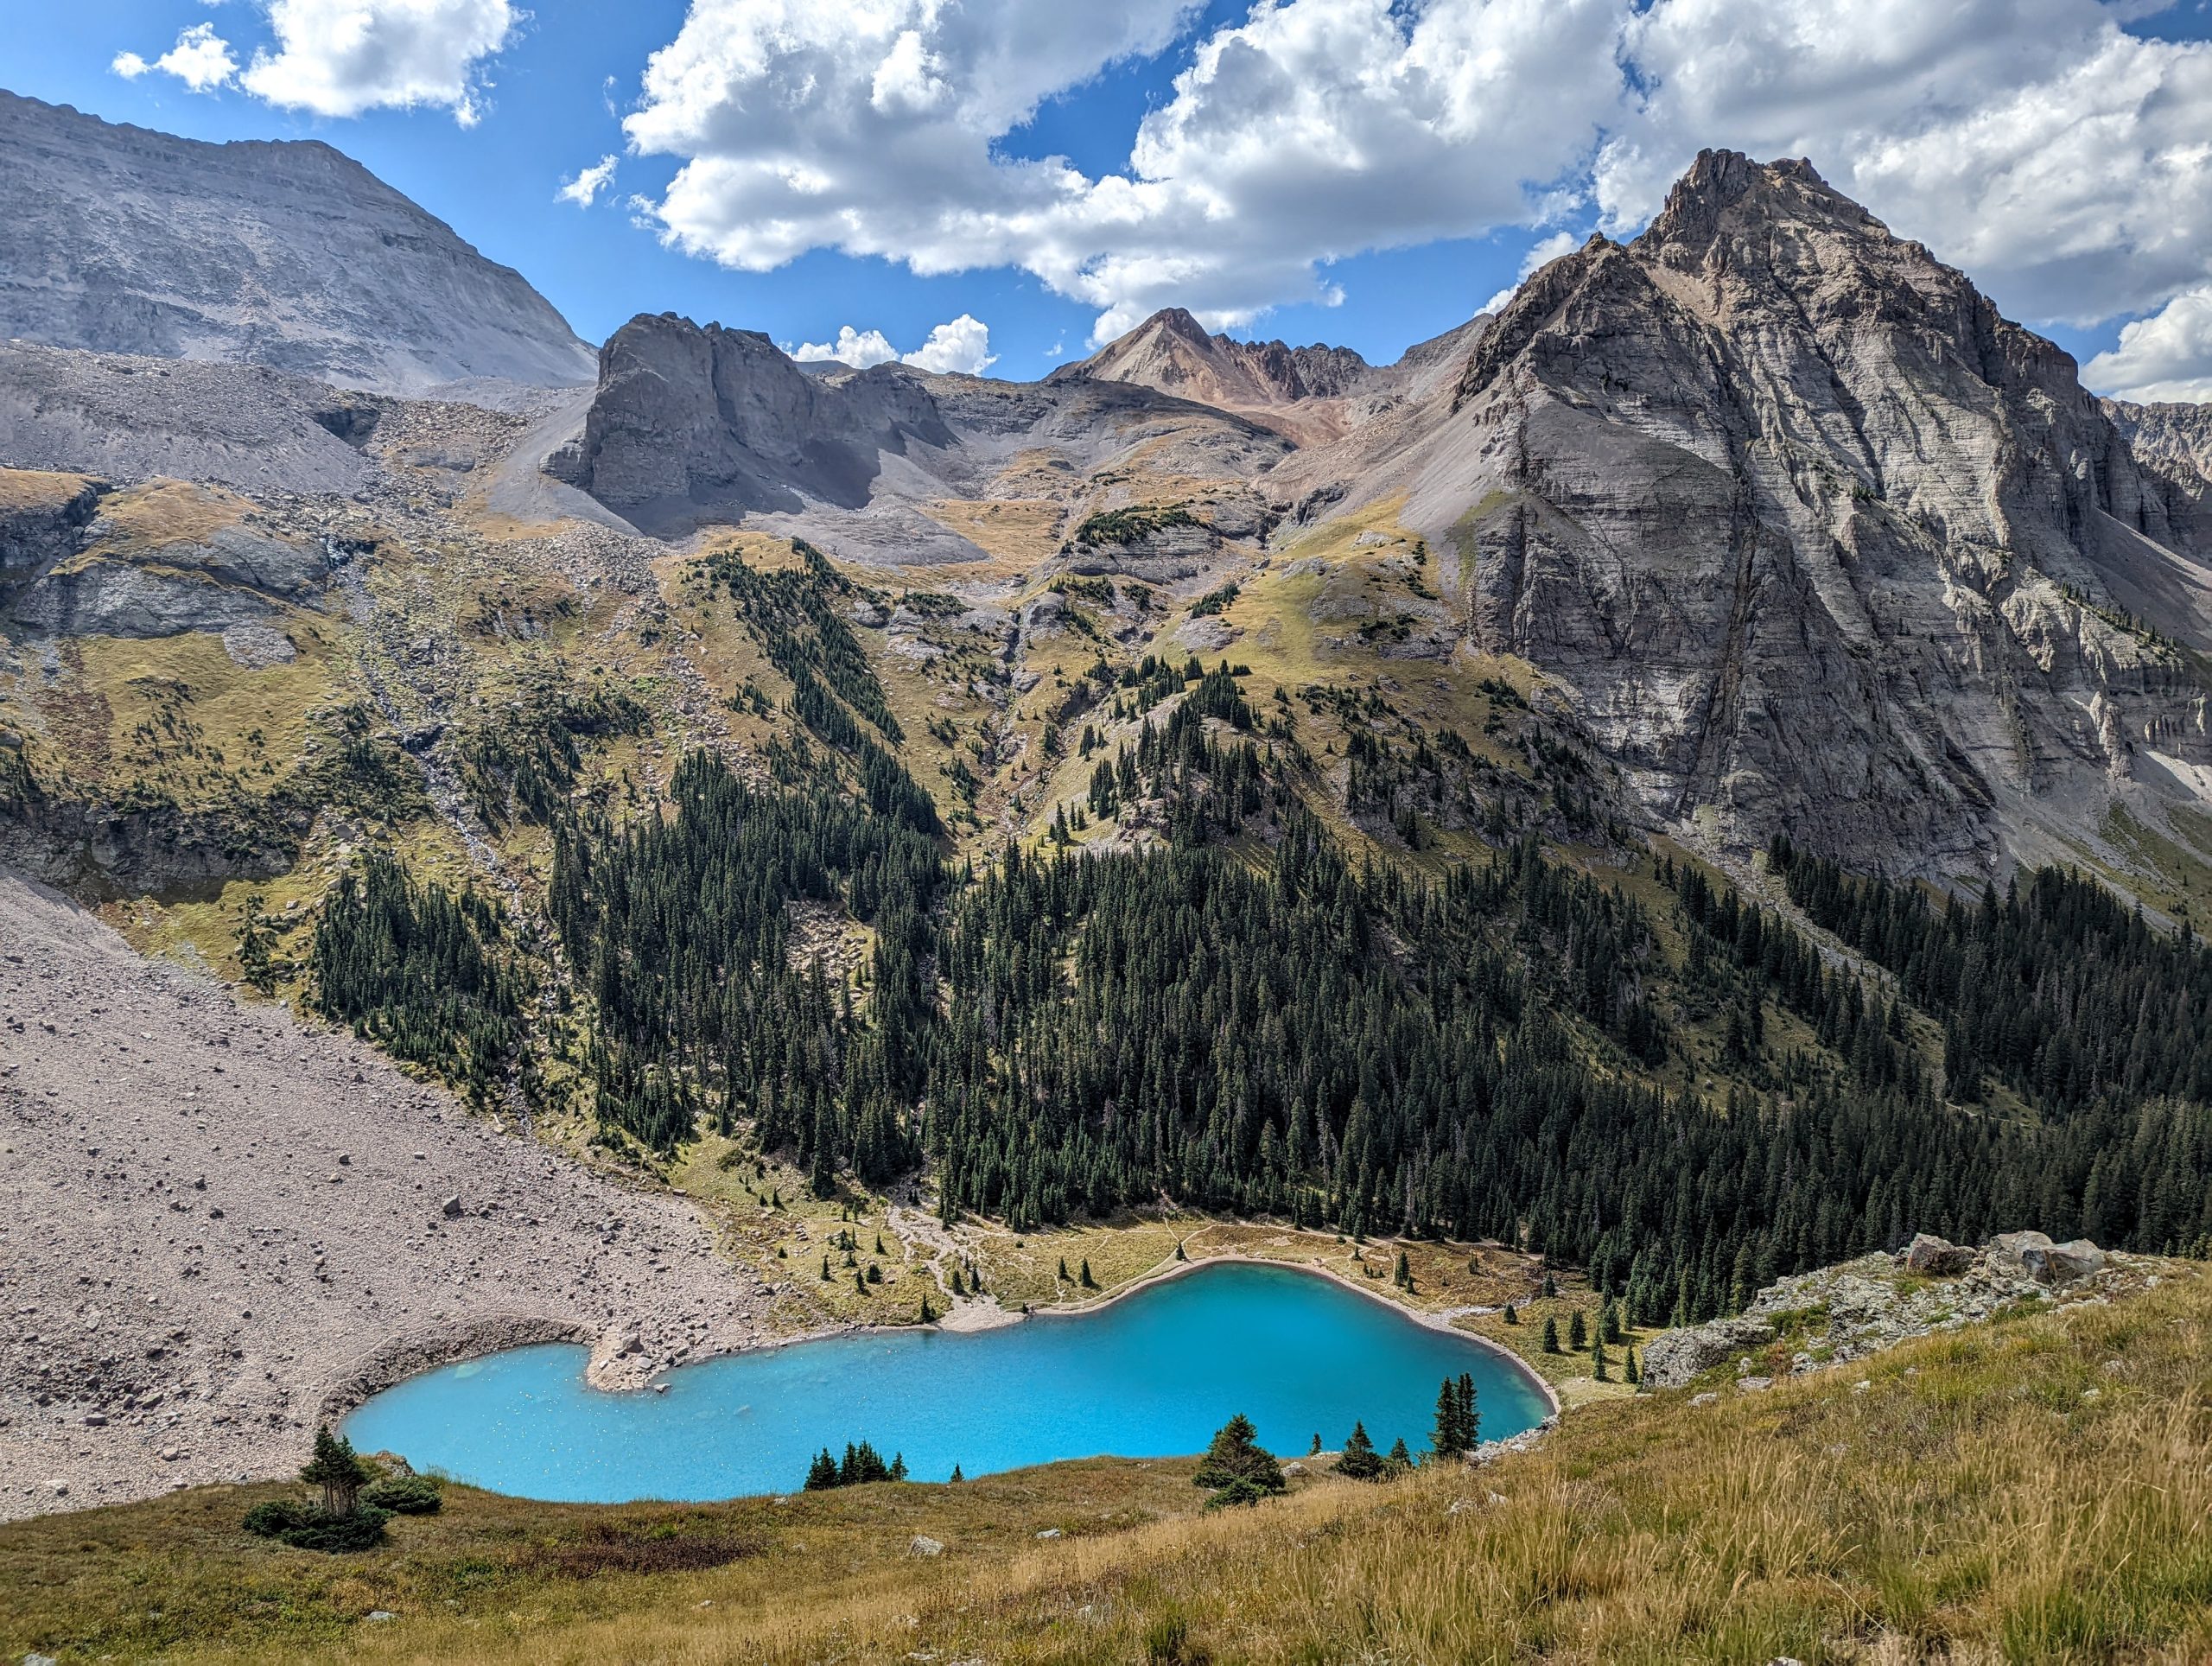
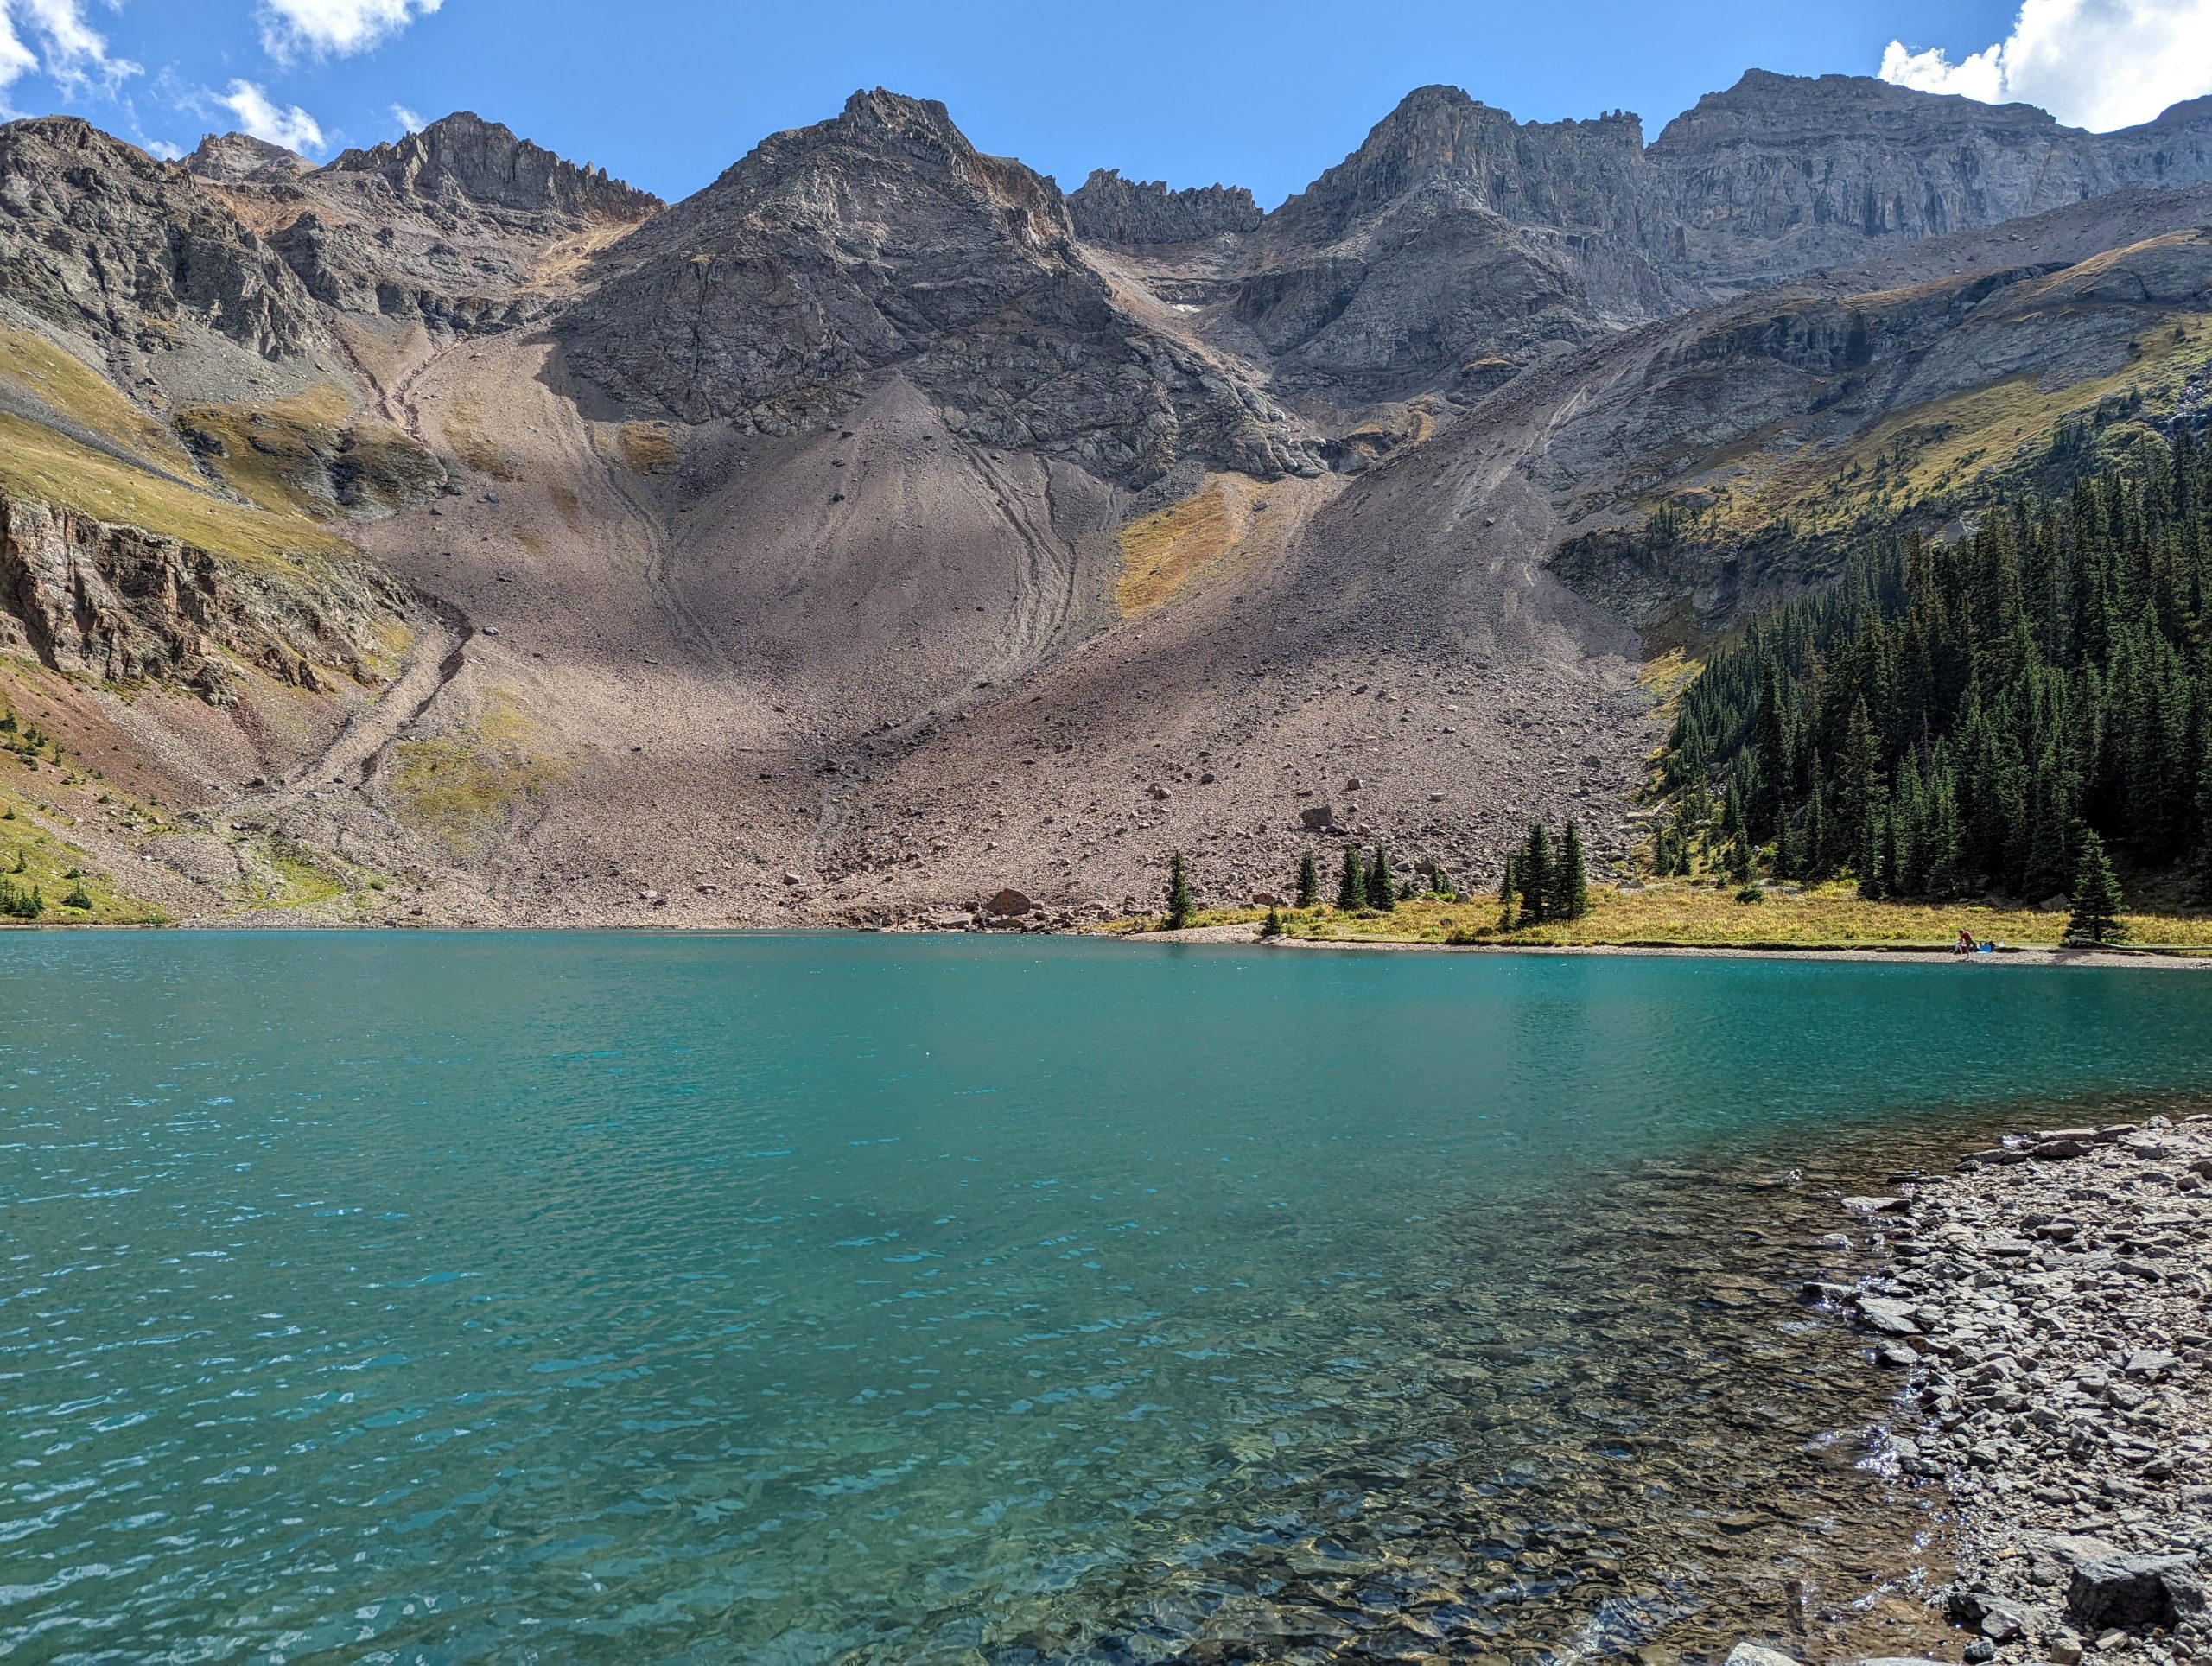
After heading straight, Lower Blue Lake will appear before you in a minute or so. You’ll have gone 3.3 miles and gained about 1,700 feet of elevation – take a break, walk the shoreline, and enjoy the views. It took me just over an hour to get to Lower Blue Lake and the water was completely still, offering a perfect reflection of the surrounding mountains.
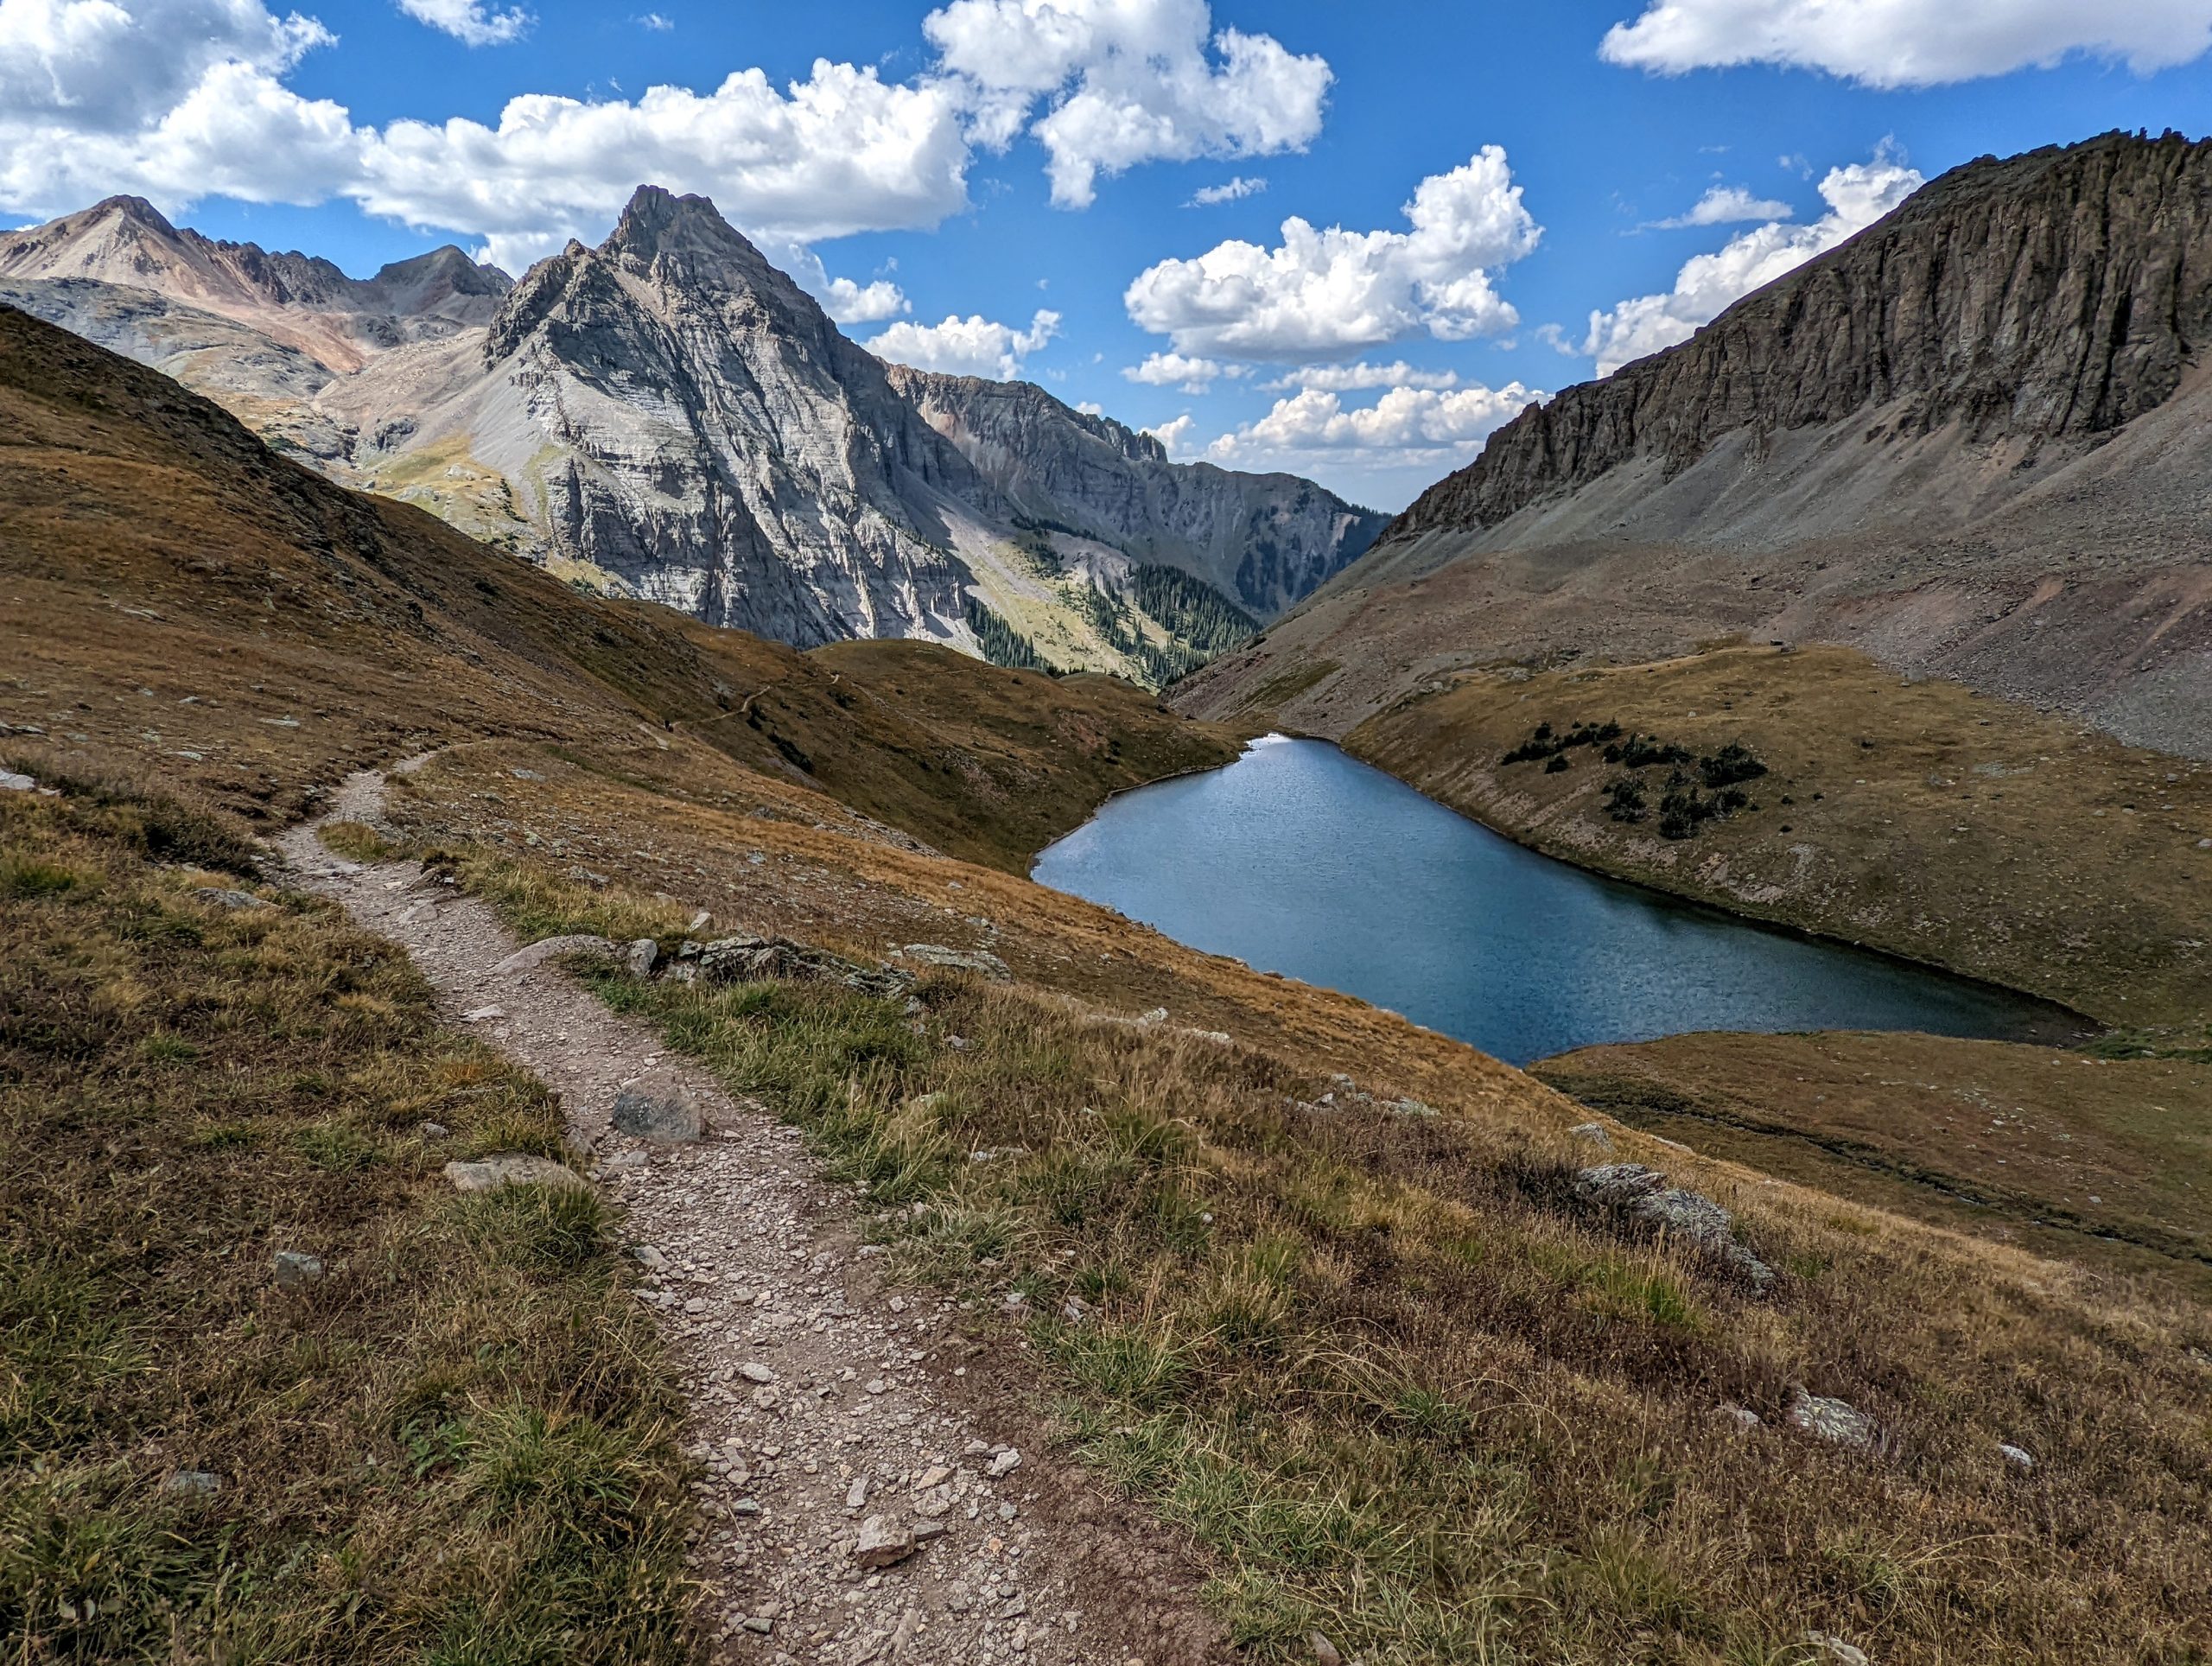
Lower Blue Lake to Blue Lakes Pass (2.4 miles)
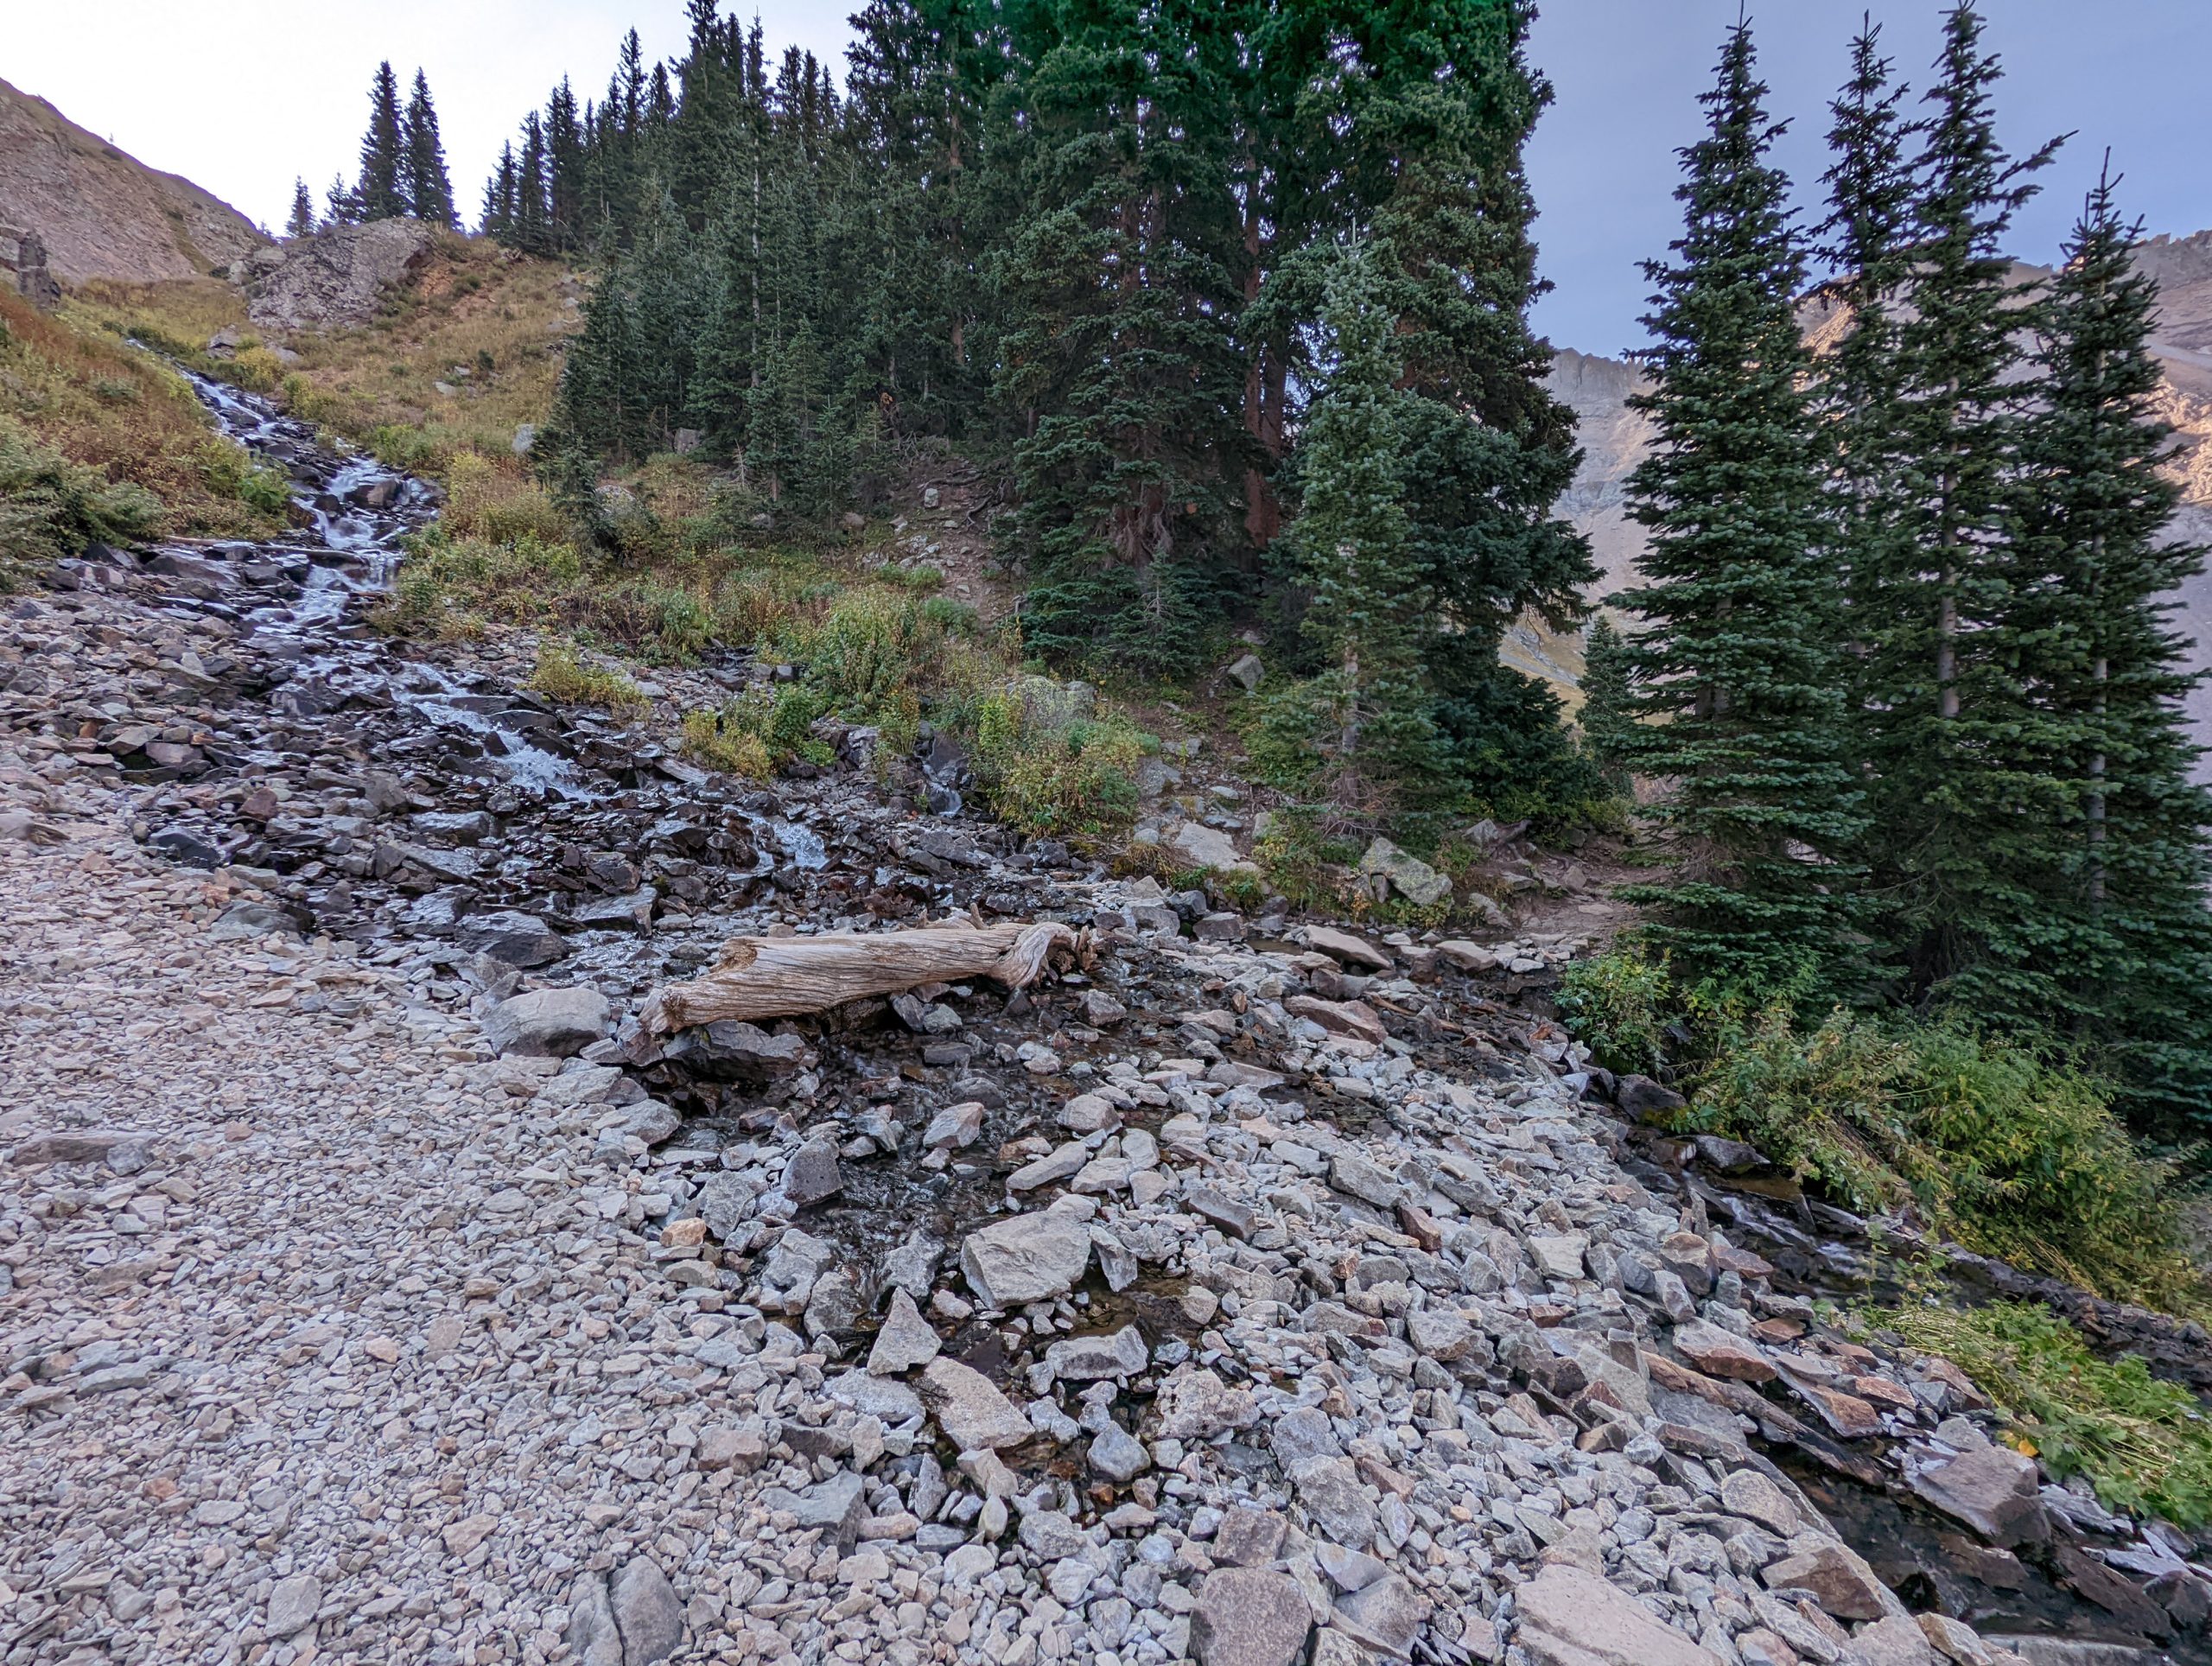
This section is where you’ll get the unbelievable views of Lower Blue Lake that probably first got you interested in this hike. Retrace your steps back to the sign that points to Blue Lake Pass and head that direction. There is another creek crossing right away – here’s where I crossed and you can see the trail to pick up on the other side:
Just across the water you’ll start heading uphill. There are other social trails throughout this area, too – I checked my phone a couple of times times on the way up and coming back down to make sure I was taking the right path (I recommend Gaia GPS for that). After about 10-15 minutes of uphill hiking you’ll come across a stream again. I saw another hiker who wasn’t sure where the trail was at this point on the way back down, and these pictures show the water and trail looking in both directions for where to cross:
Once you pass between those pines, Lower Blue Lake comes back into view on your right. The view is a bit obscured when you’re on the main trail, but once you walk the length of the lake and turn to the left to continue uphill through some trees, there are a few side trails on your right that will lead to overlooks of the lake. Make sure to explore multiple side trails between here and around Middle Blue Lake, as those yield the views you’re looking for.
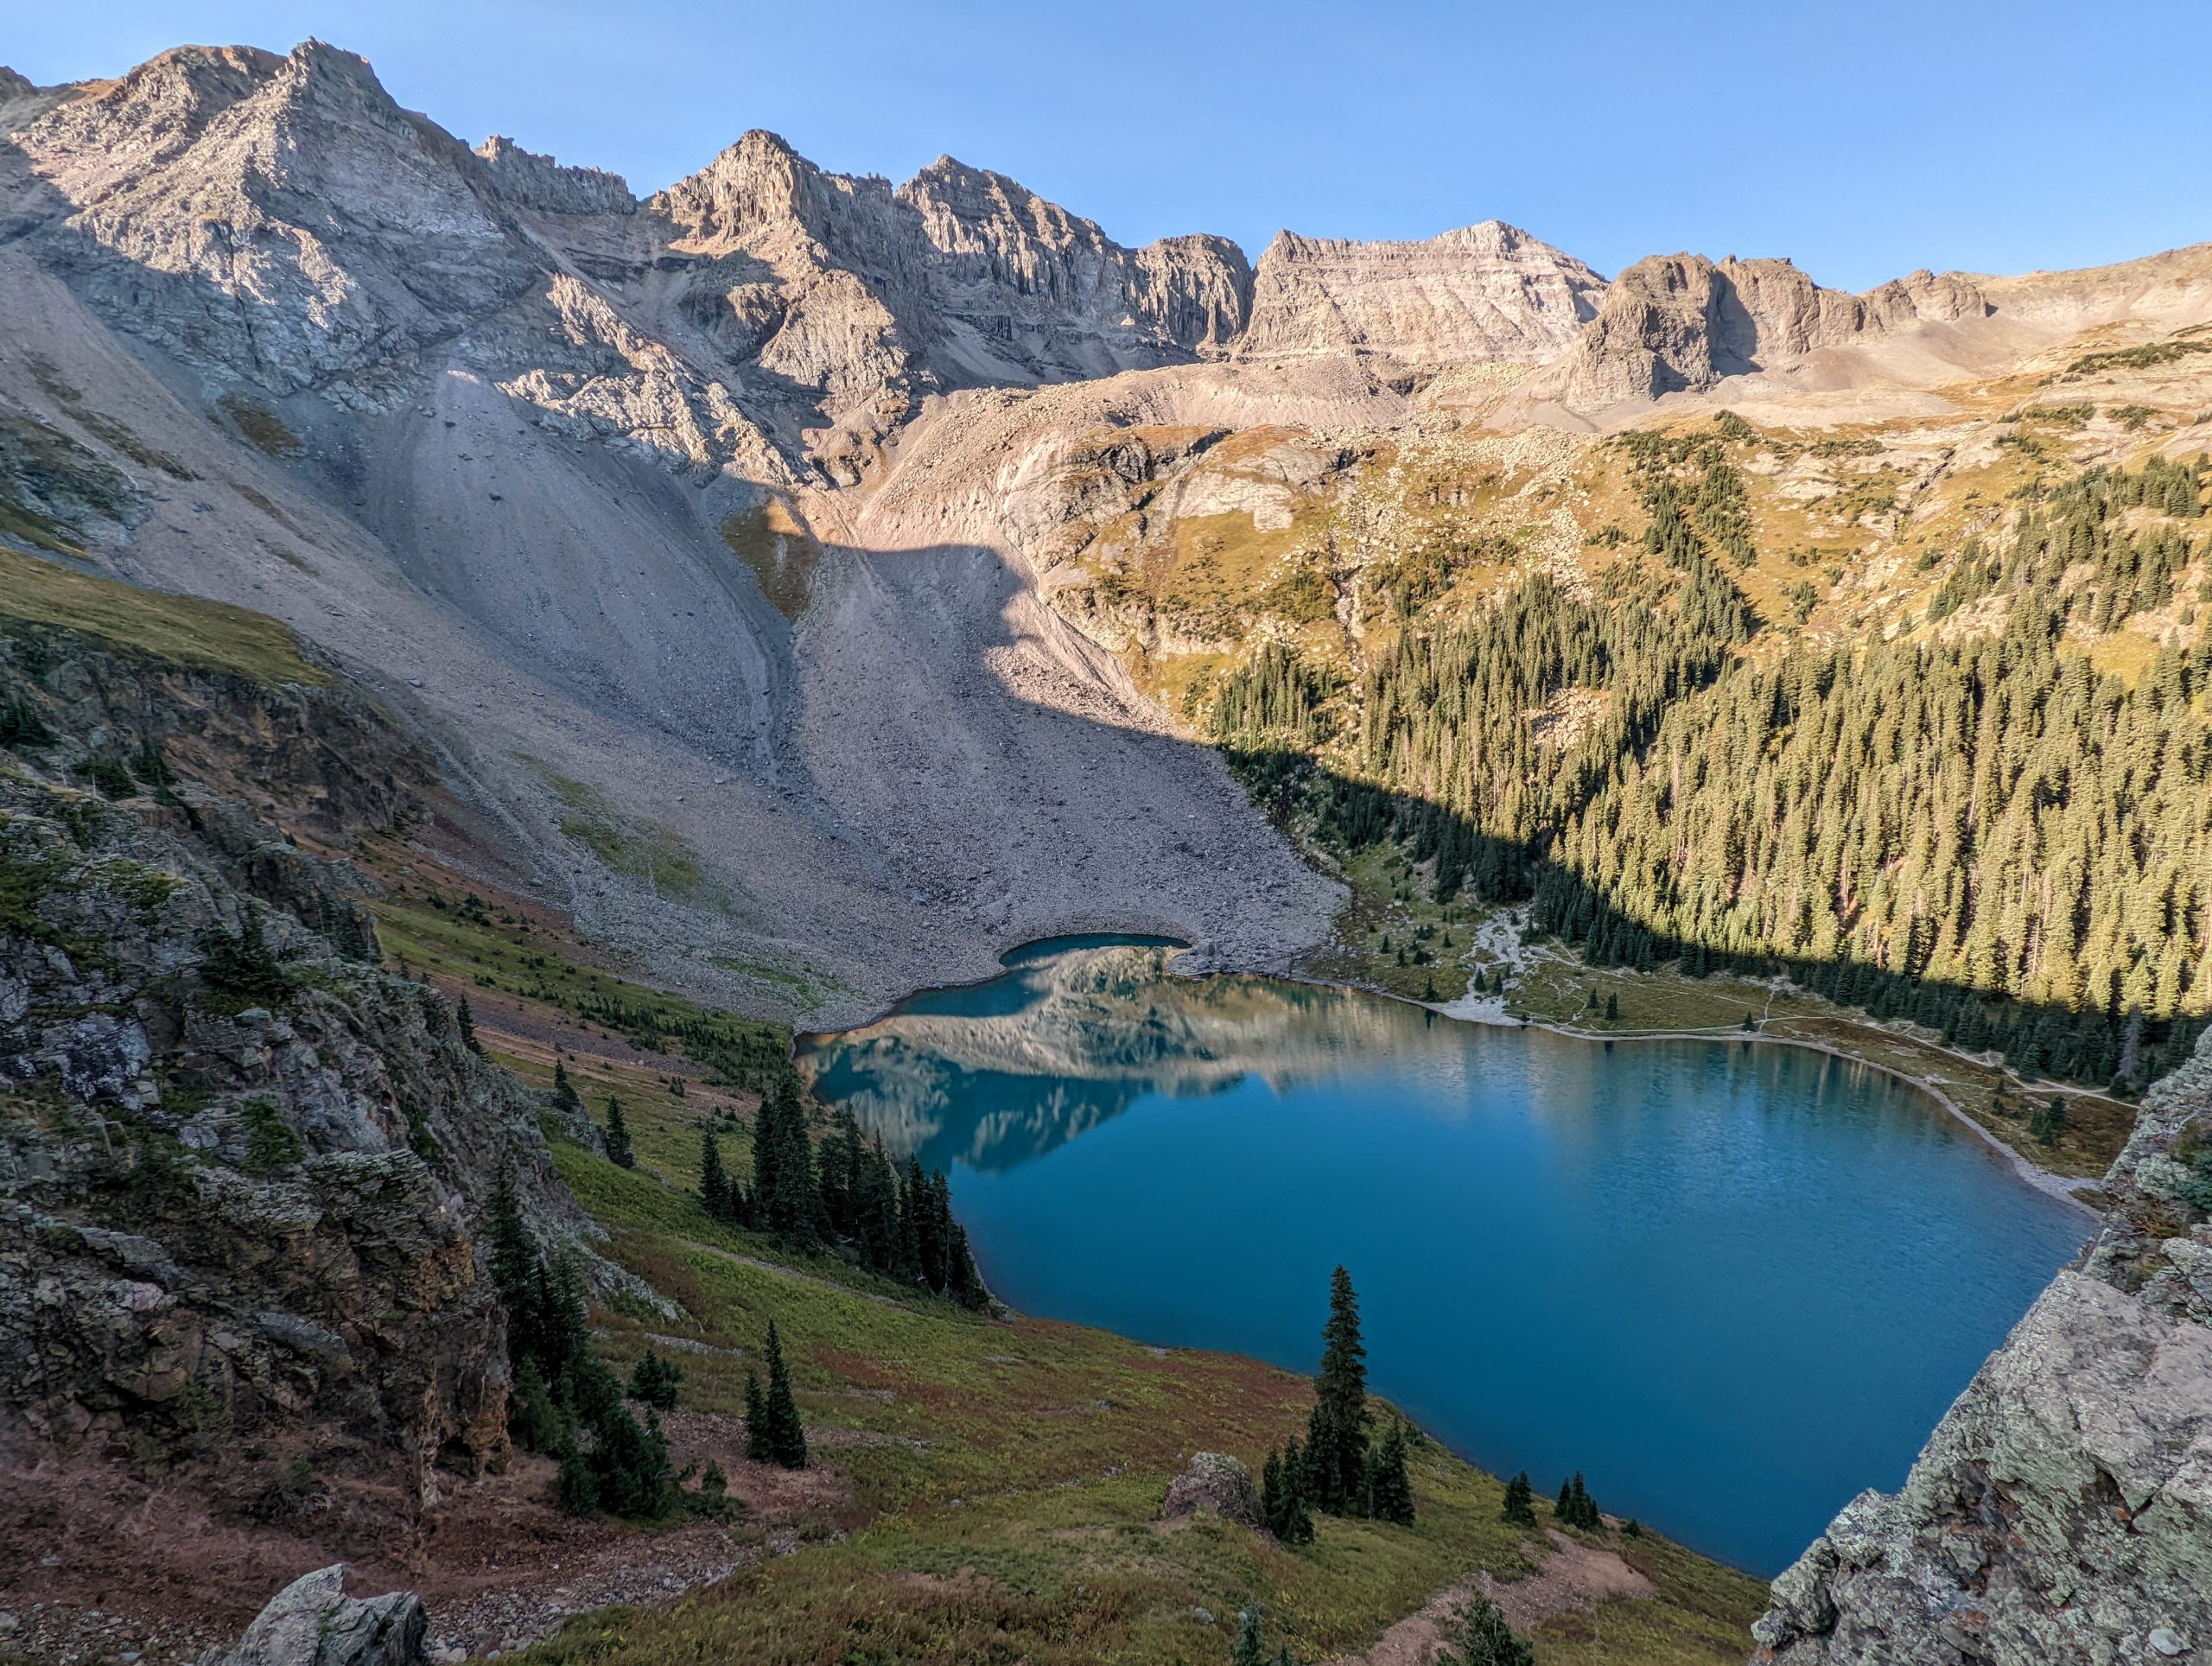
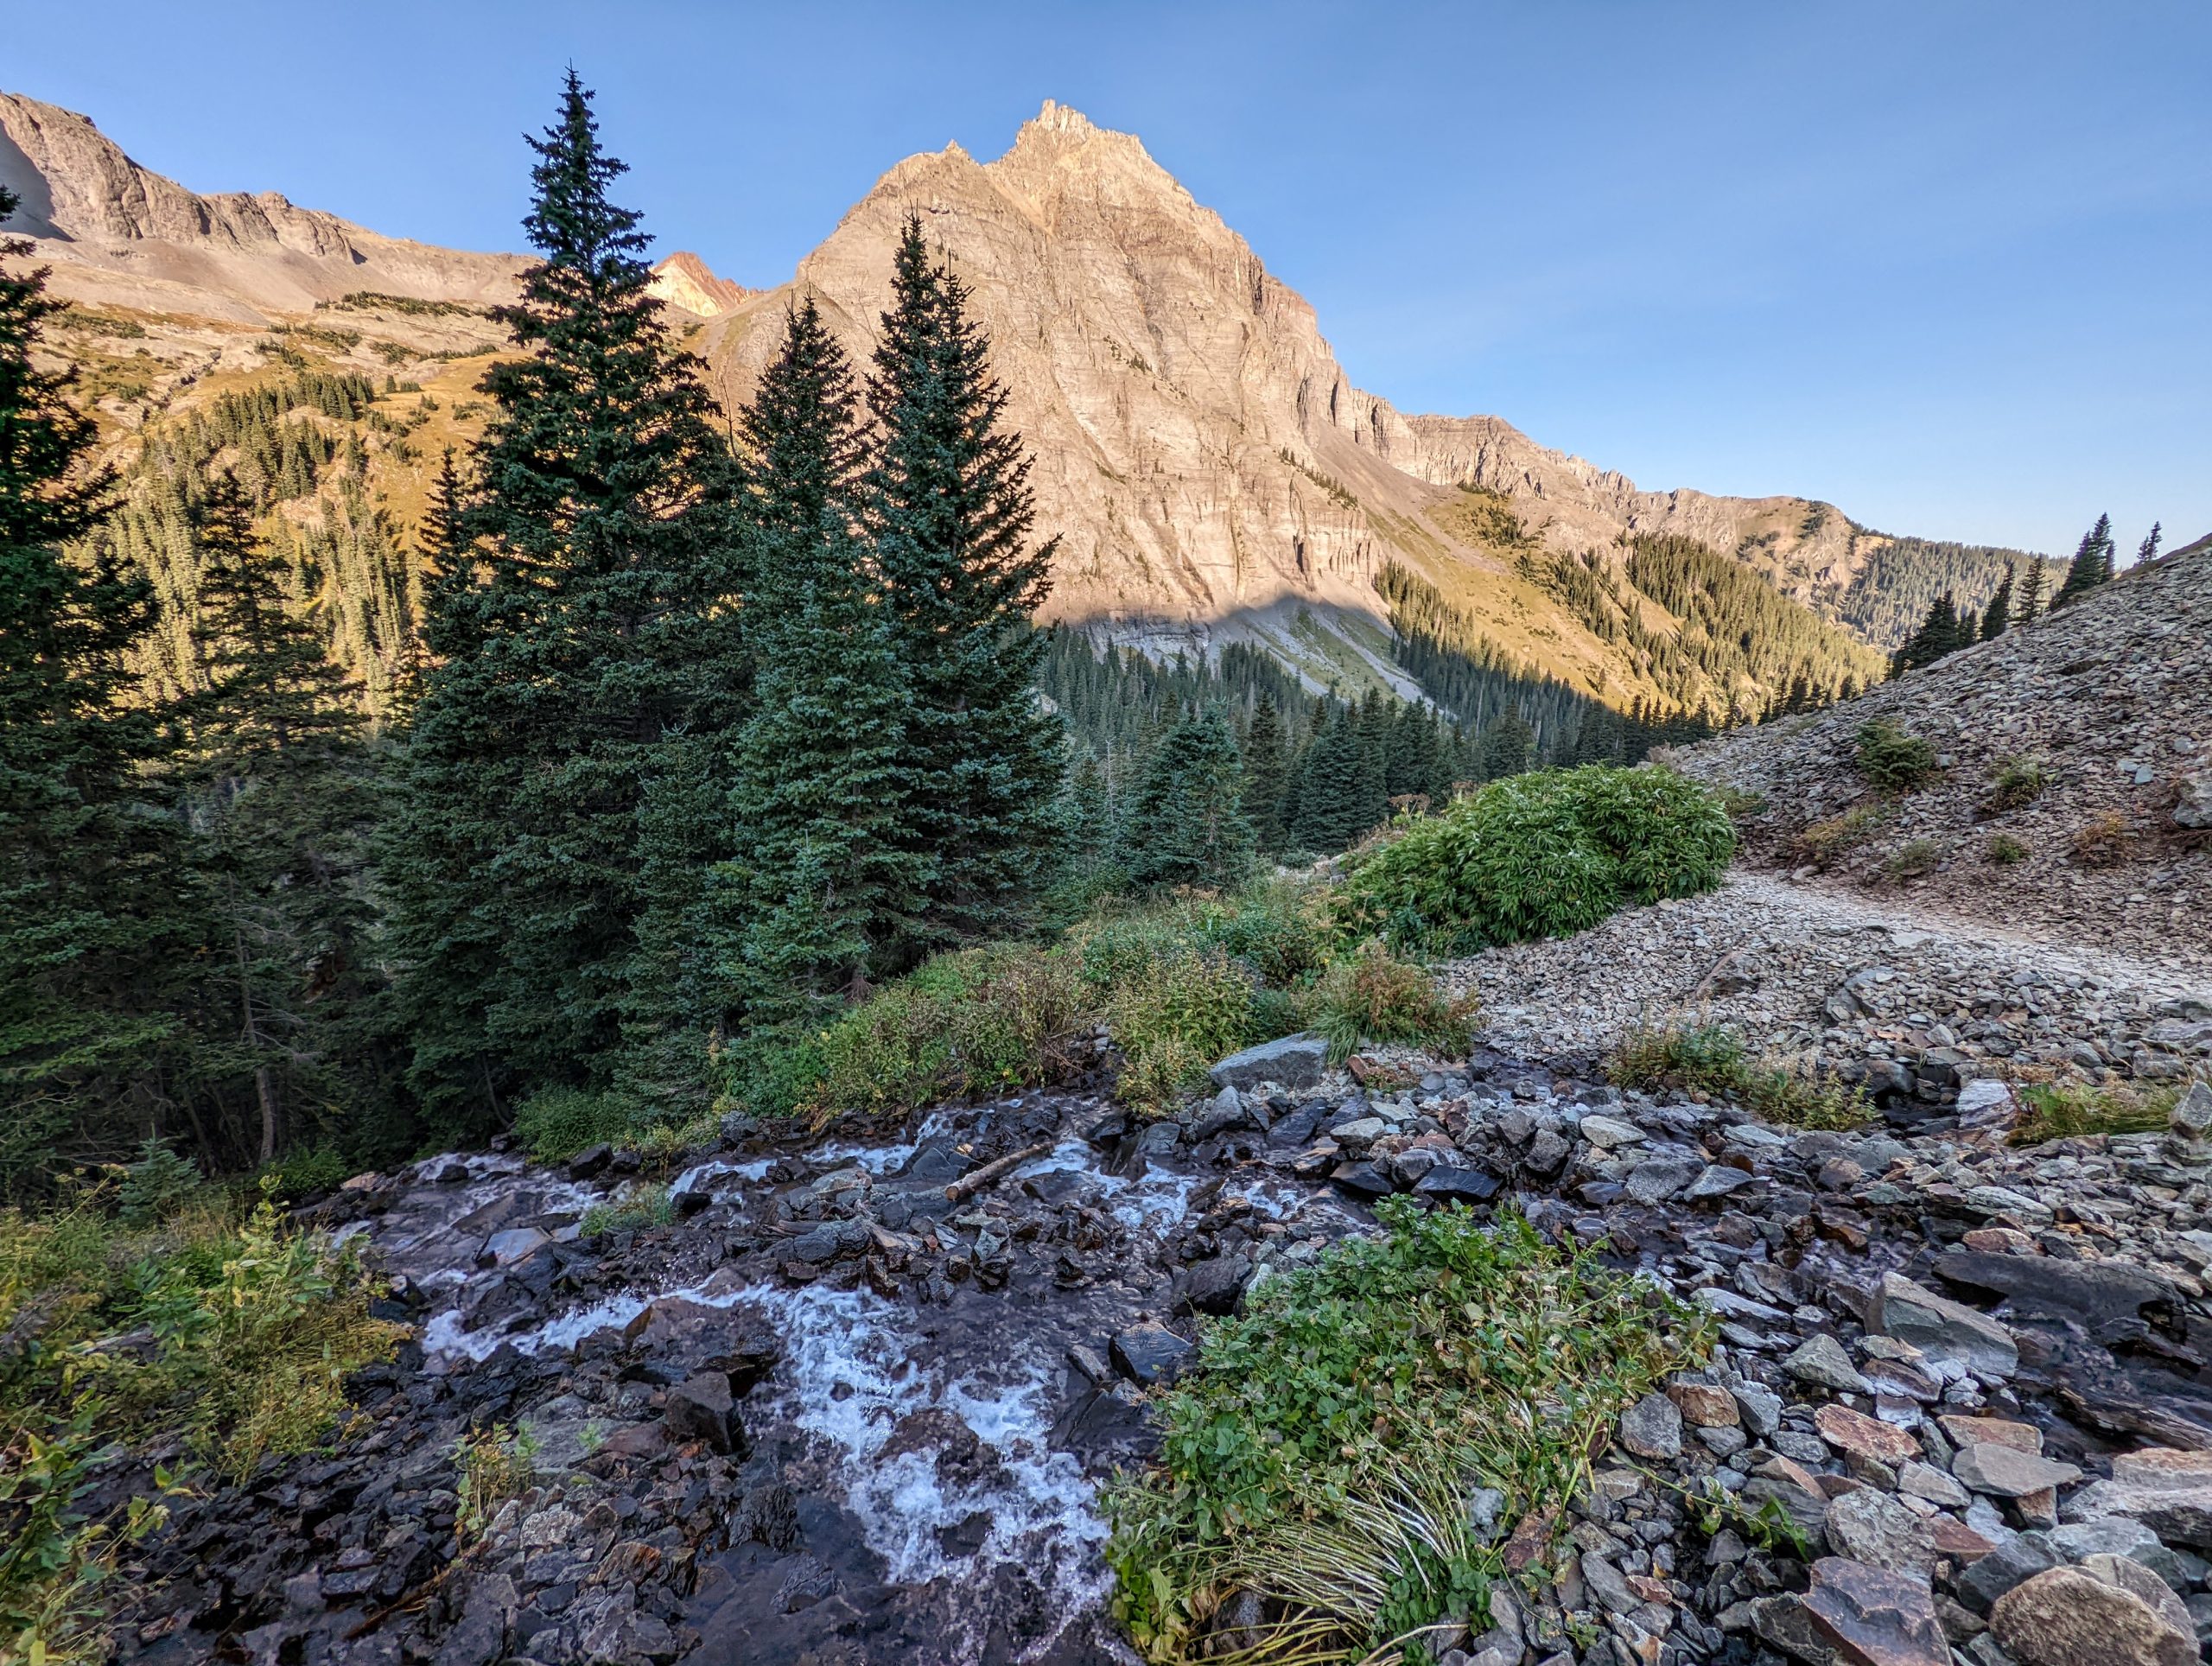
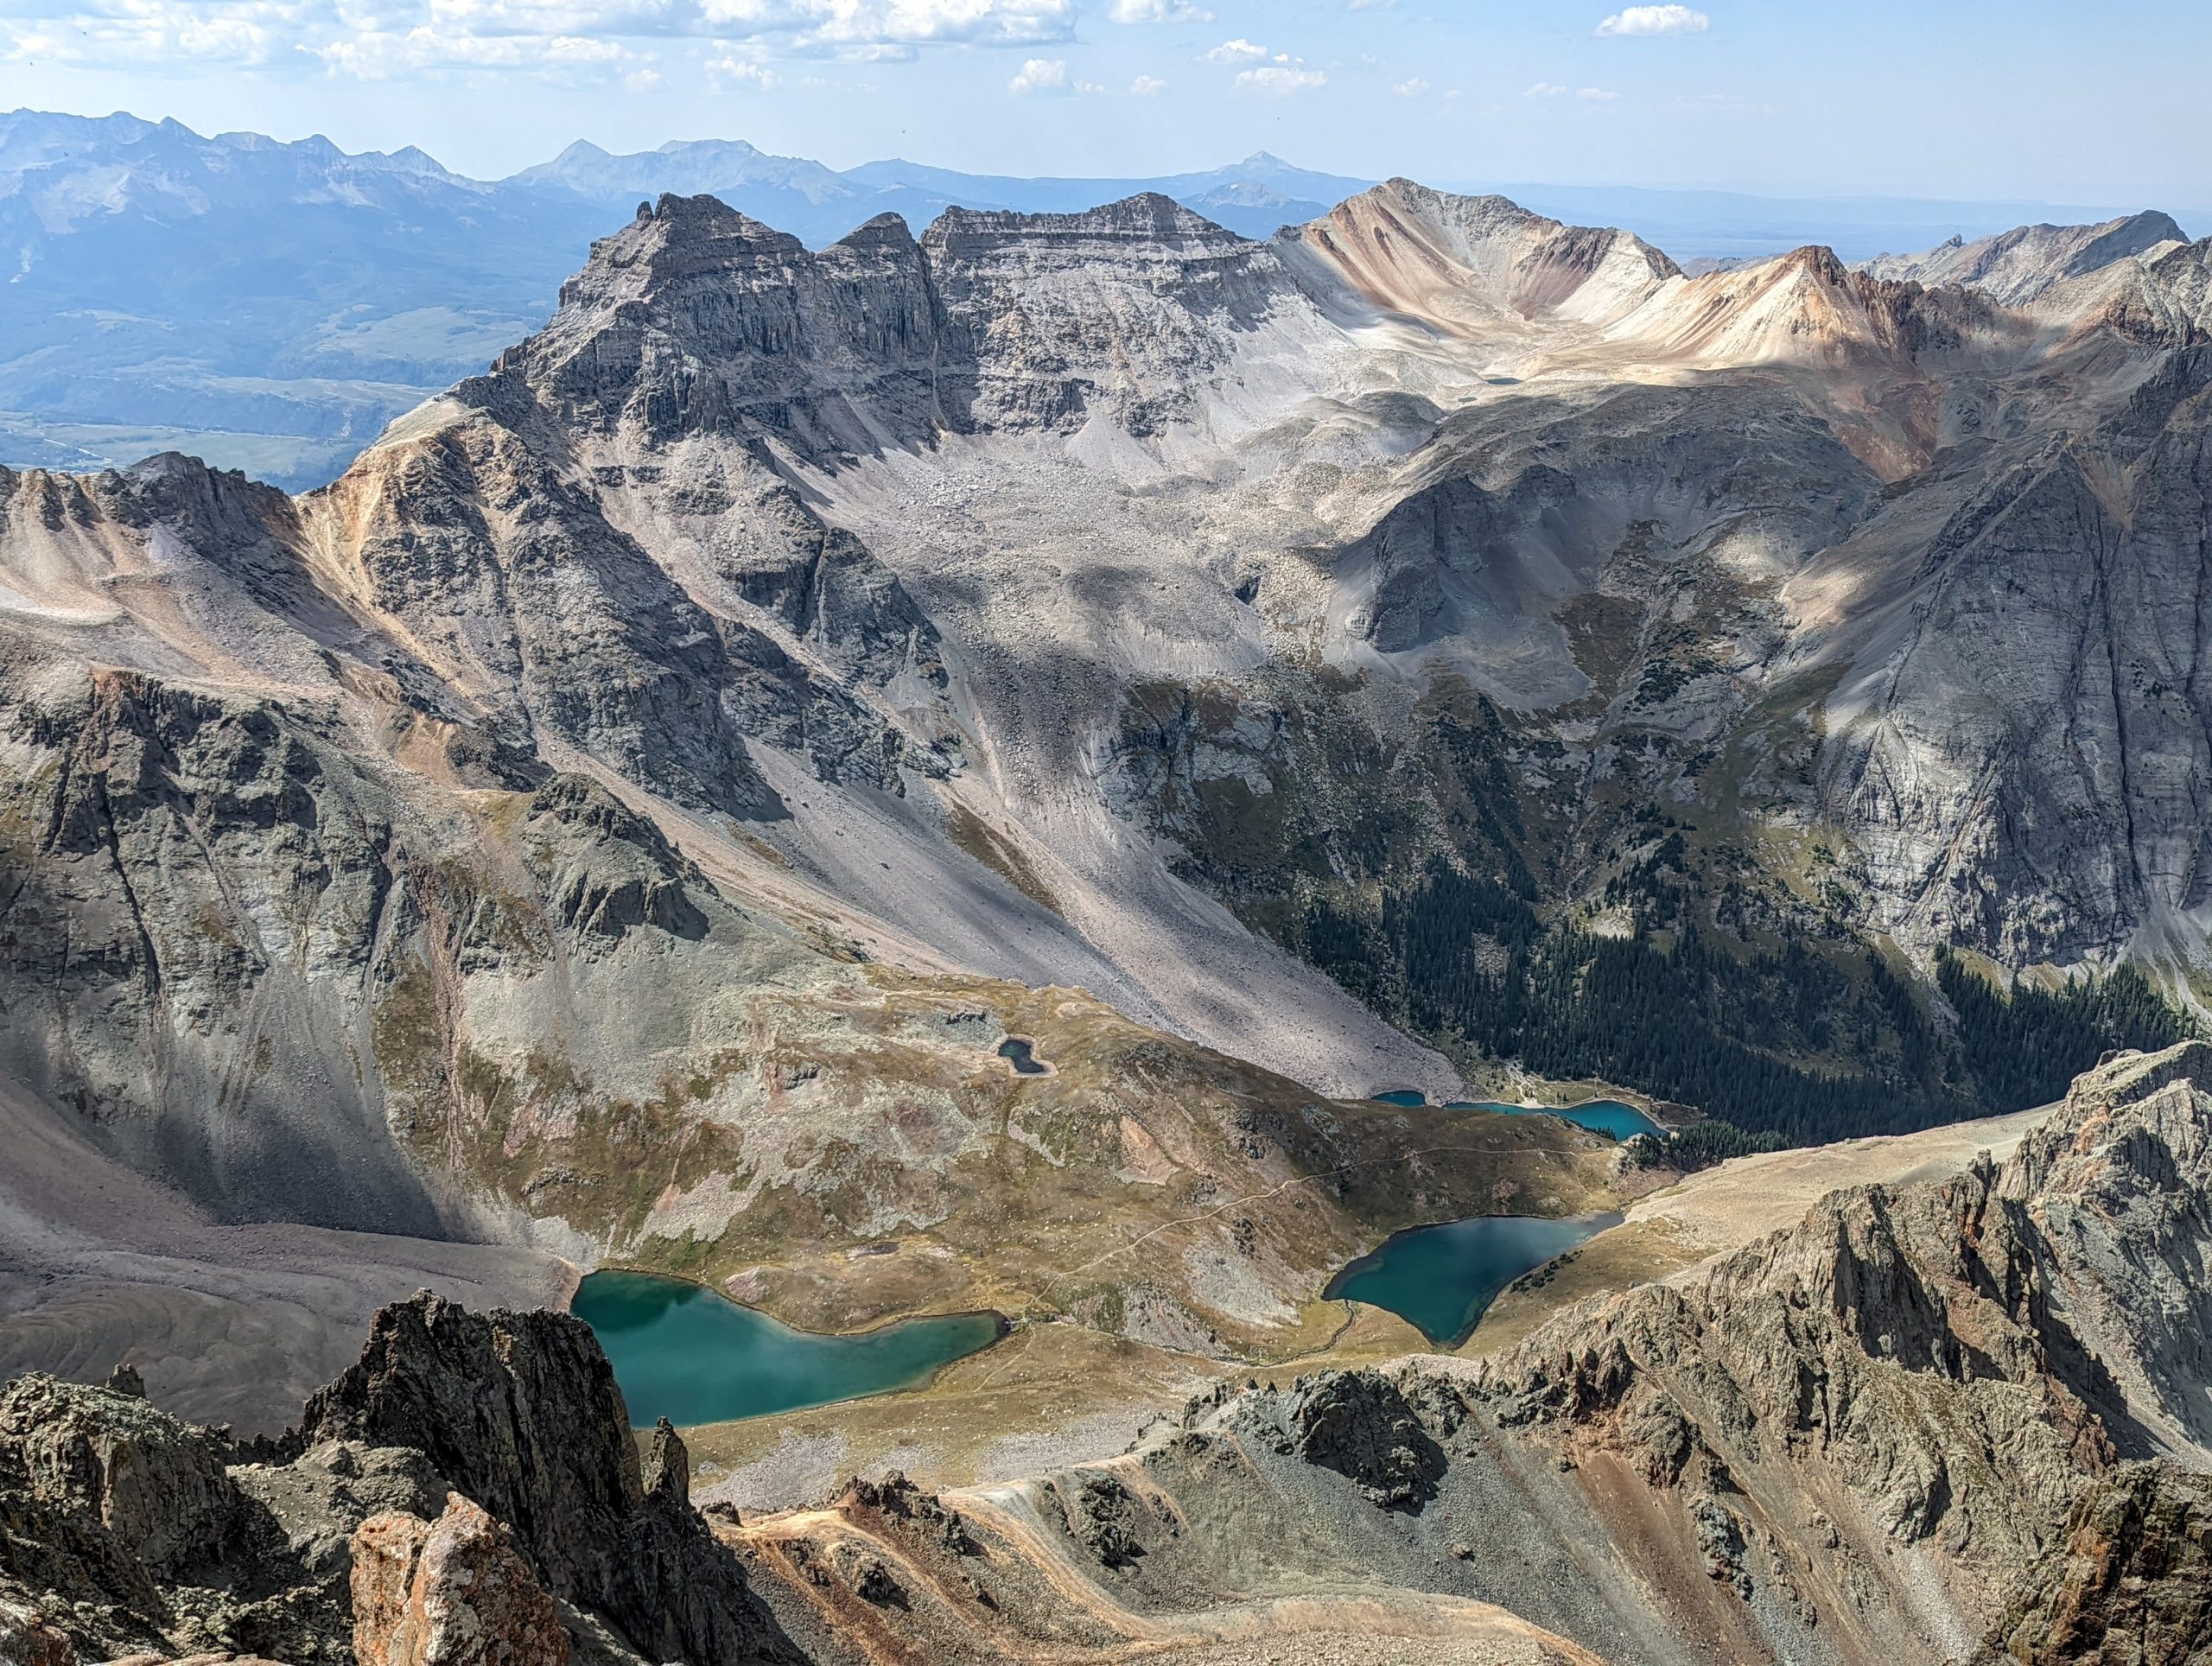
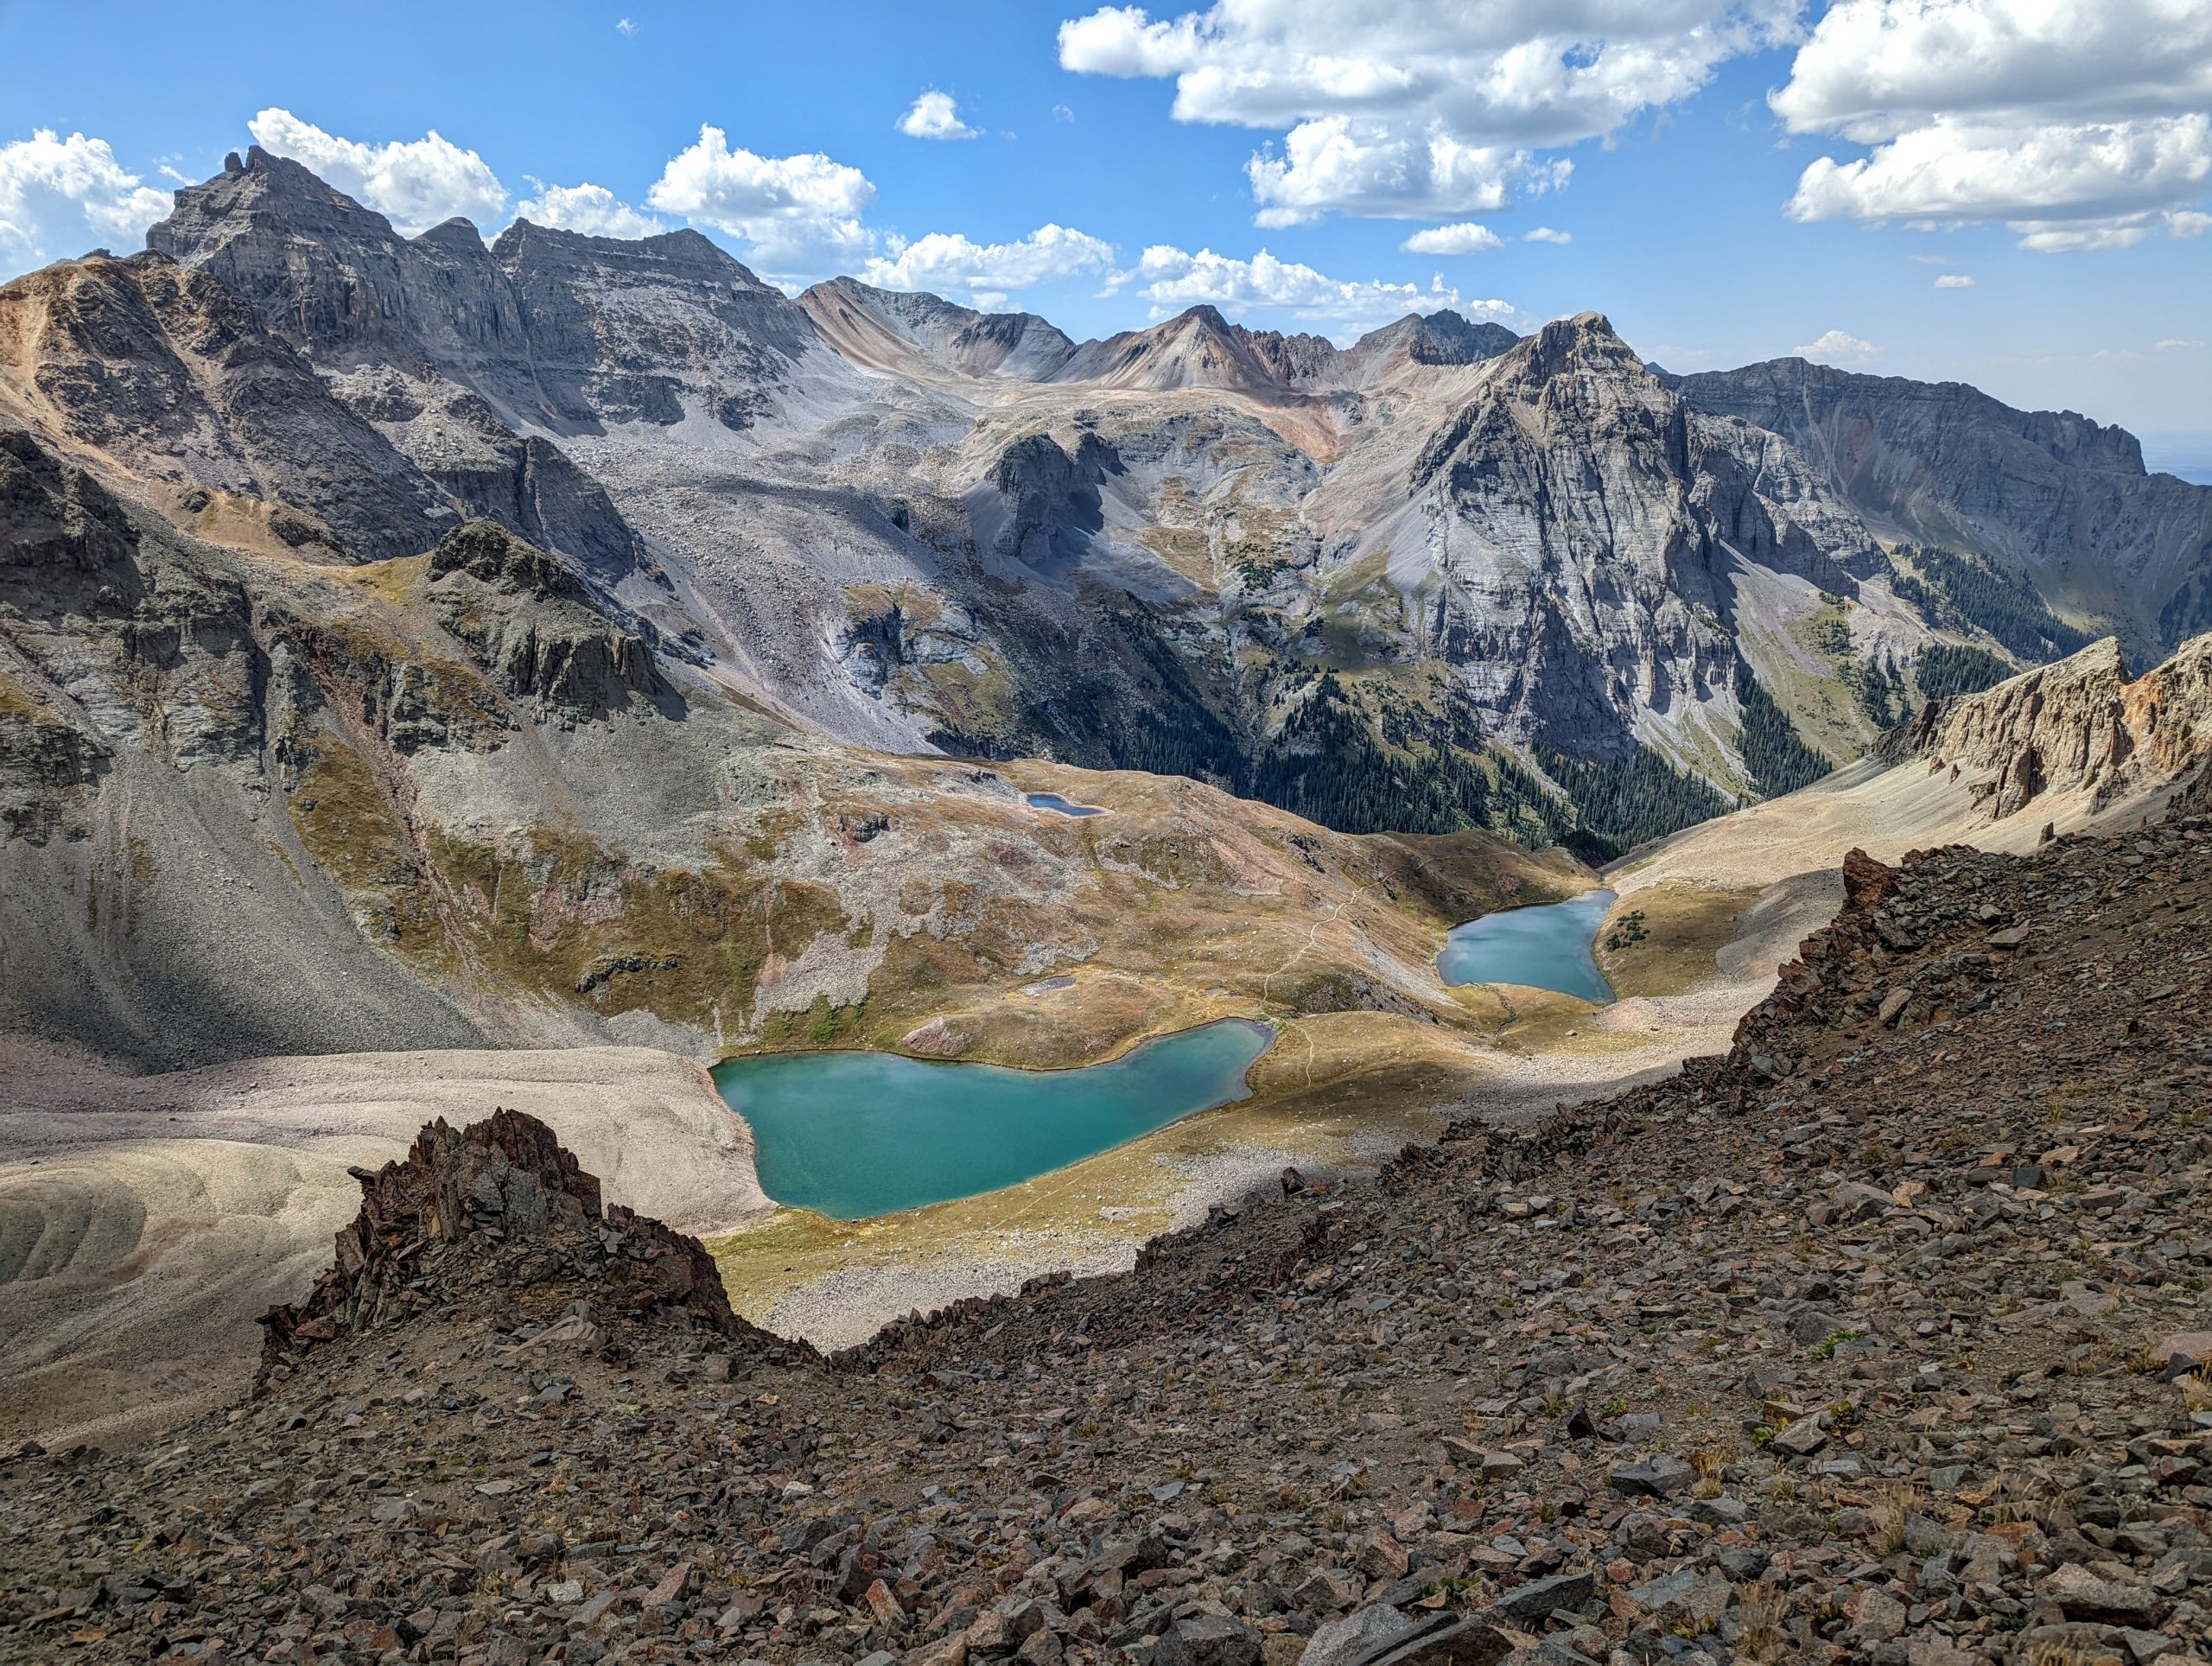
Middle Blue Lake is on your left as you walk past, then the trail crosses between Middle and Upper Blue Lakes so Upper is on your right. This section is relatively flat and easy and the views are great looking forward and backward – enjoy this section because one of the worst parts are coming up. As I was walking around Upper Blue Lake I remember thinking, “where could the trail go from here?” Up and to the left is the answer.
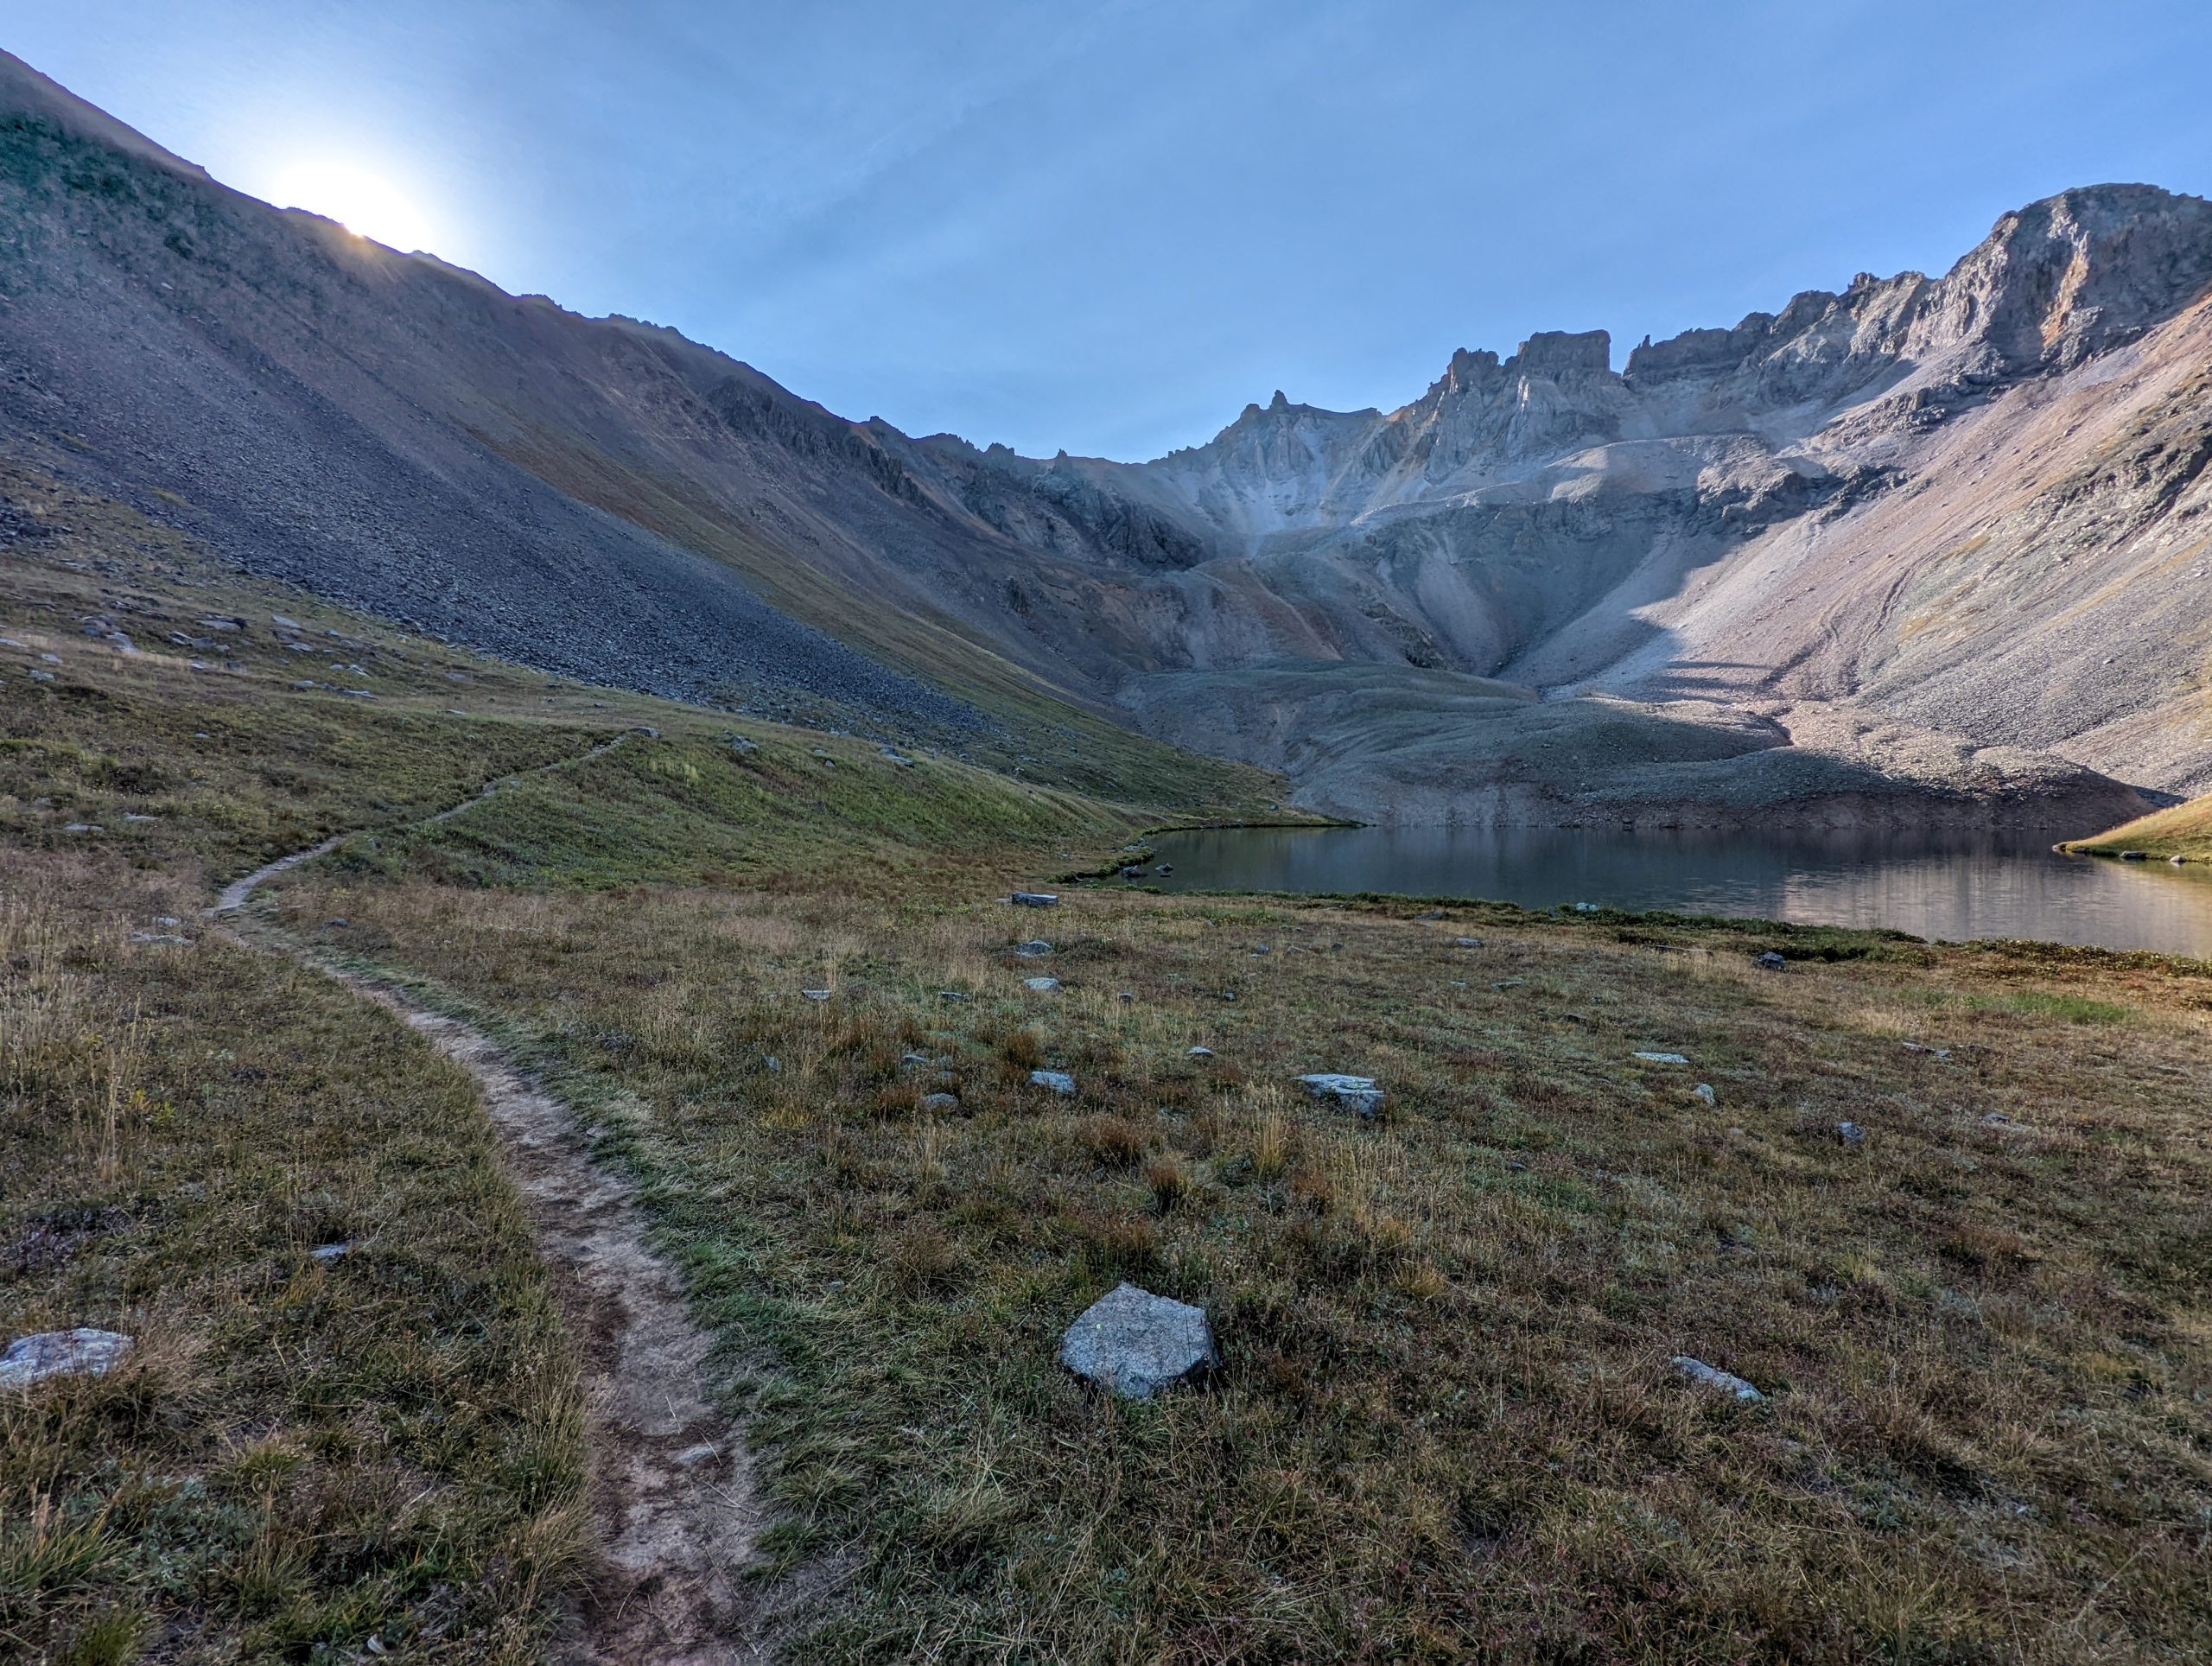
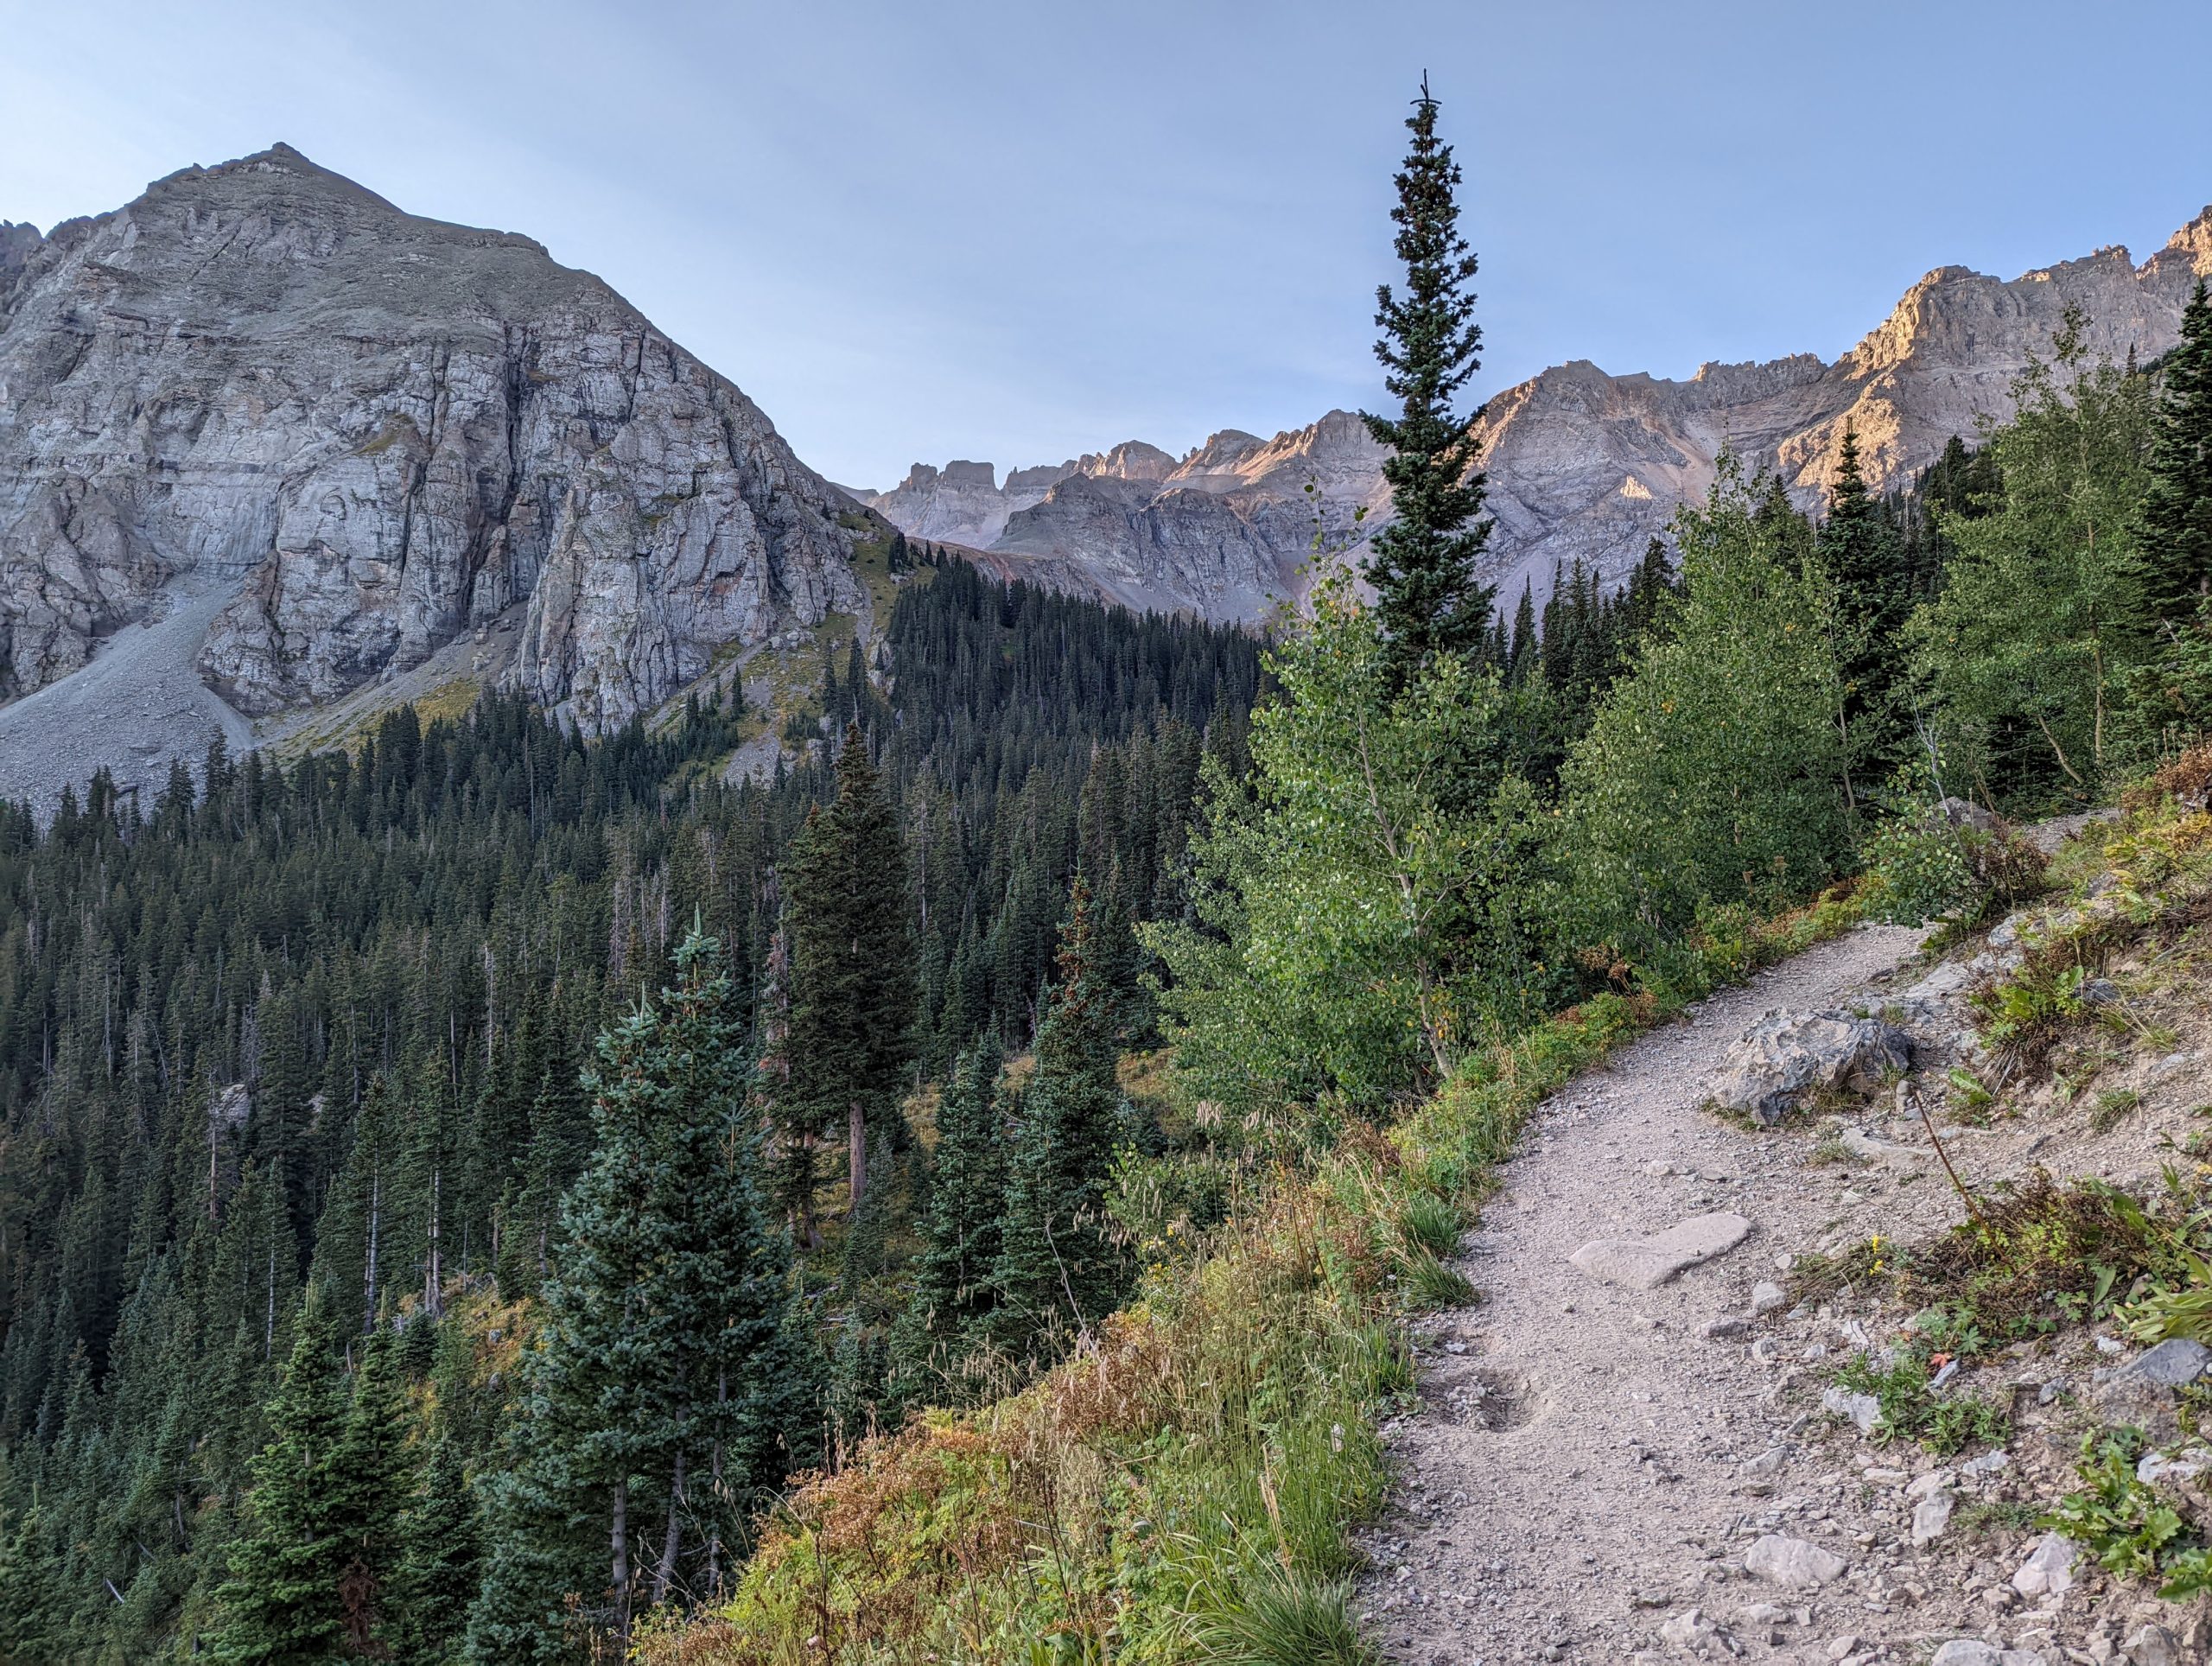
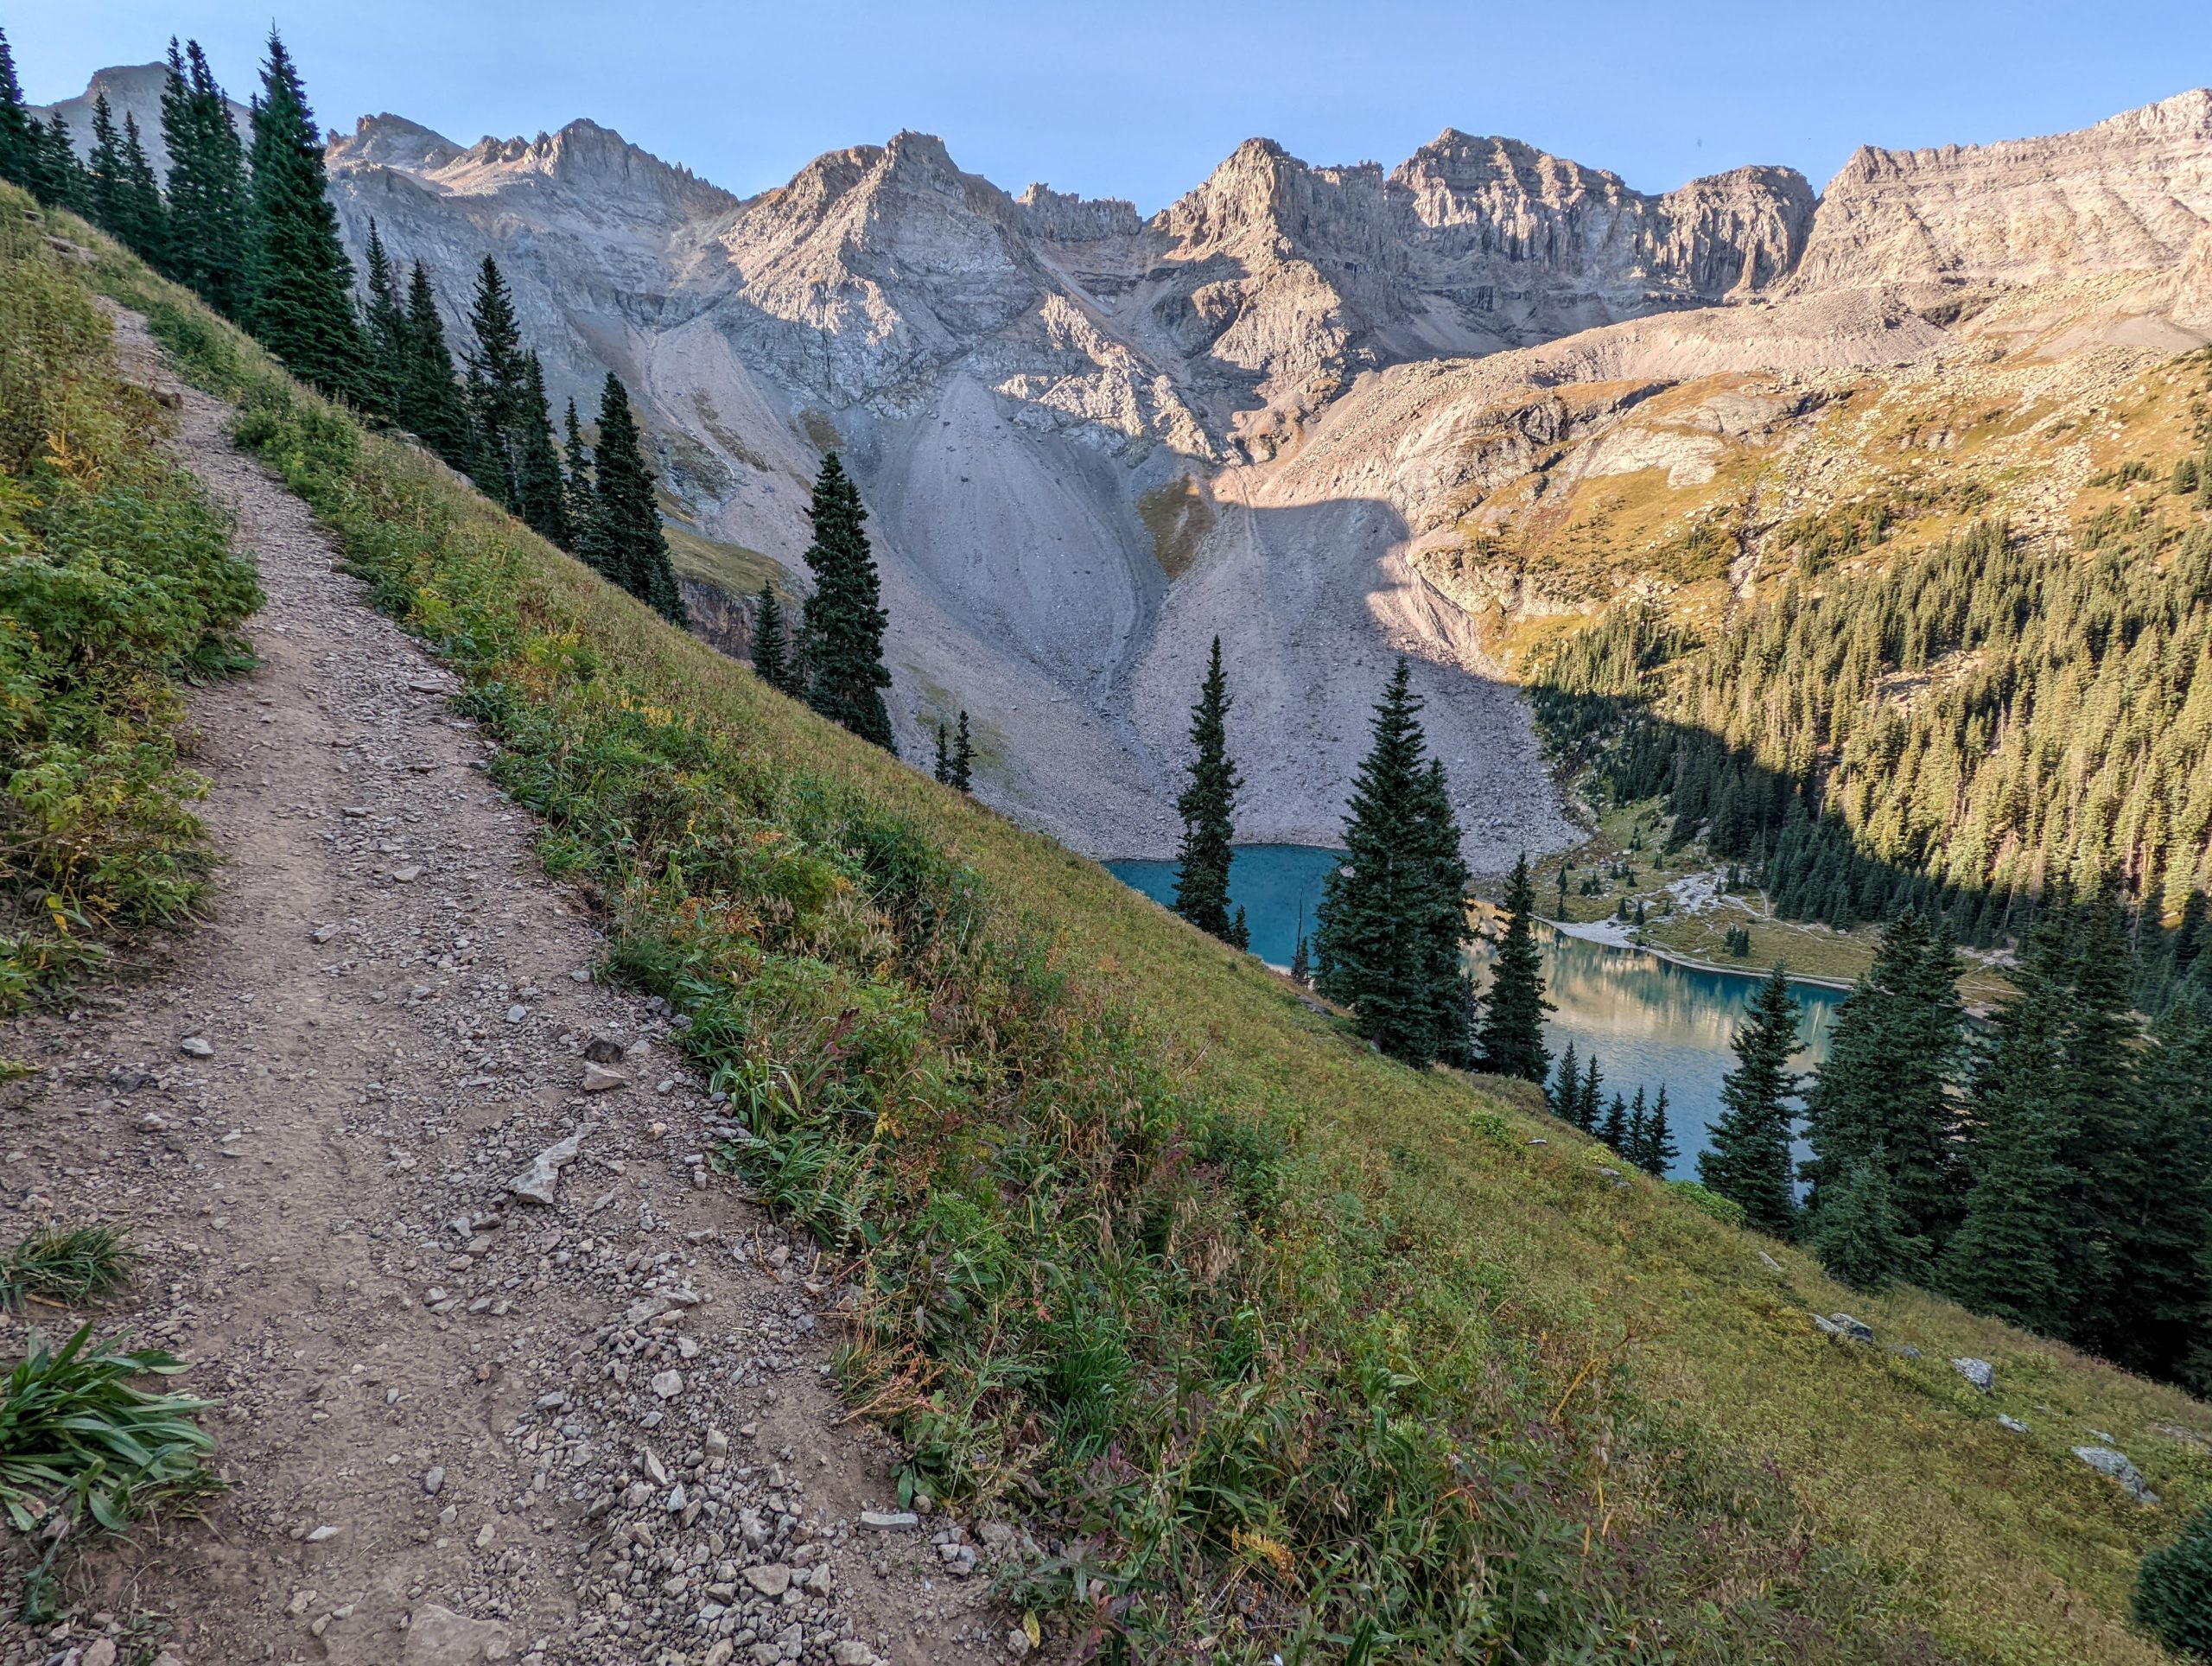
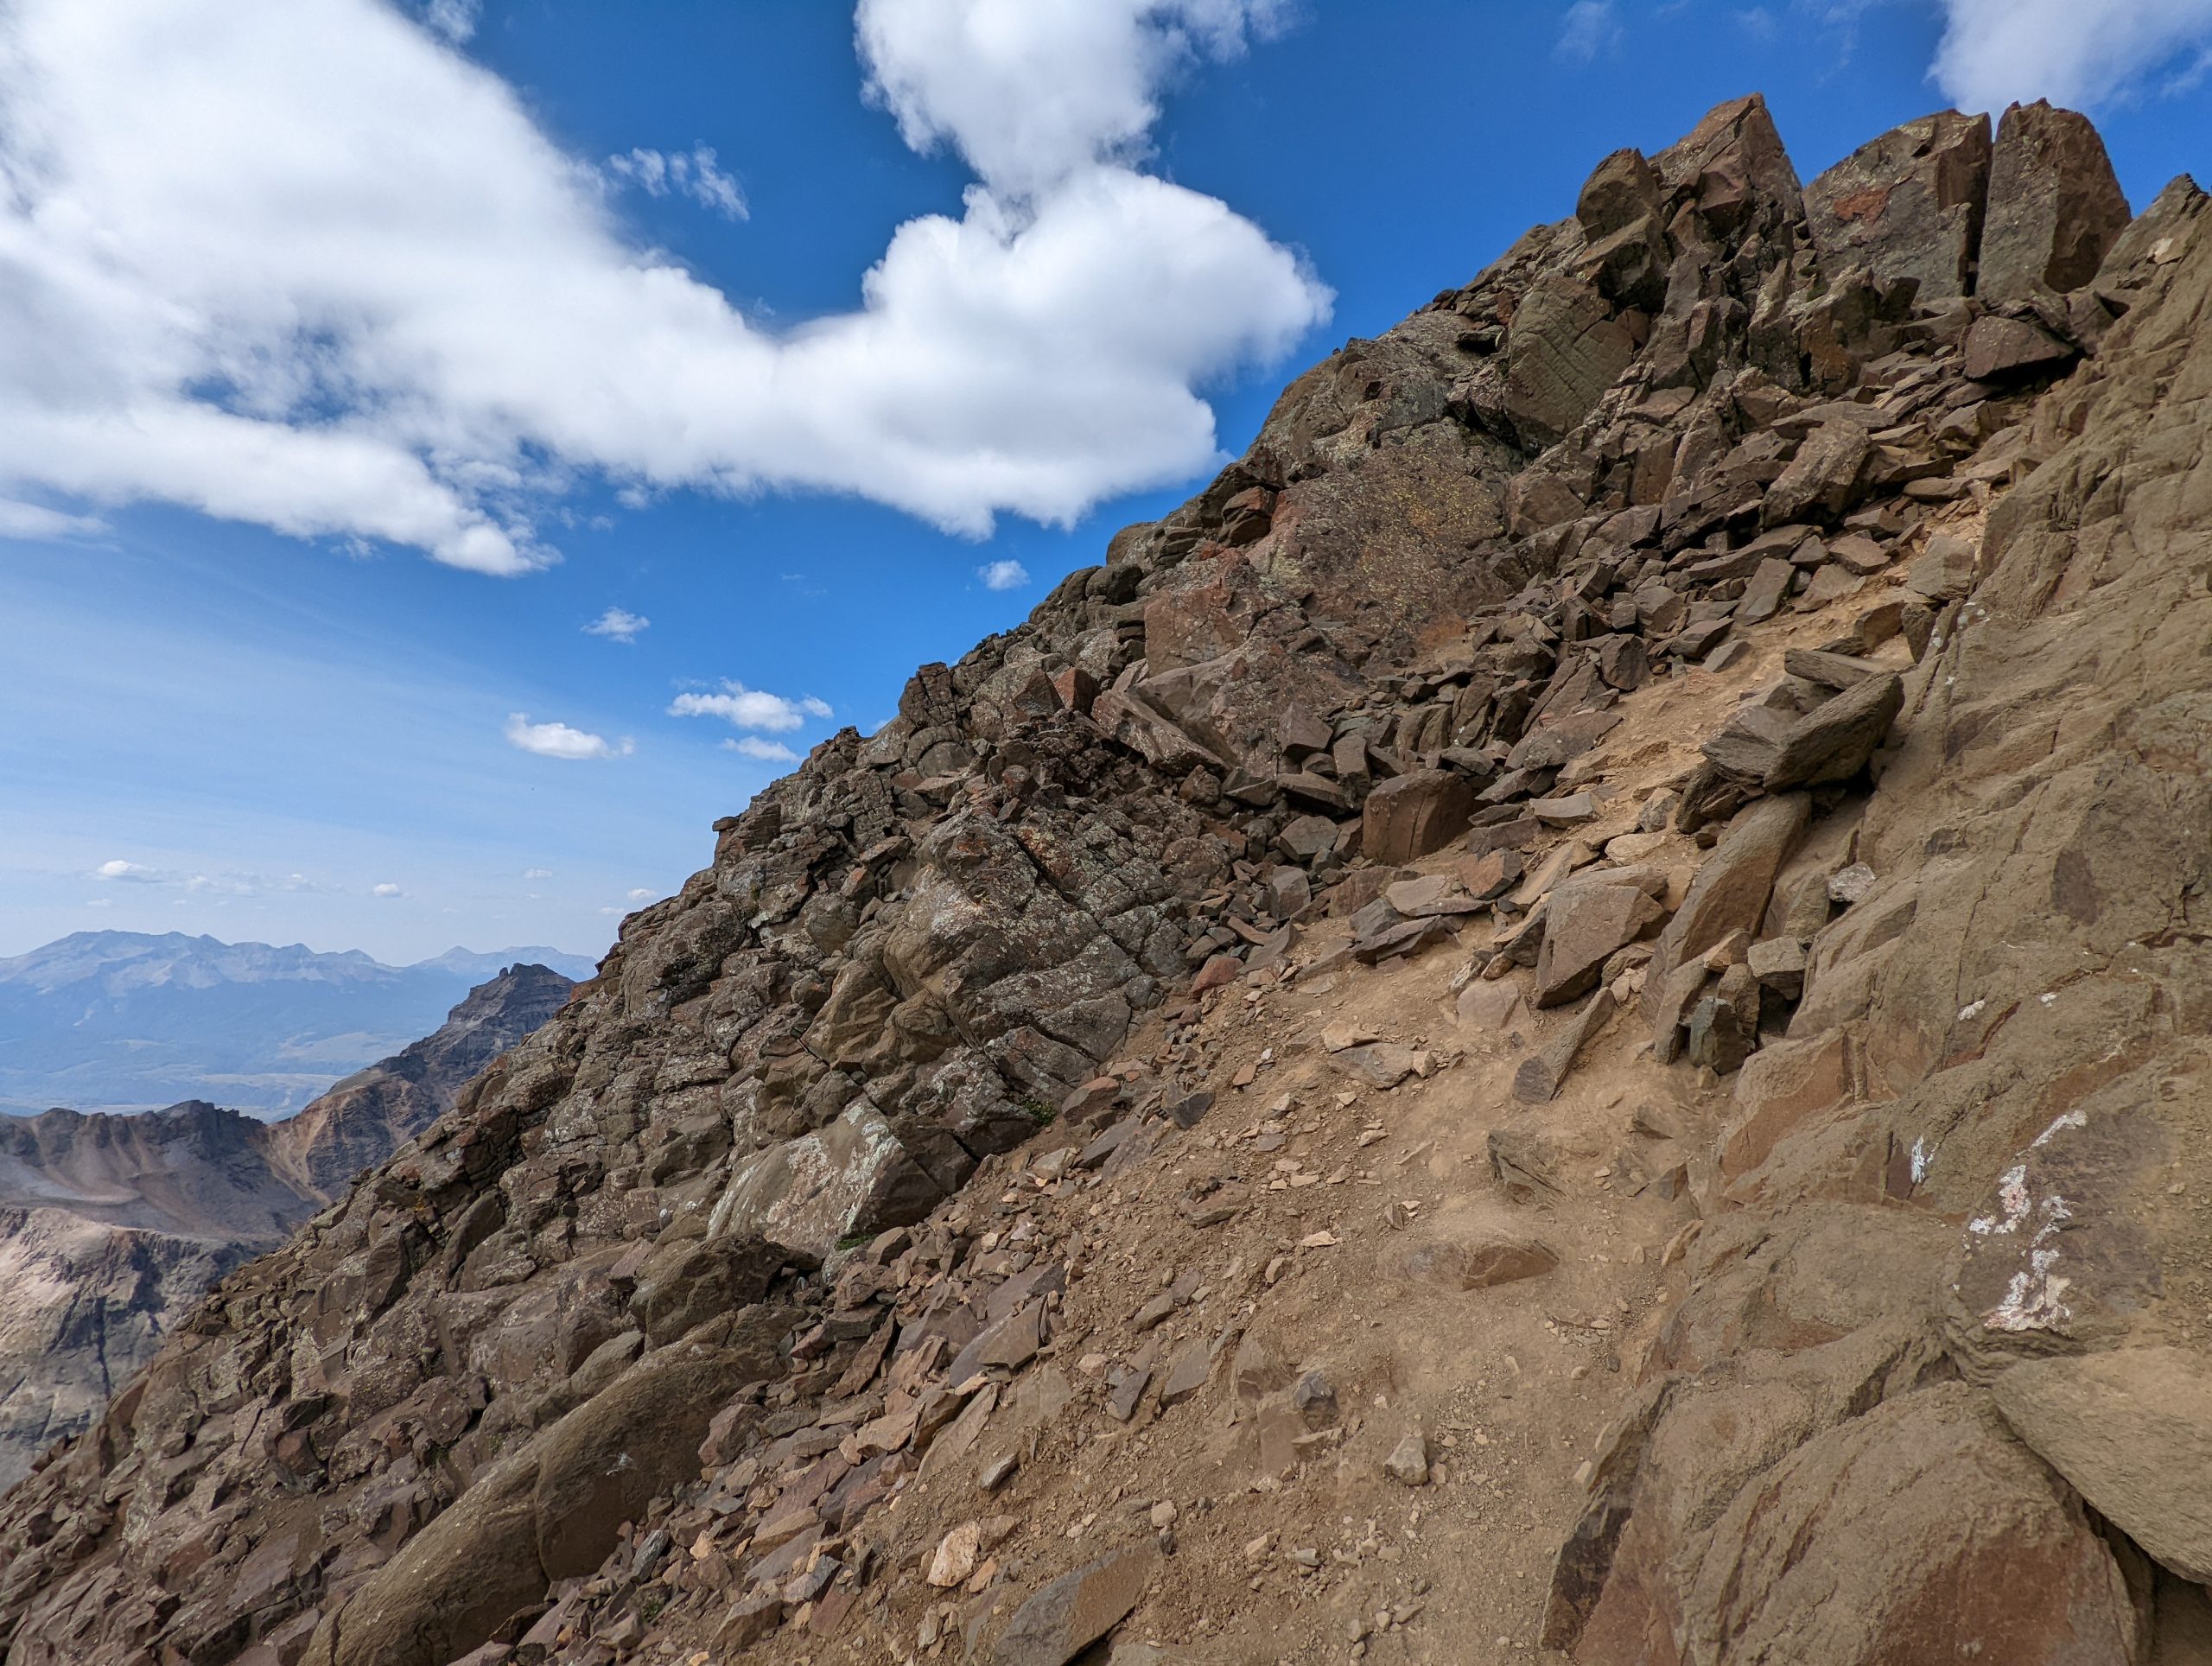
The switchbacks to get up to Blue Lakes Pass start out pretty tight but towards the top they get very long as the incline gets steeper. The path is very narrow and a lot of it is loose rock – I put on my crampons and had poles and felt a lot safer. You’d be sliding down for a while with a misstep or if the ground slid out from beneath you. The view of Upper and Middle Blue Lakes keeps getting better and better as you ascend, so that helps.
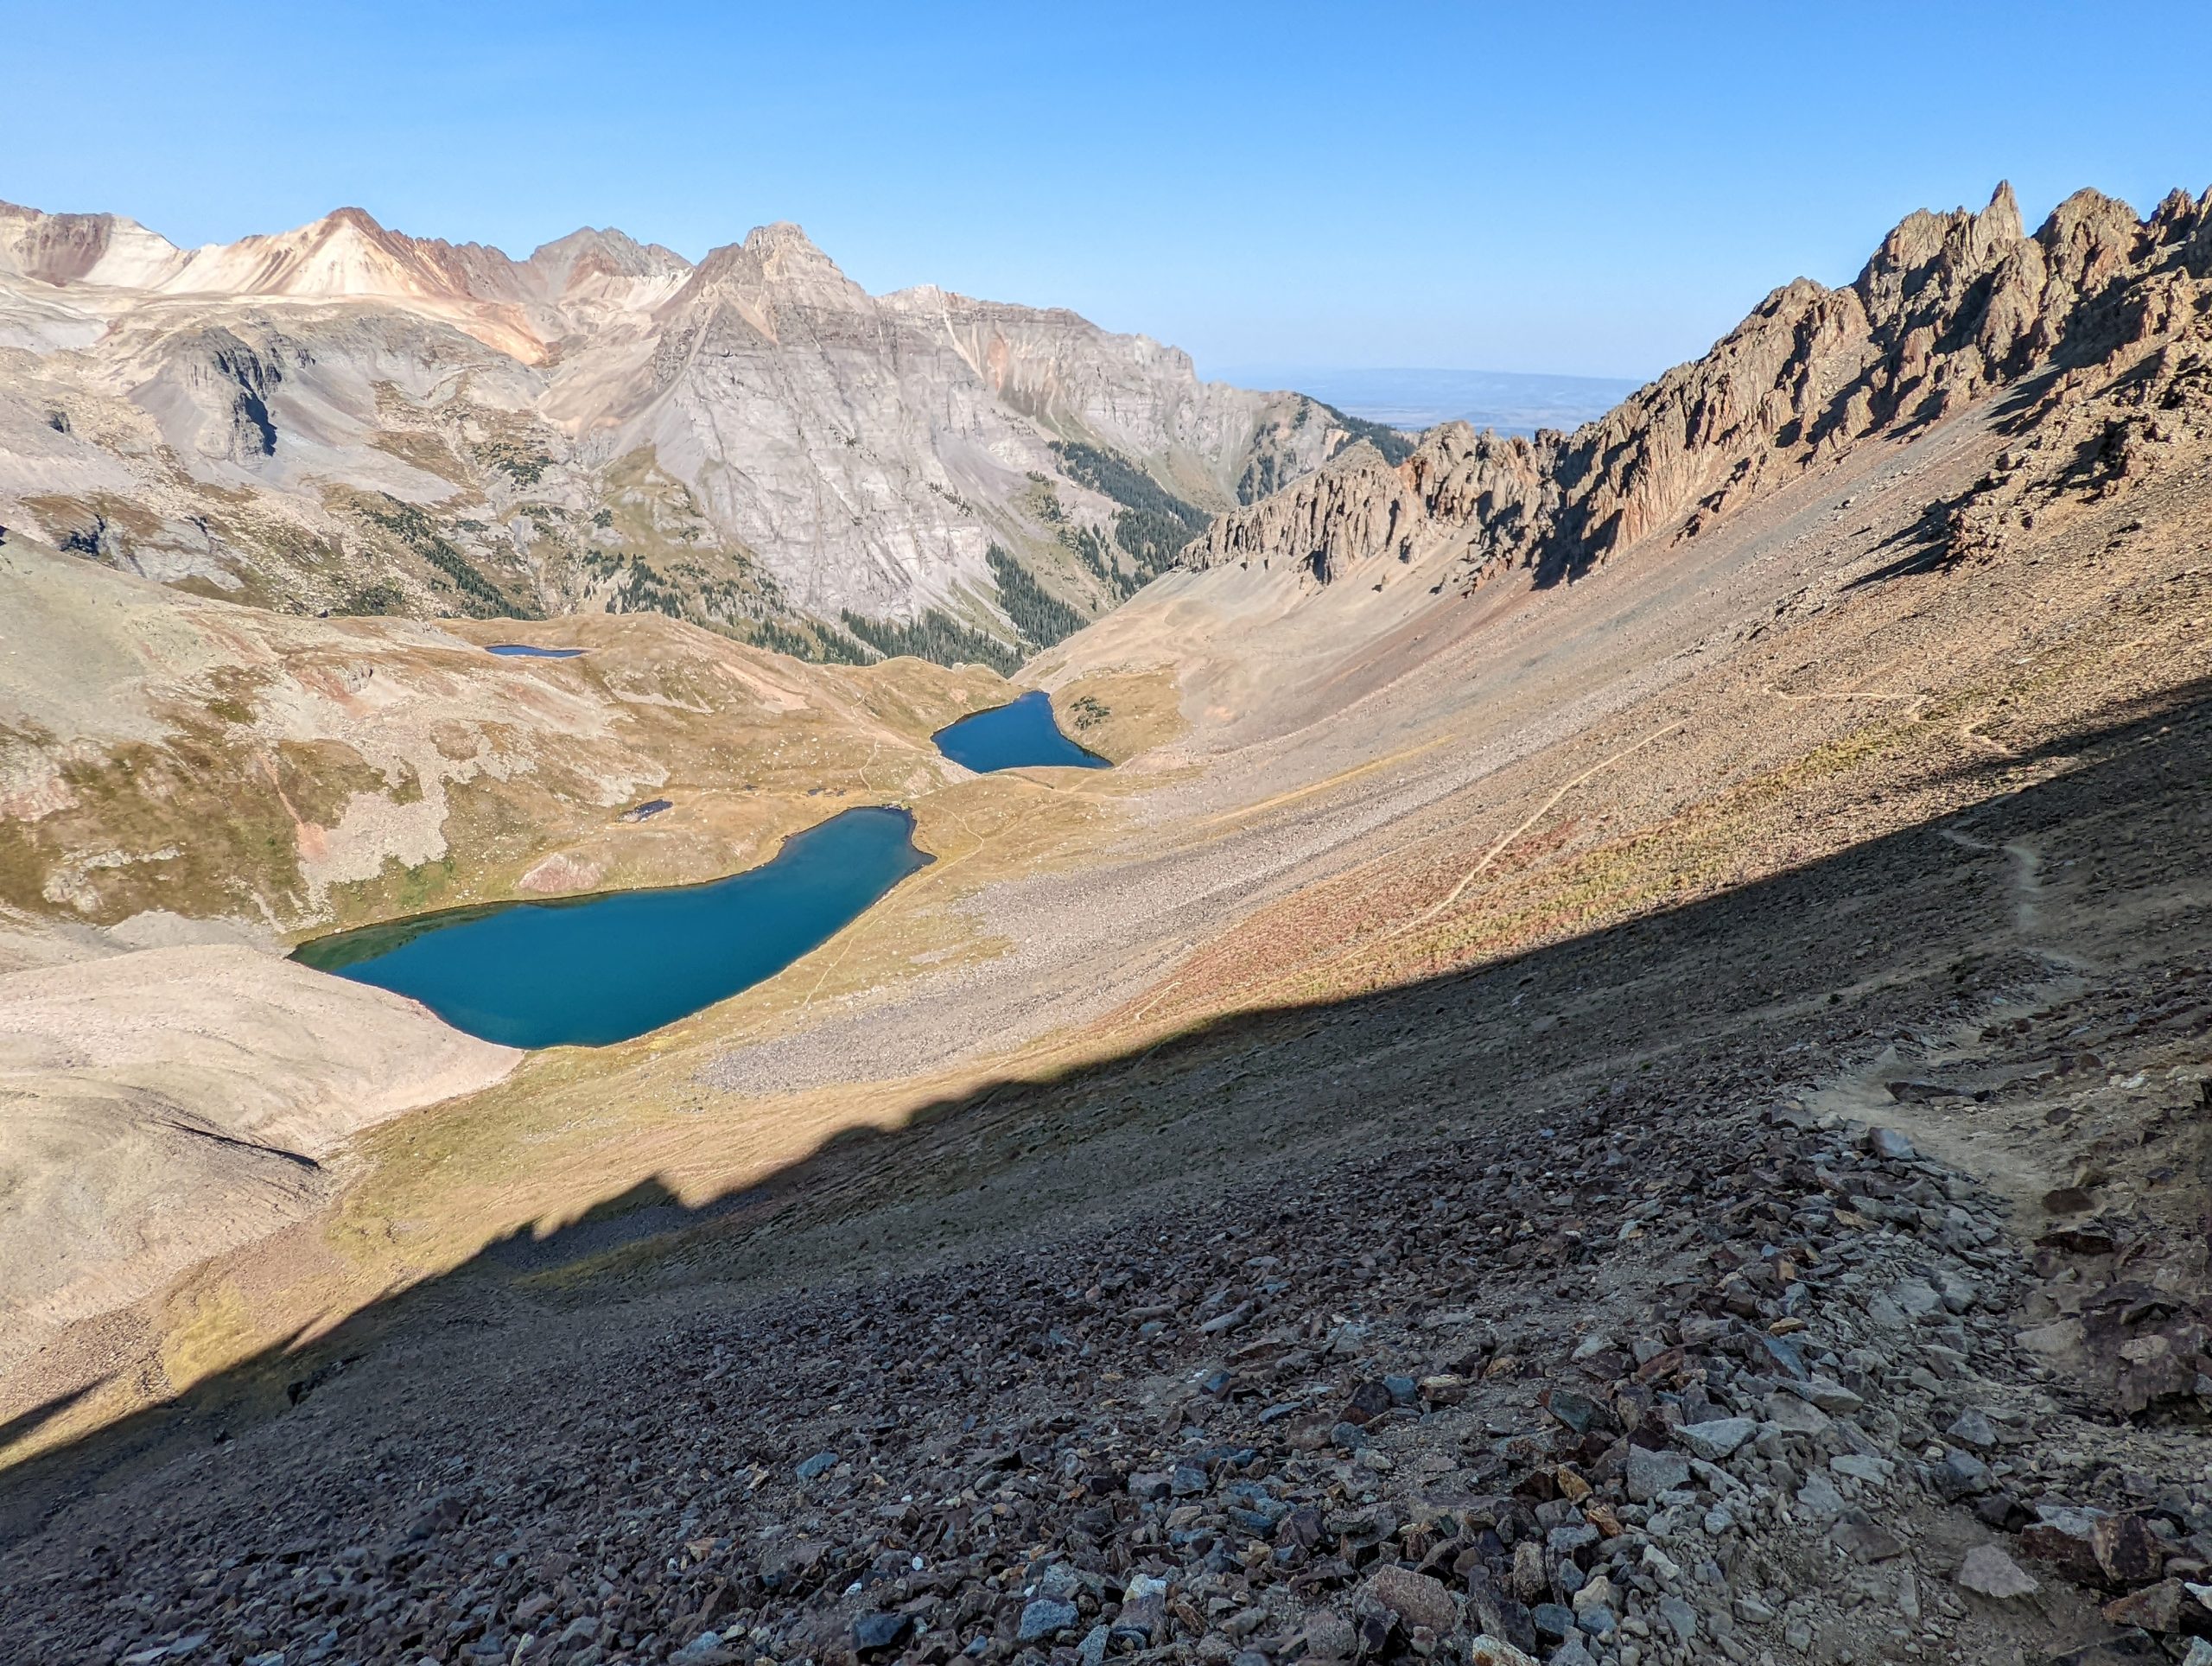
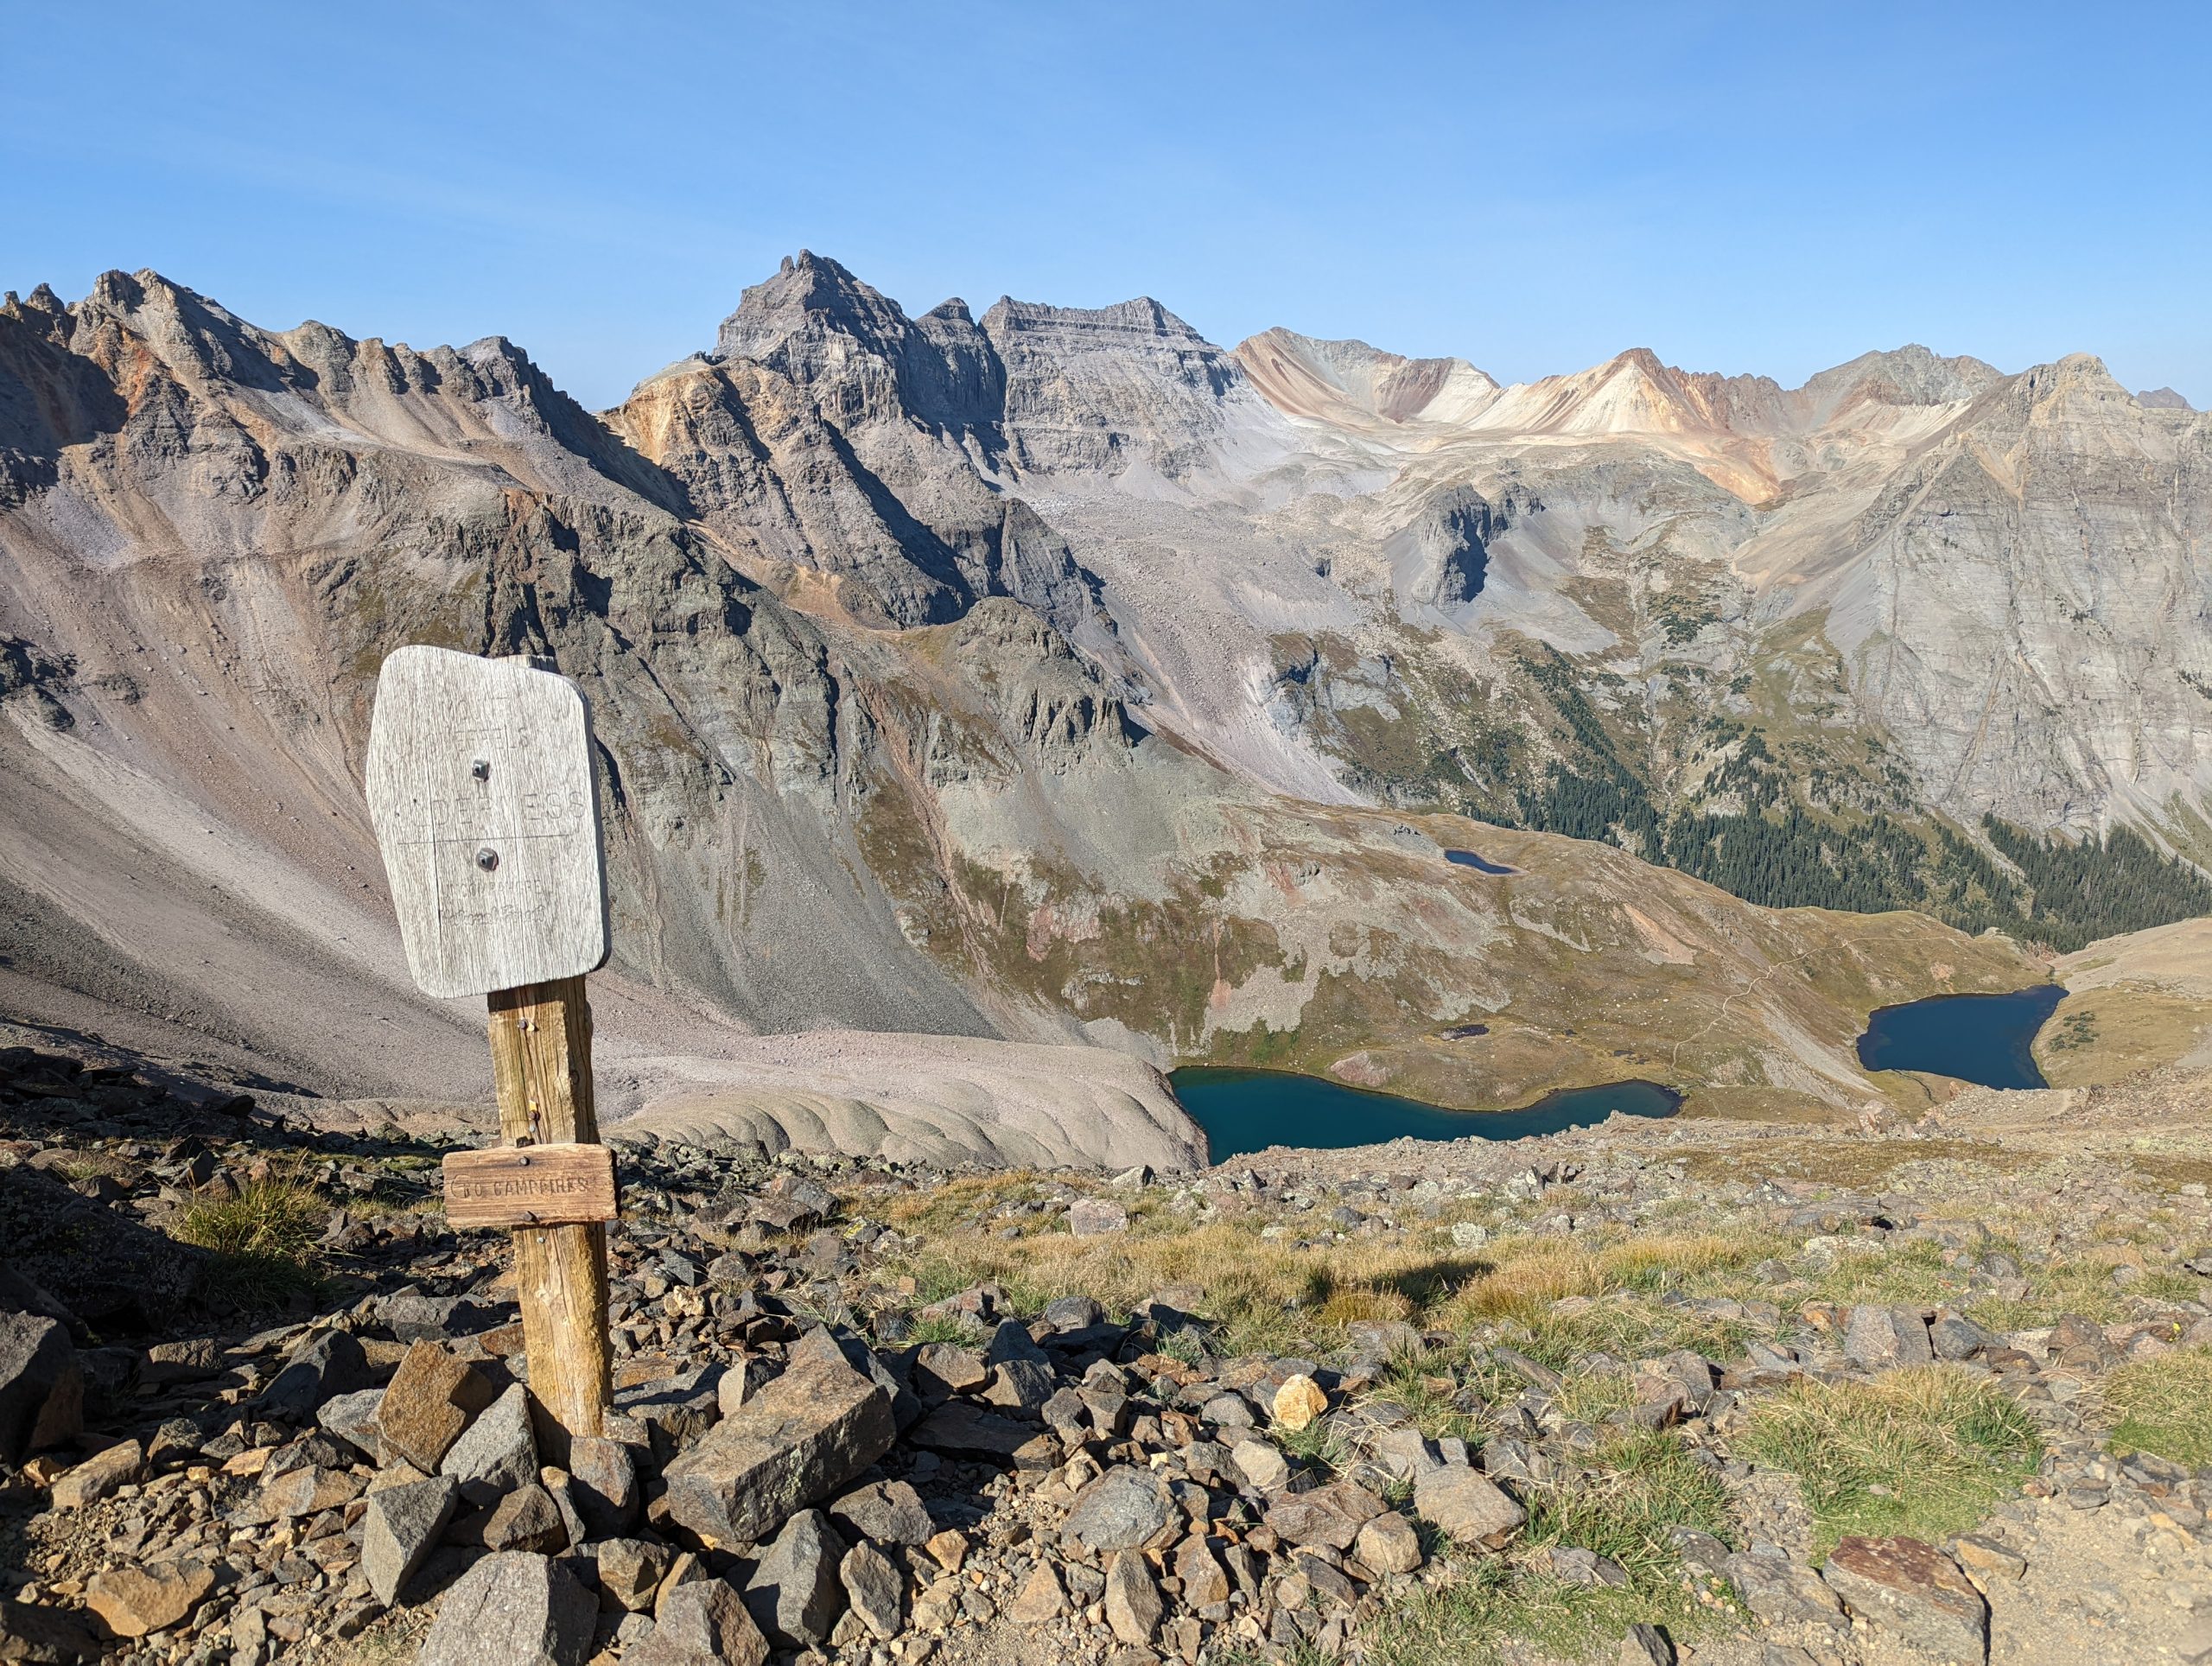
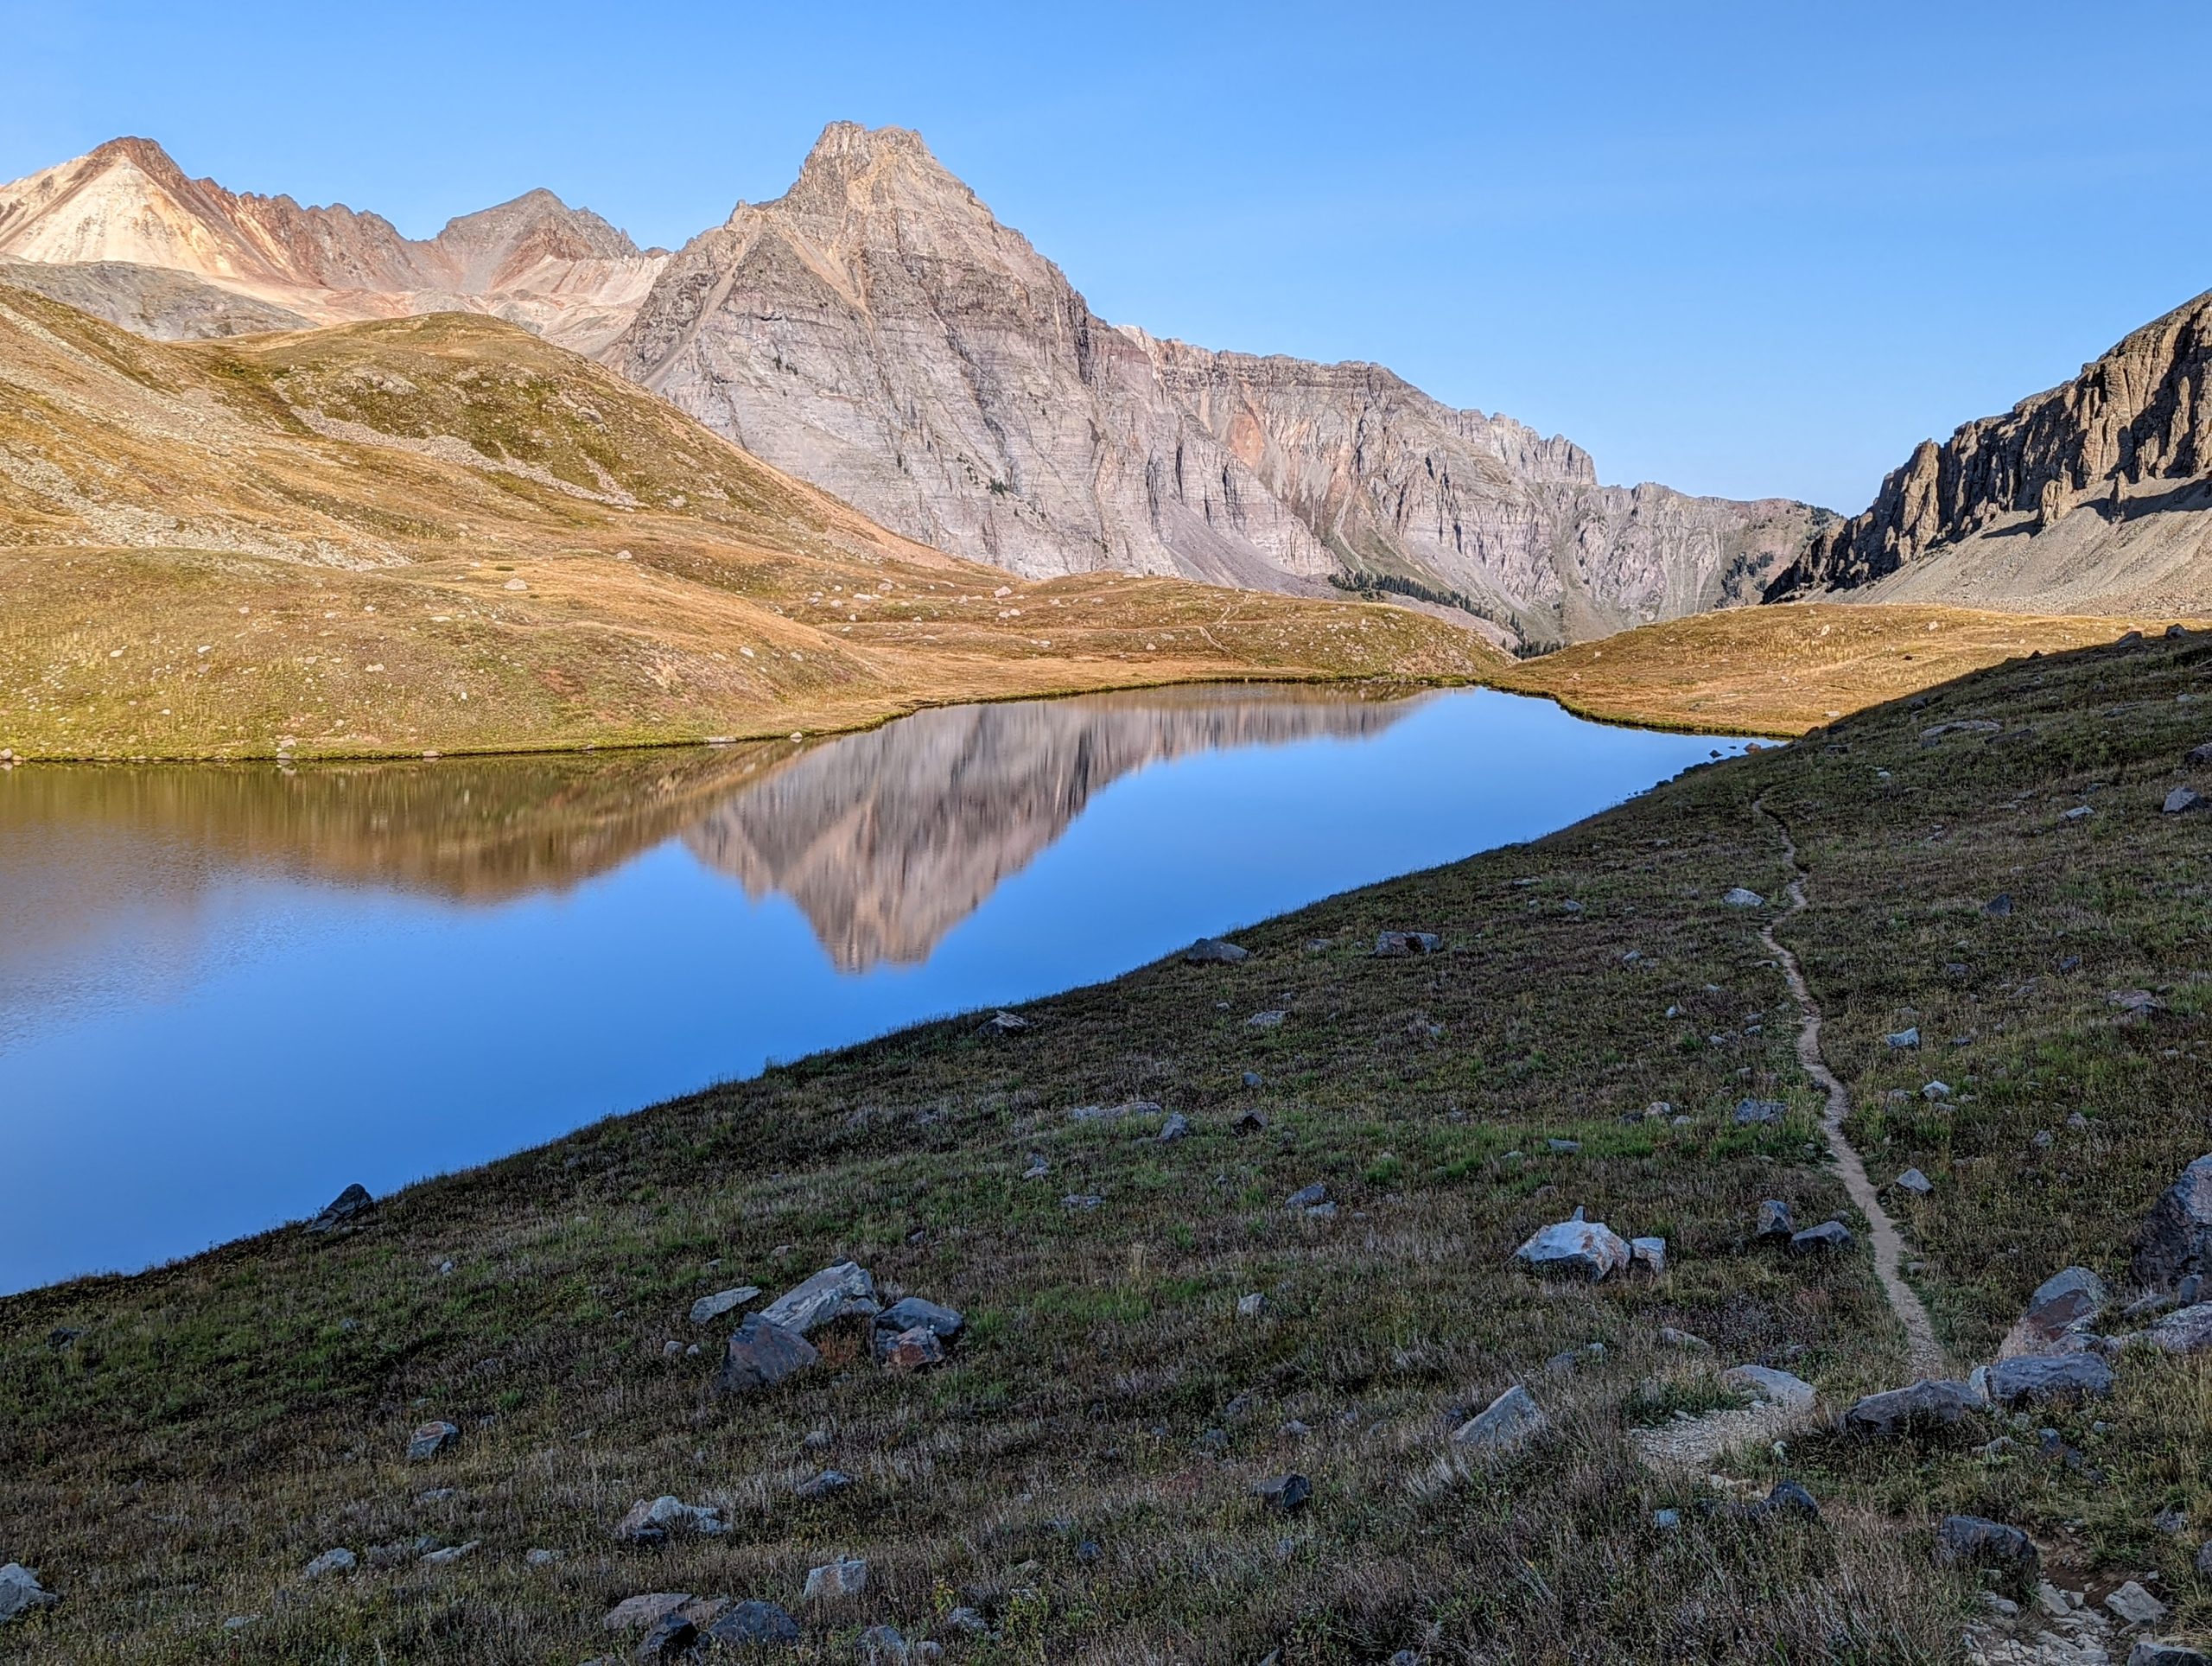
After what seems like a never-ending journey along the switchbacks (it took me 1 hour), you’ll be 5.7 miles from the trailhead at 13,000 feet on Blue Lakes Pass. I met several people who hiked to Blue Lakes Pass and back, and that would be a fantastic day hike on its own. I’d highly recommend this hike even without summiting Sneffels. At the bare minimum, you should hike to Middle Blue Lake and explore around the area leading up to it for the view looking down on Lower Blue Lake.
Blue Lakes Pass to Mount Sneffels: decision time
There are 2 ways to summit Mount Sneffels and they are commonly referred to as the ridge and the gully.
I didn’t take the ridge, but here’s what I know about it:
- The climb starts immediately from Blue Lakes Pass, saving mileage and elevation loss and re-gain. Very tempting.
- Is exposed and at least Class 3 (requiring use of all 4 limbs where a fall would be serious or fatal).
- Does not have an obvious trail. I felt there was a good chance I’d be doing some backtracking while looking for the best route.
I took the gully and here’s what I can say after doing so:
- It’s a safer option than the ridge, which I needed since I was solo on this hike.
- The trail seems so far out of the way and it is soul-crushing to descend and go back up on the way, then again on the way back.
- Climbing up the gully takes a long time and the terrain (loose scree) is difficult. Crampons and hiking poles were extremely useful.
- This is the path that is mapped out on Gaia GPS.
- It is not fun. While it shows just over a mile from the pass to the summit, it feels 10x longer than everything from the trailhead to the pass. Elevation gain will do that, I guess.
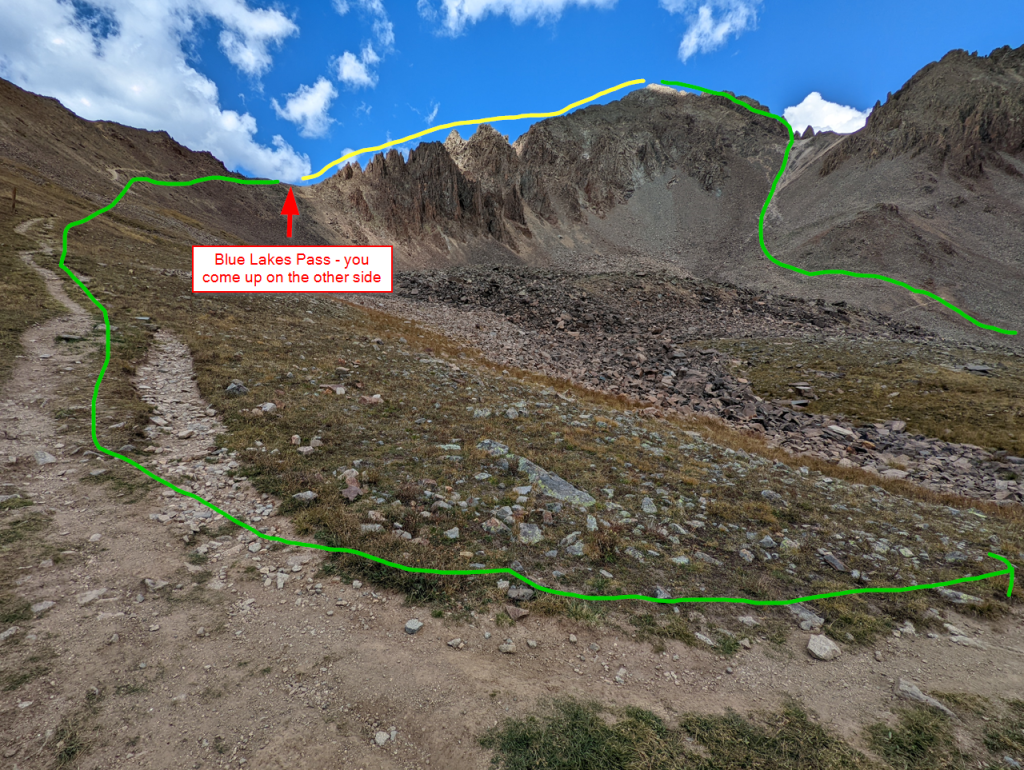
The gulley to Blue Lakes Pass
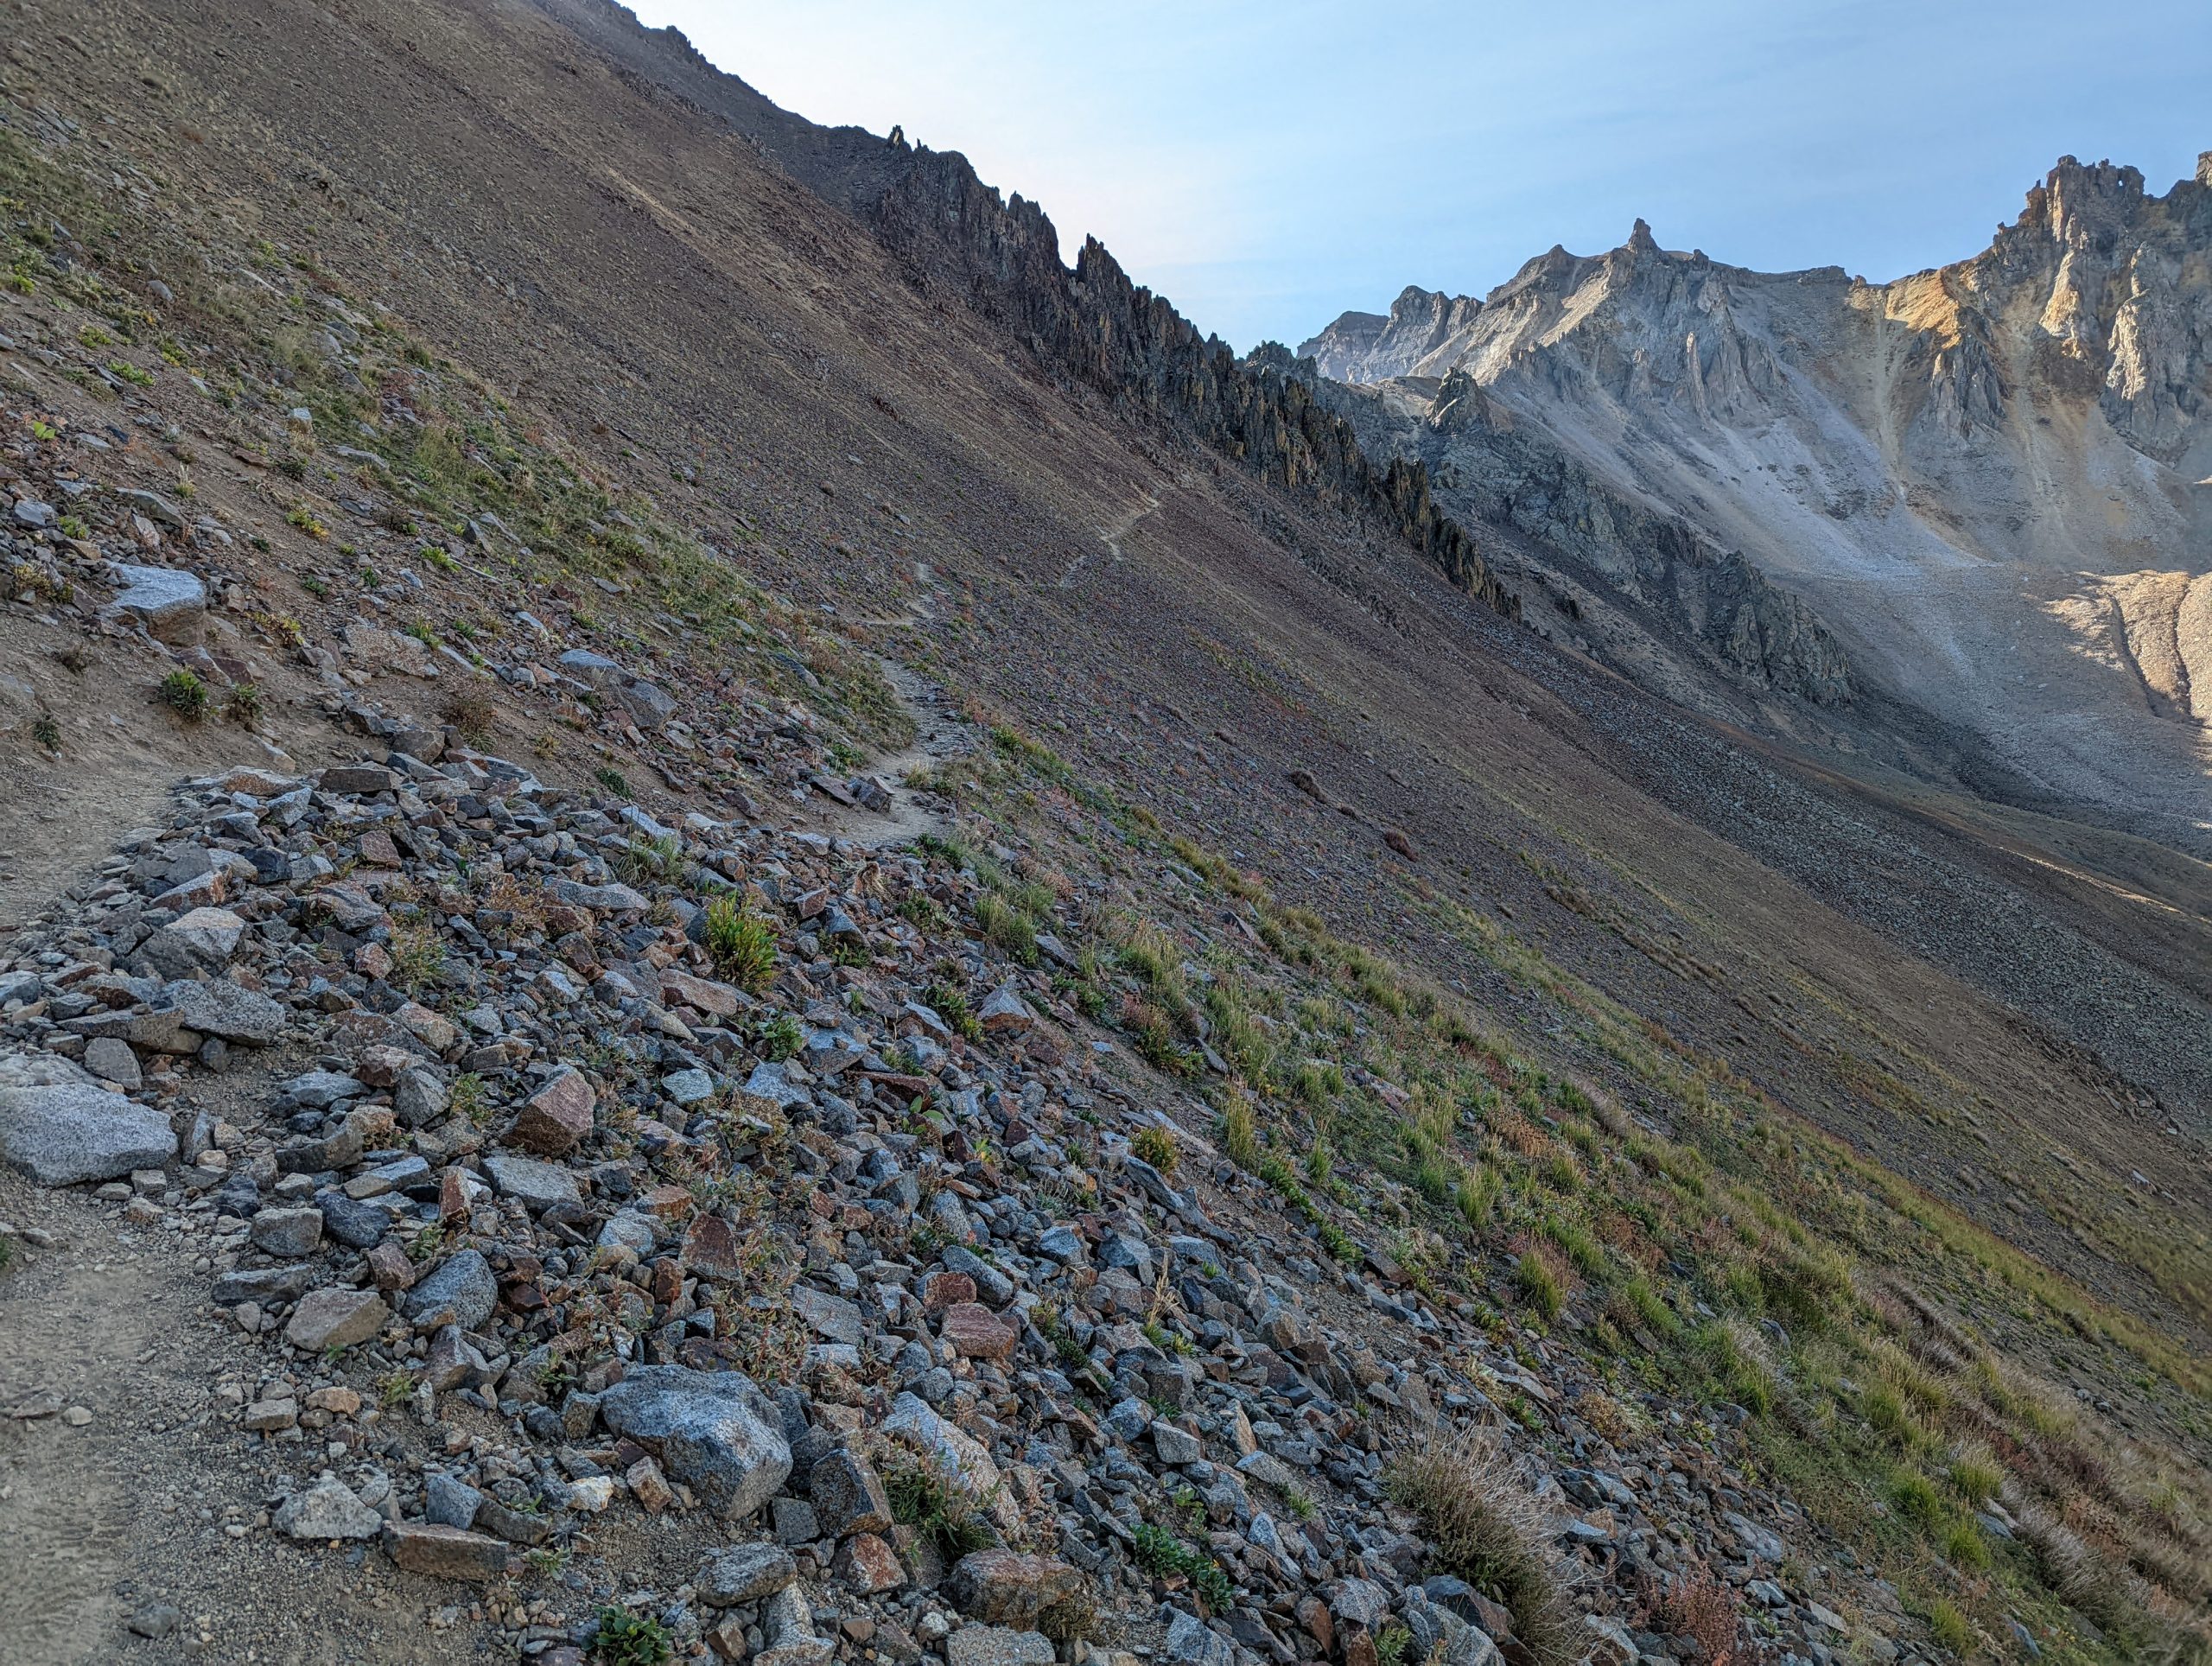
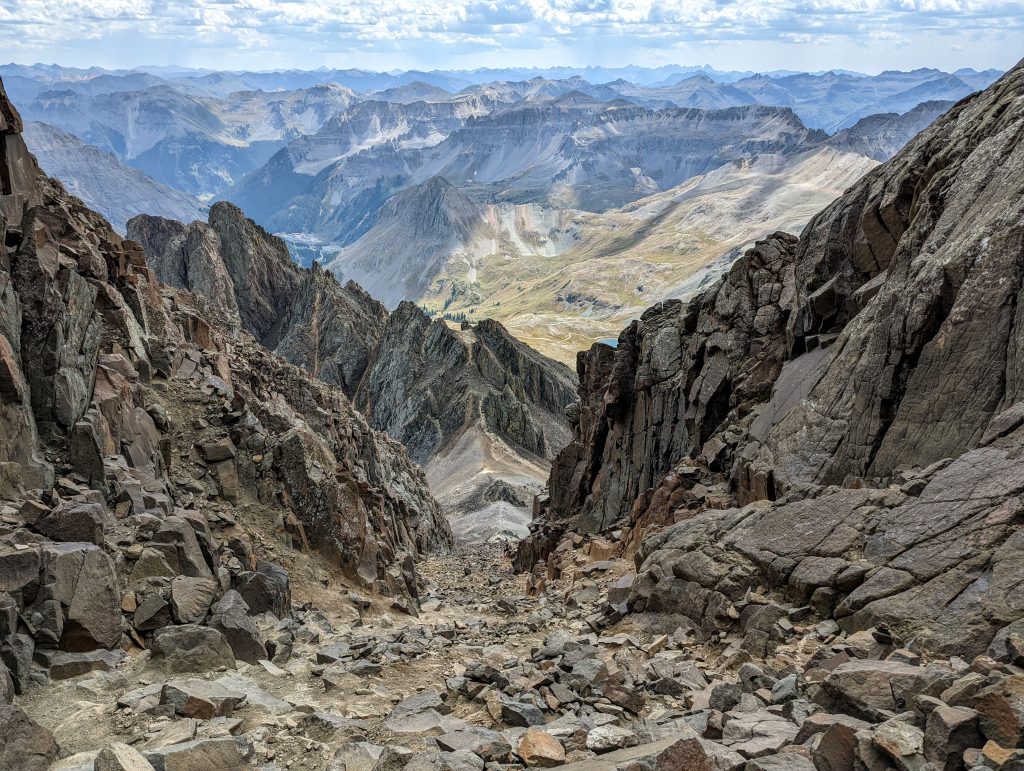
You’ll start descending into Yankee Boy Basin along a looping counter-clockwise dirt trail that turns into small boulders at times. You can see where you need to go from the pass, and while it might be tempting to cut straight across, please stick to the trail.
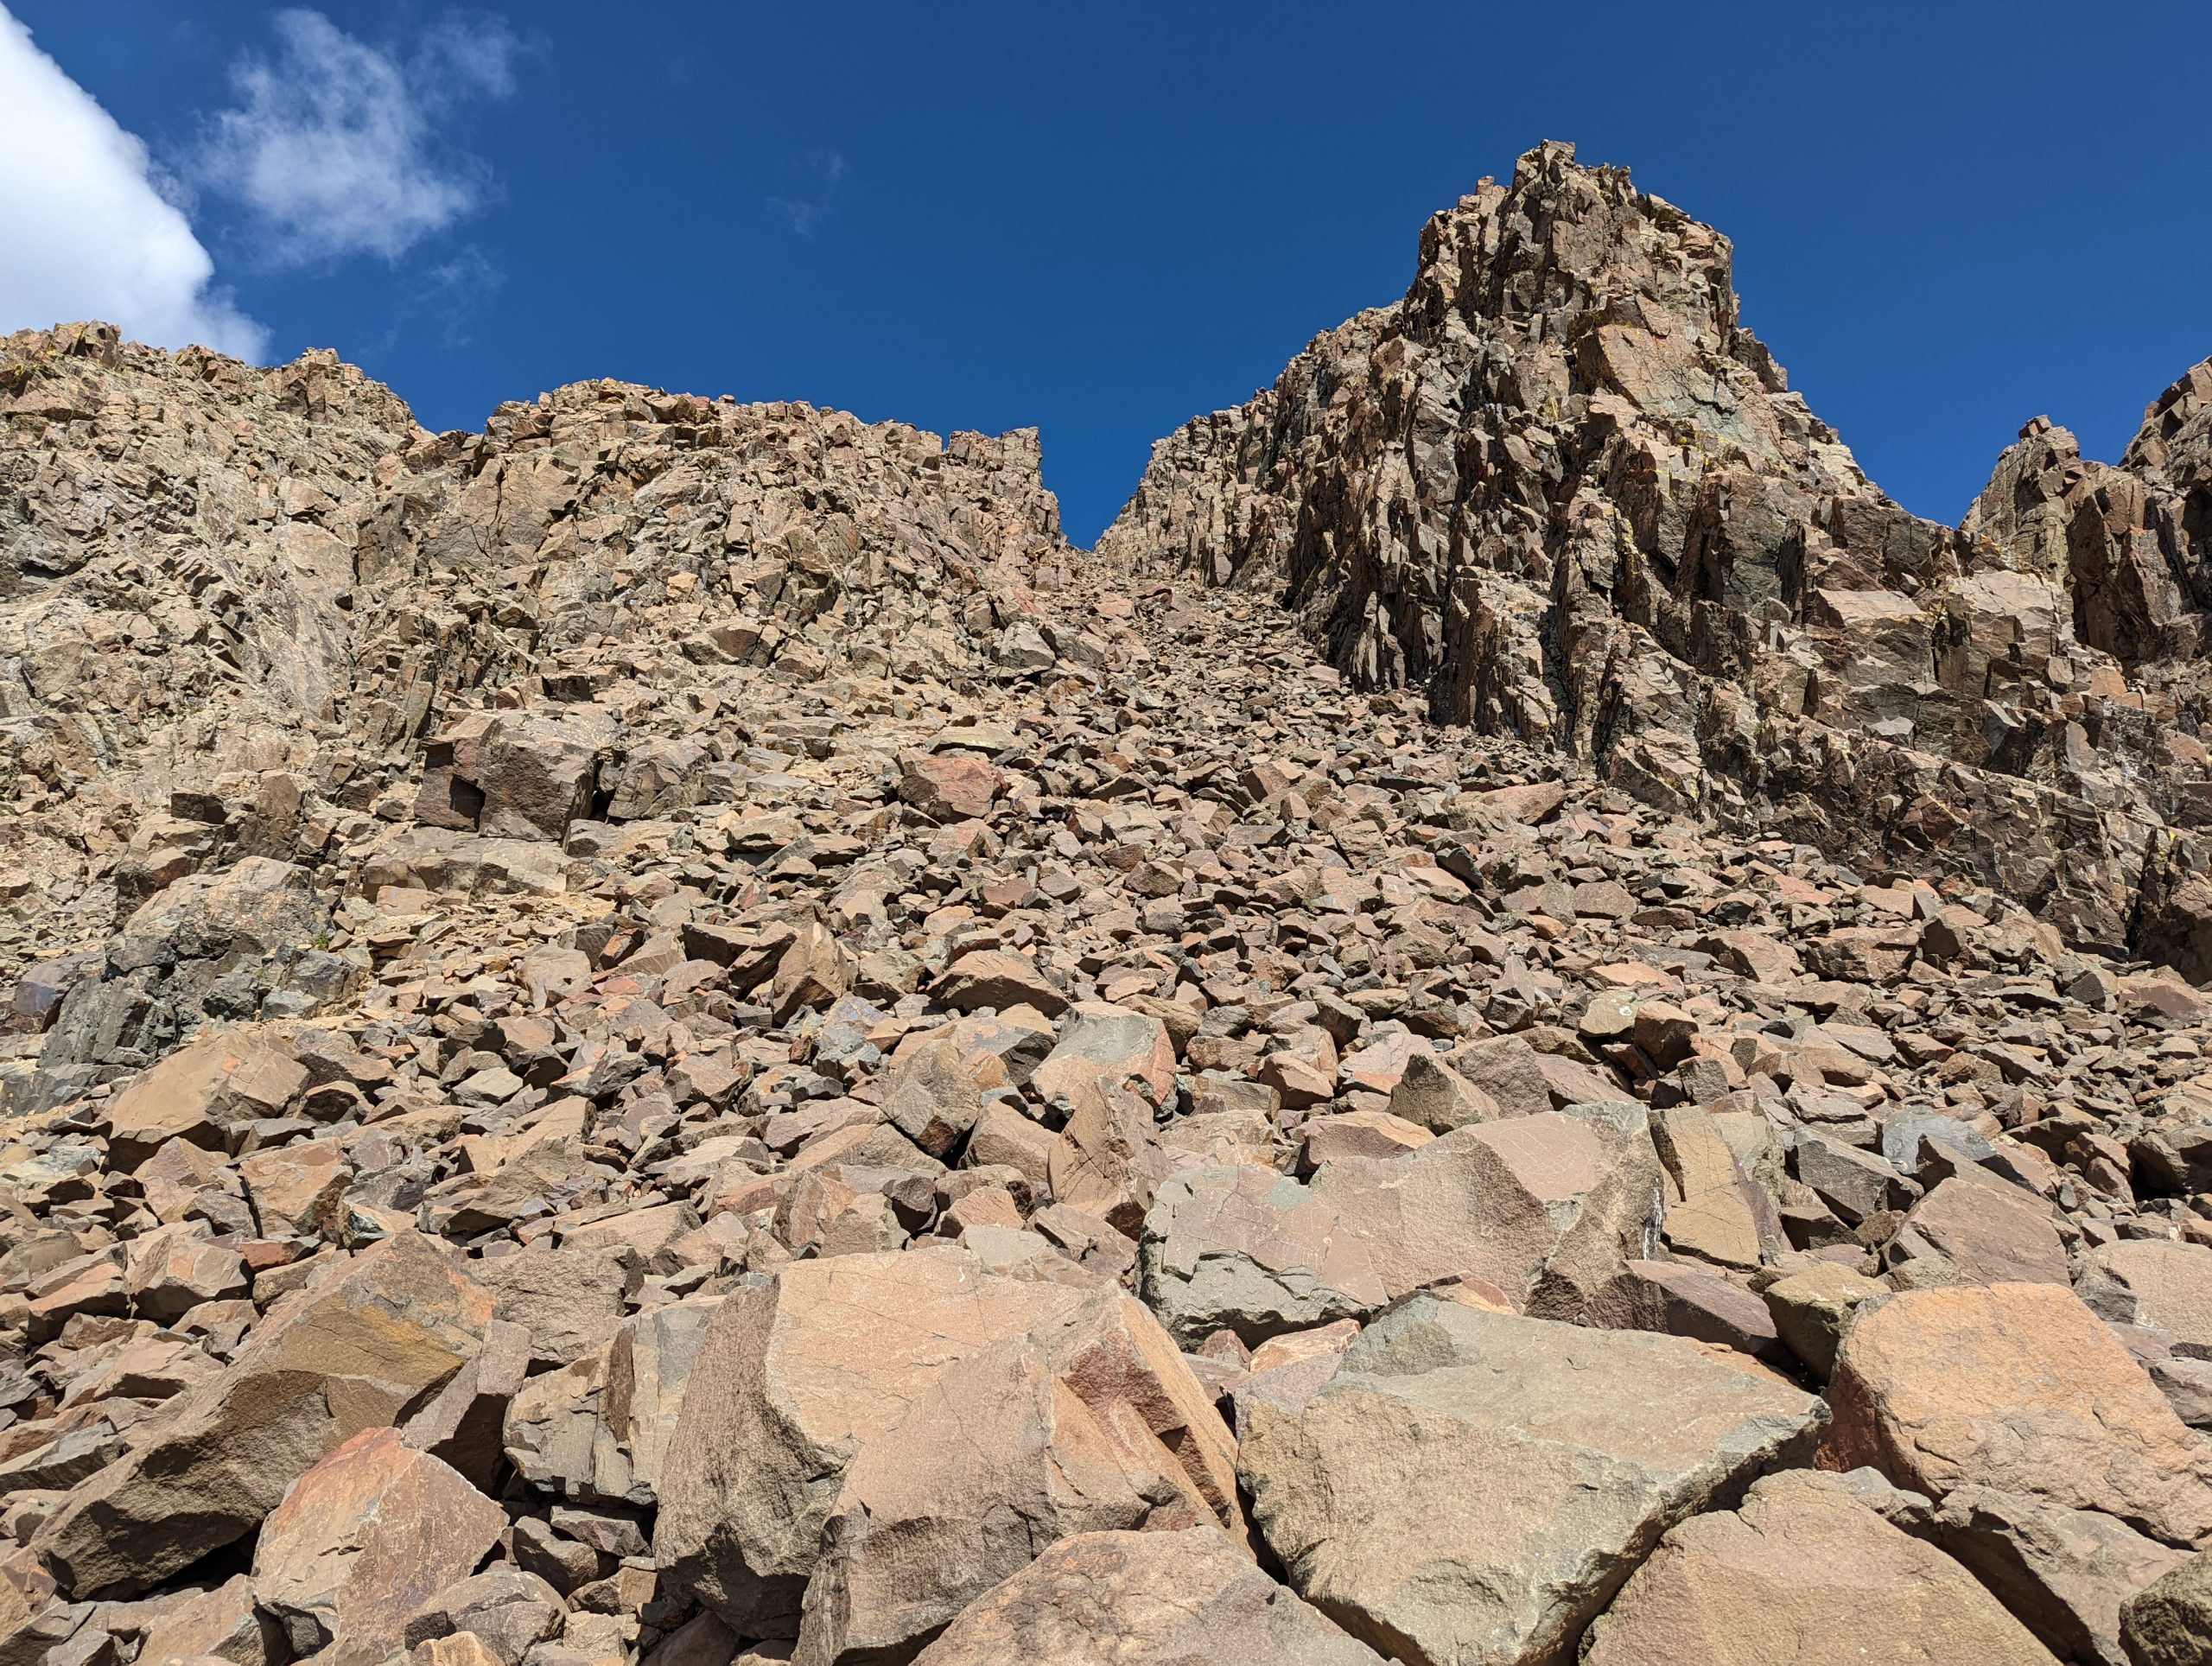
After reaching the low point, you’ll gently ascend over more small boulders and arrive at the bottom of the gully. From there it looks straight up, and it is steep. On the left side are some smaller rocks and boulders that are still pretty loose, but some may find easier.
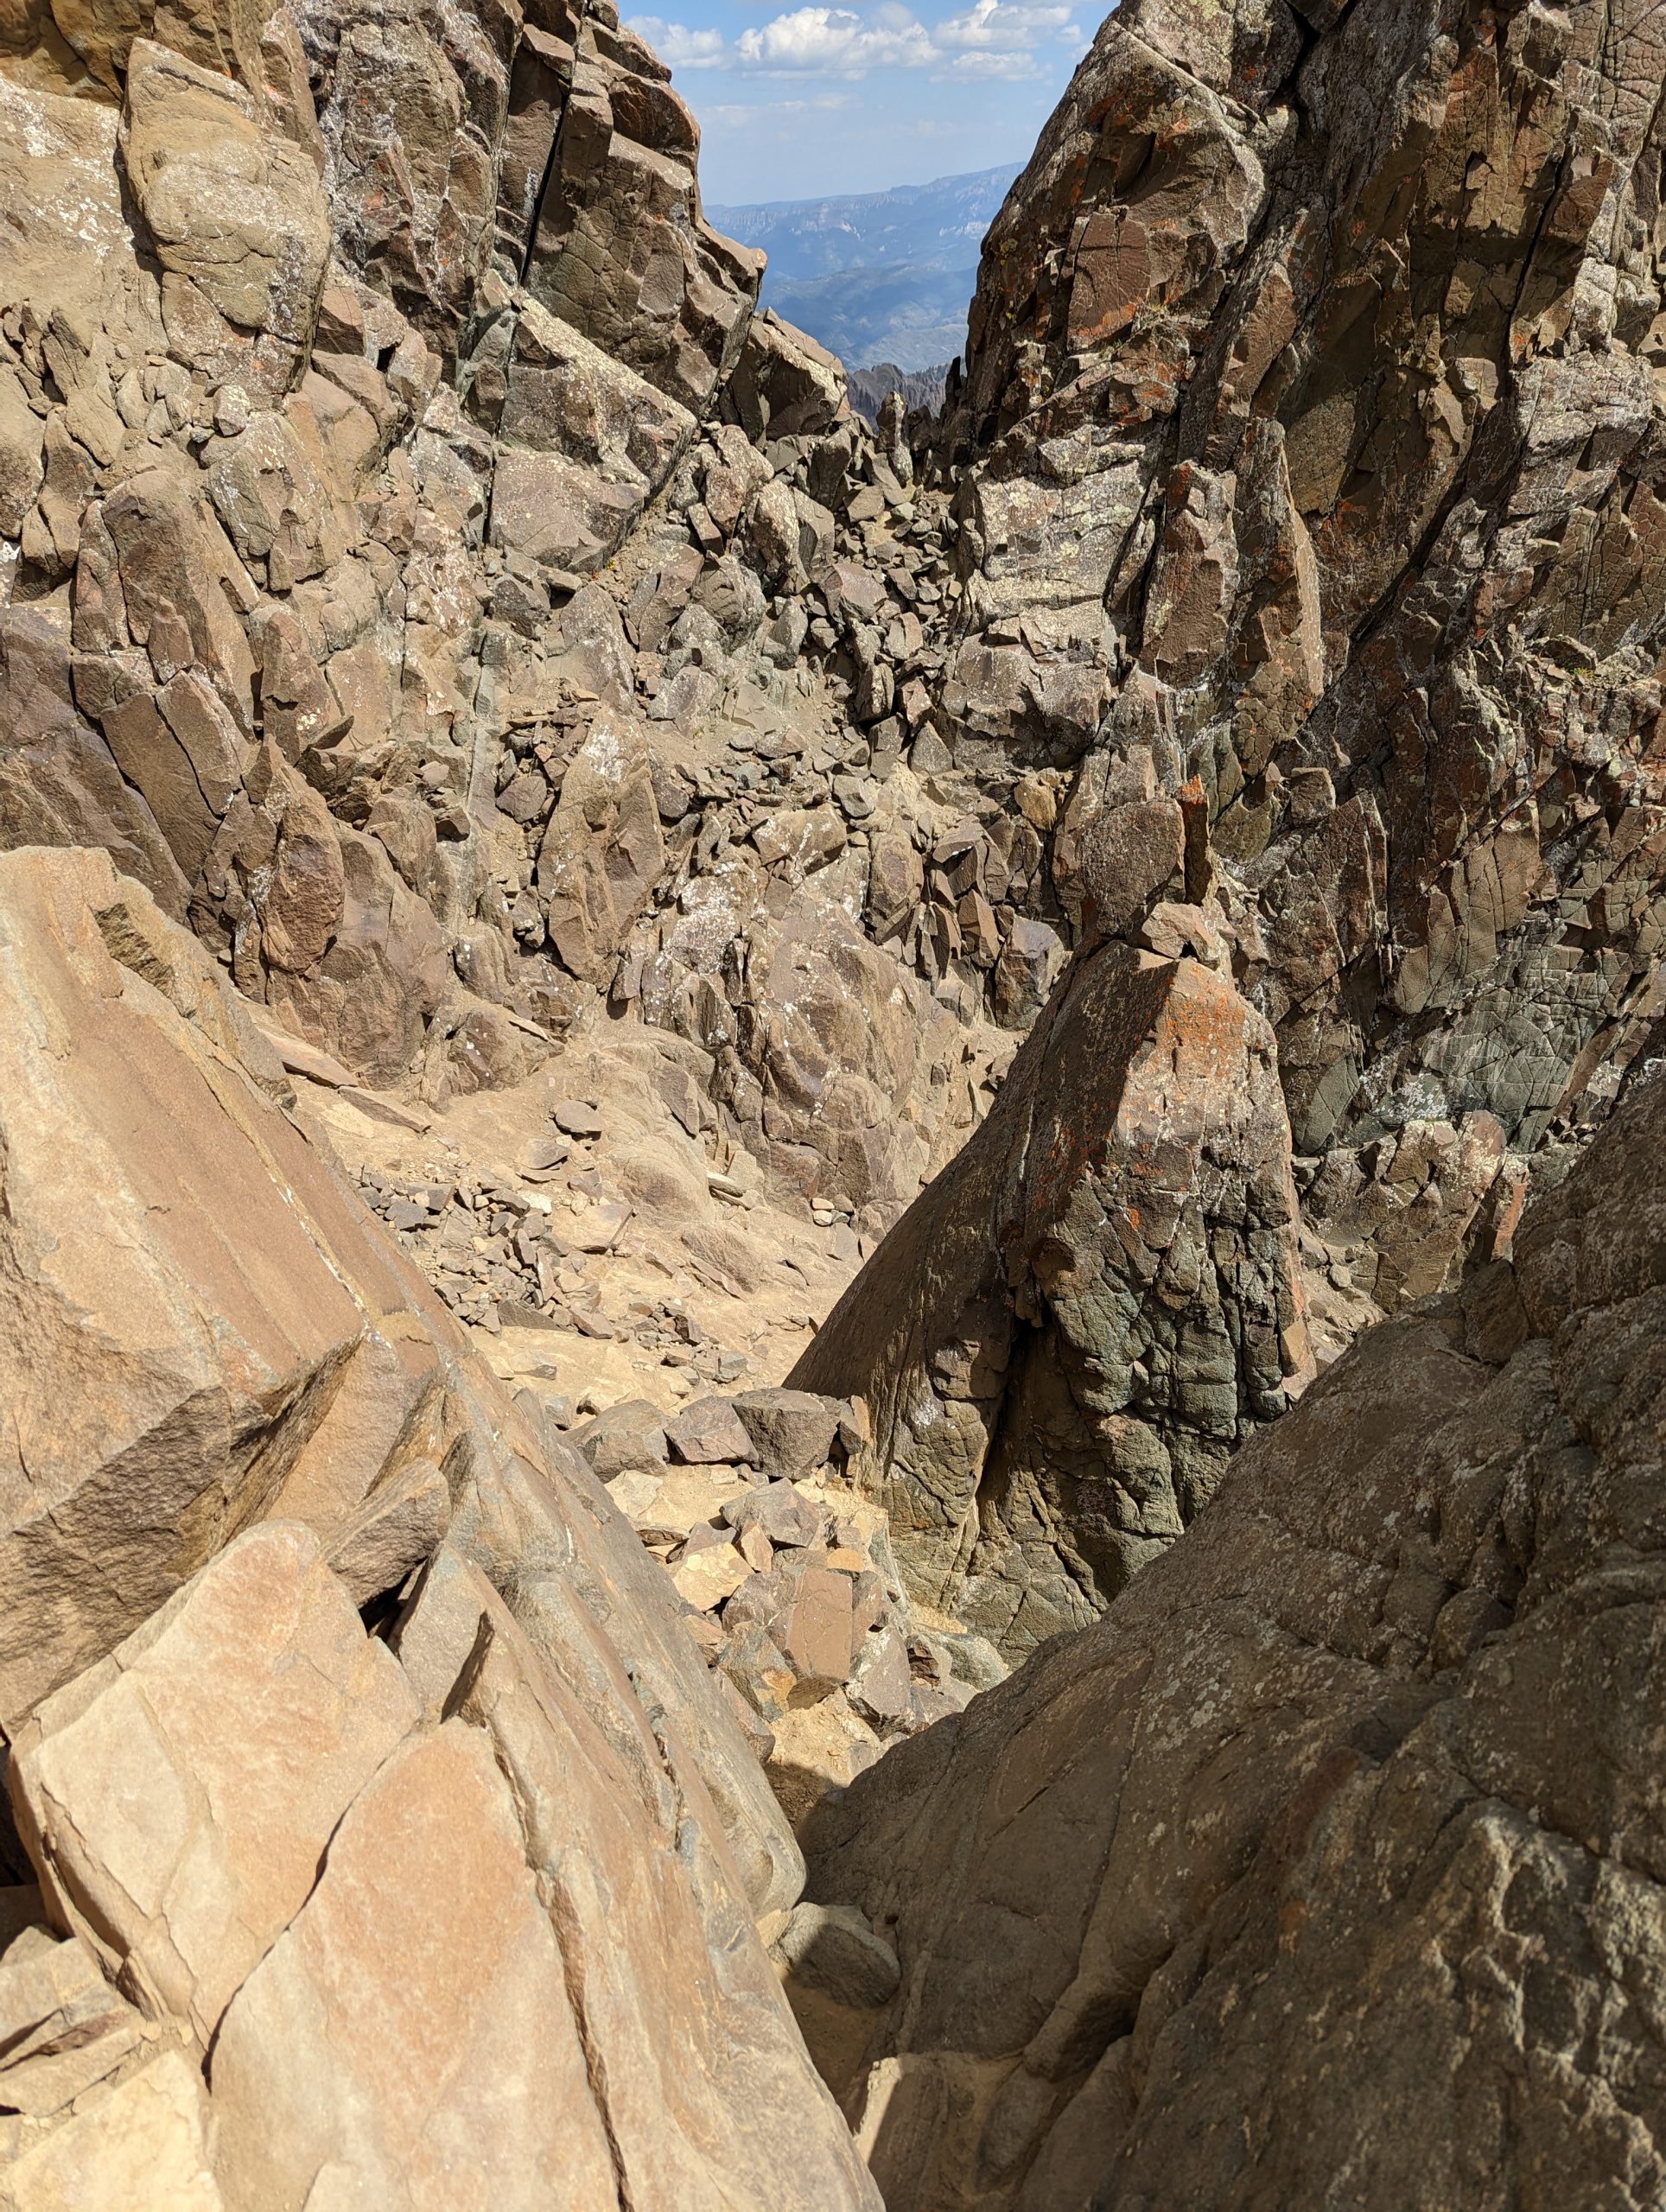
I took the route straight up the middle and had to stop many, many times on the way up to catch my breath and do a lot of pre-step checks to make sure my footing was secure. It’s a mental and physical grind but it does end. Views at the top of the gully are beautiful and it’s a great spot for a prolonged break as another steep chute awaits you.
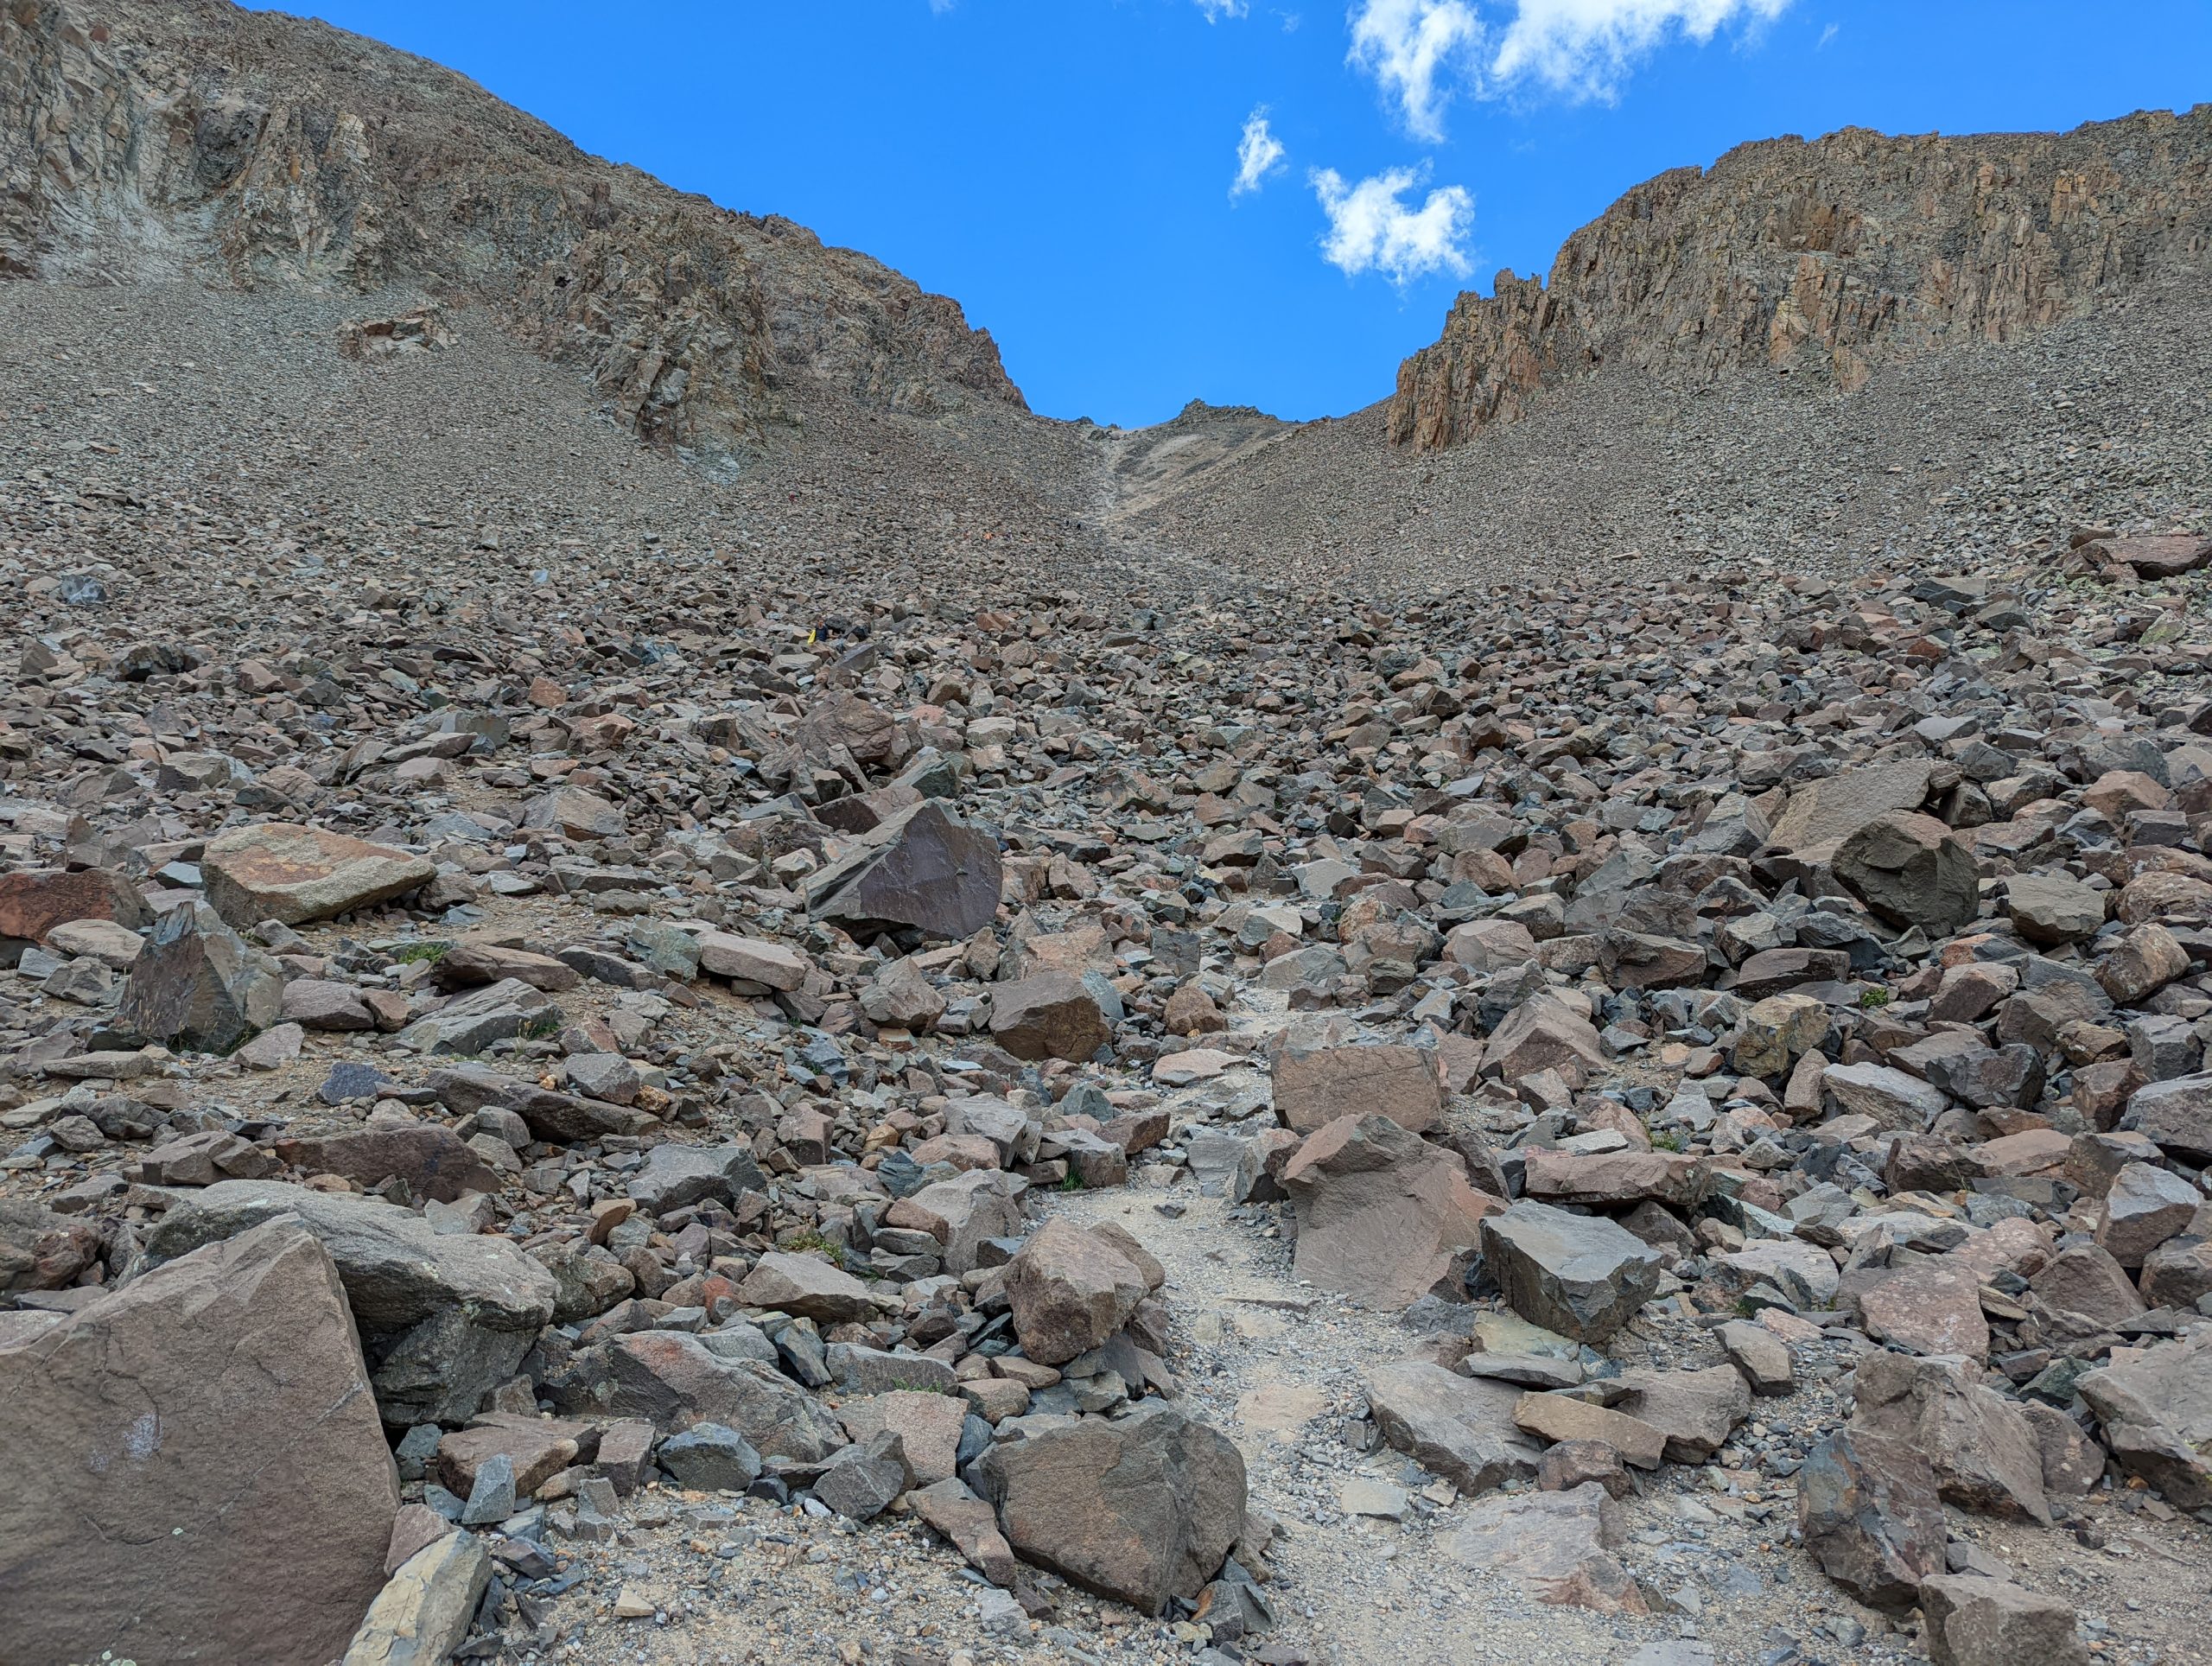

Please be very careful from the bottom of the gully all the way to the top of Mount Sneffels as you can very easily send rocks tumbling below you. The bigger ones on the chute will do some damage if they’re sent down the mountain.
While this part wasn’t exactly easy, boulder hopping was a welcome variation from the scree. You’ll want to head straight up the chute but need to look to your left just before it ends to get to the true summit. There is a distinct V-shaped crevice you need to pass through:
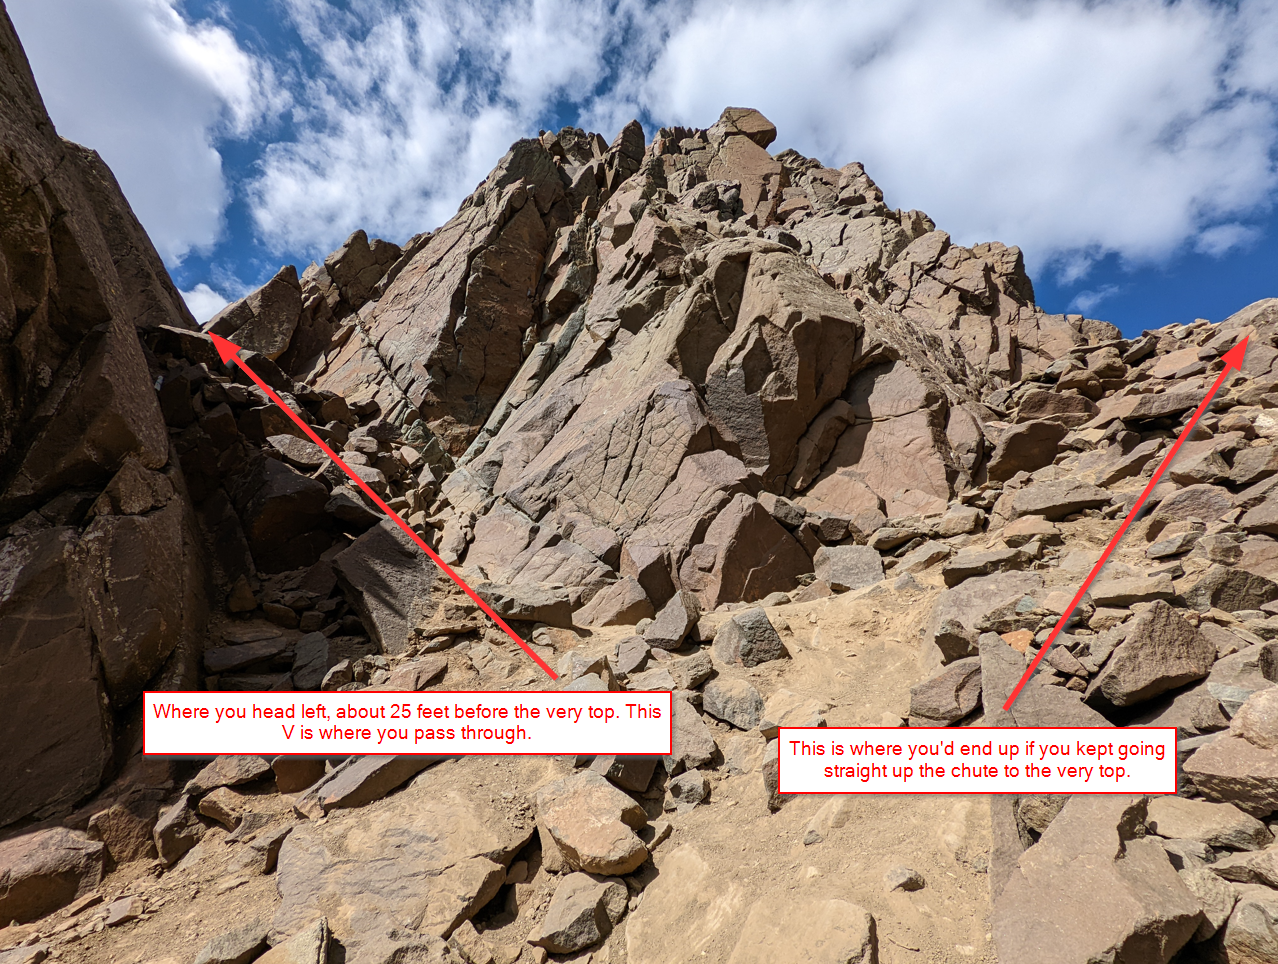
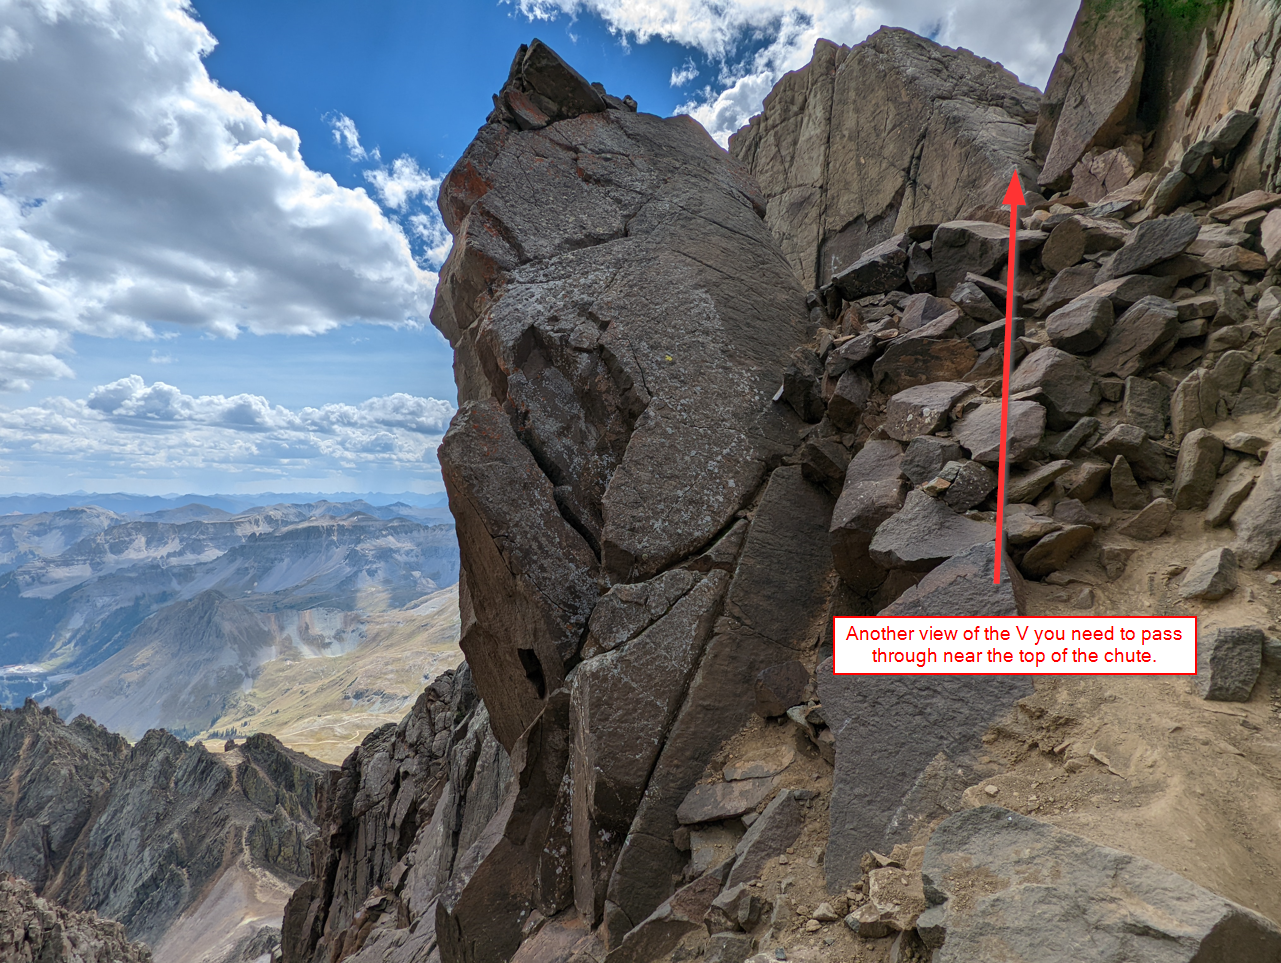
This was the trickiest move of the hike. You have to get up and between the narrow passage with some exposure on the downside. You’ll need all 4 limbs. Once you get through it, there is a short climb up and to the right to get to the Mount Sneffels summit.
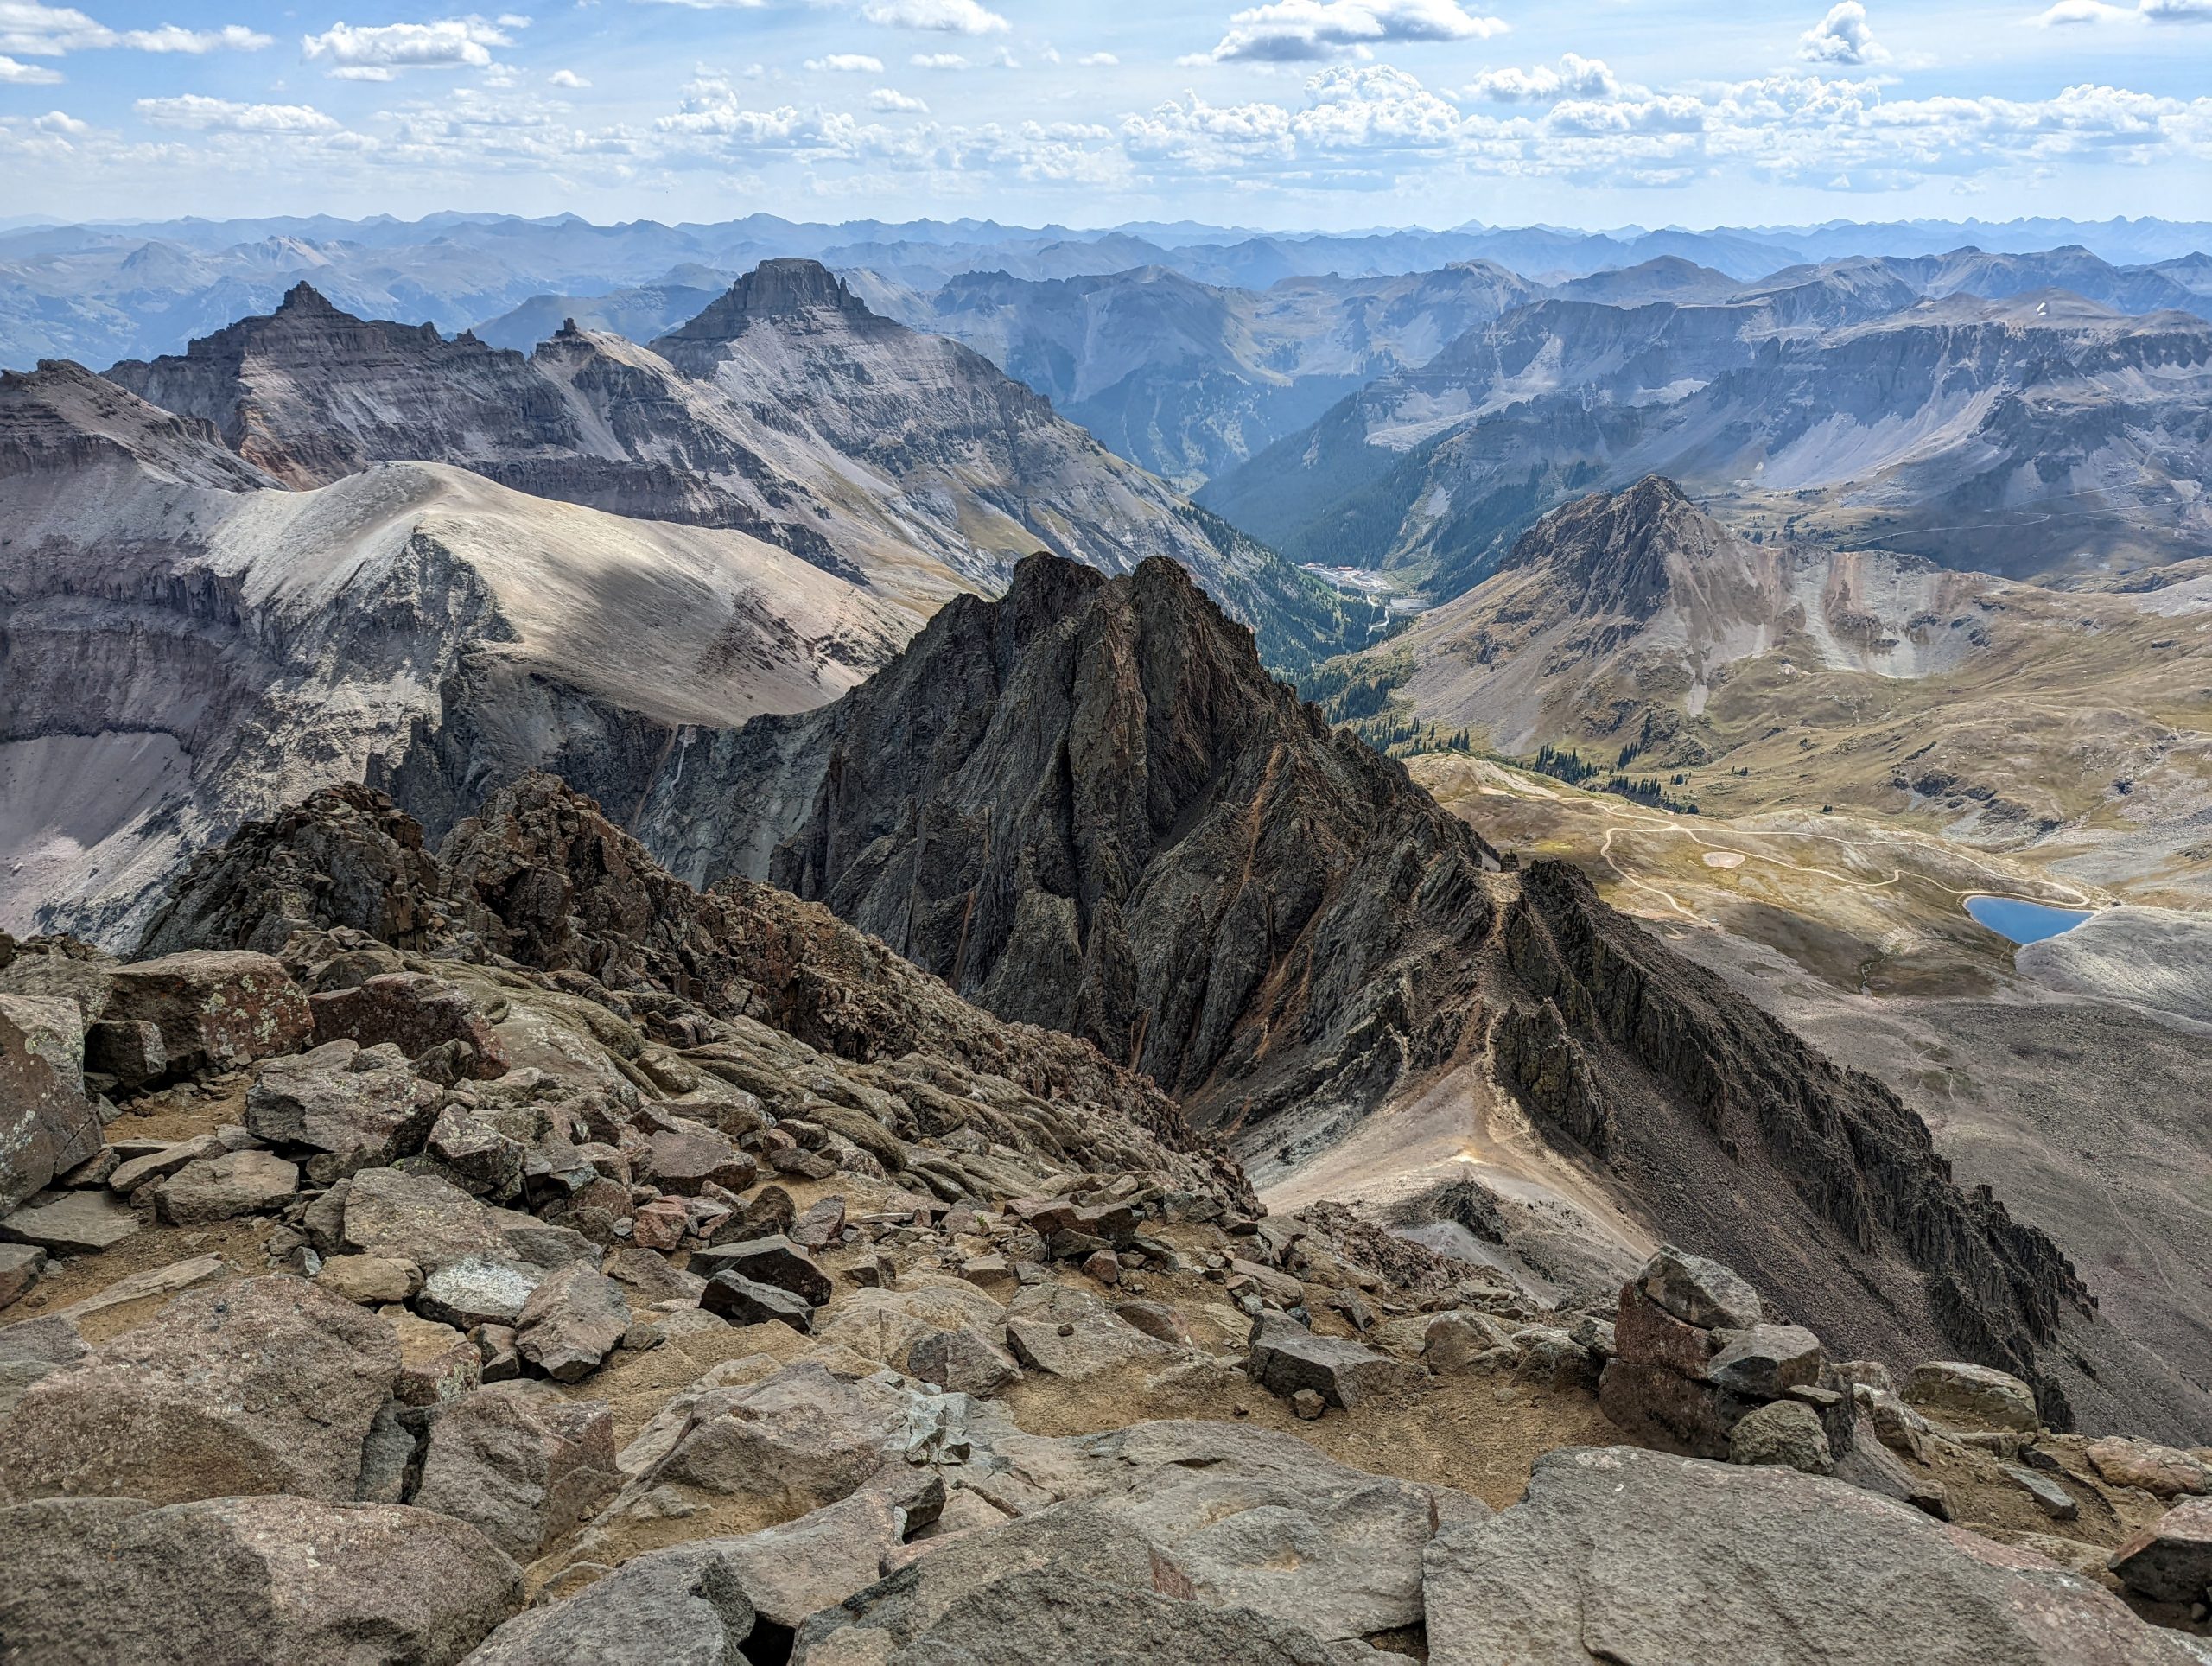
There were some parts where there was an obvious trail and cairns in other parts, but you basically need to ascend to the high point as safely as you can. Then you’re there! 14,150 feet in the air overlooking everything in sight. You can see all 3 blue lakes from here and looking back towards Yankee Boy Basin and beyond is unbelievable. This is one of those mountain after mountain after mountain views that will stick in your memory forever.
There is room on the top of Mount Sneffels for at least 5-10 people. You should be able to sit down and enjoy the view for a bit. When it’s time to head back, you could take the ridge or retrace your steps down the gully. I was hoping there were other hikers at the summit that had come up the ridge and were going down the same way, so I could go with them. However, I had the summit to myself except for a group that headed back down the gully shortly after I arrived. Better safe than sorry.
Notes for the descent
When heading down from Mount Sneffels, it was easier if I stayed to the far left through the chute. I used my hand on the sidewall for balance and was able to make quick work of that section. However, it’s important to make sure the boulders you’re stepping on aren’t going to slip out beneath you.
Now at the top of the gully, the smaller rocks on the side were tempting but after donning the crampons and poles again I was able to head down the middle at a decent clip. Then it’s that long roundabout and ascent to get back to Blue Lakes Pass.
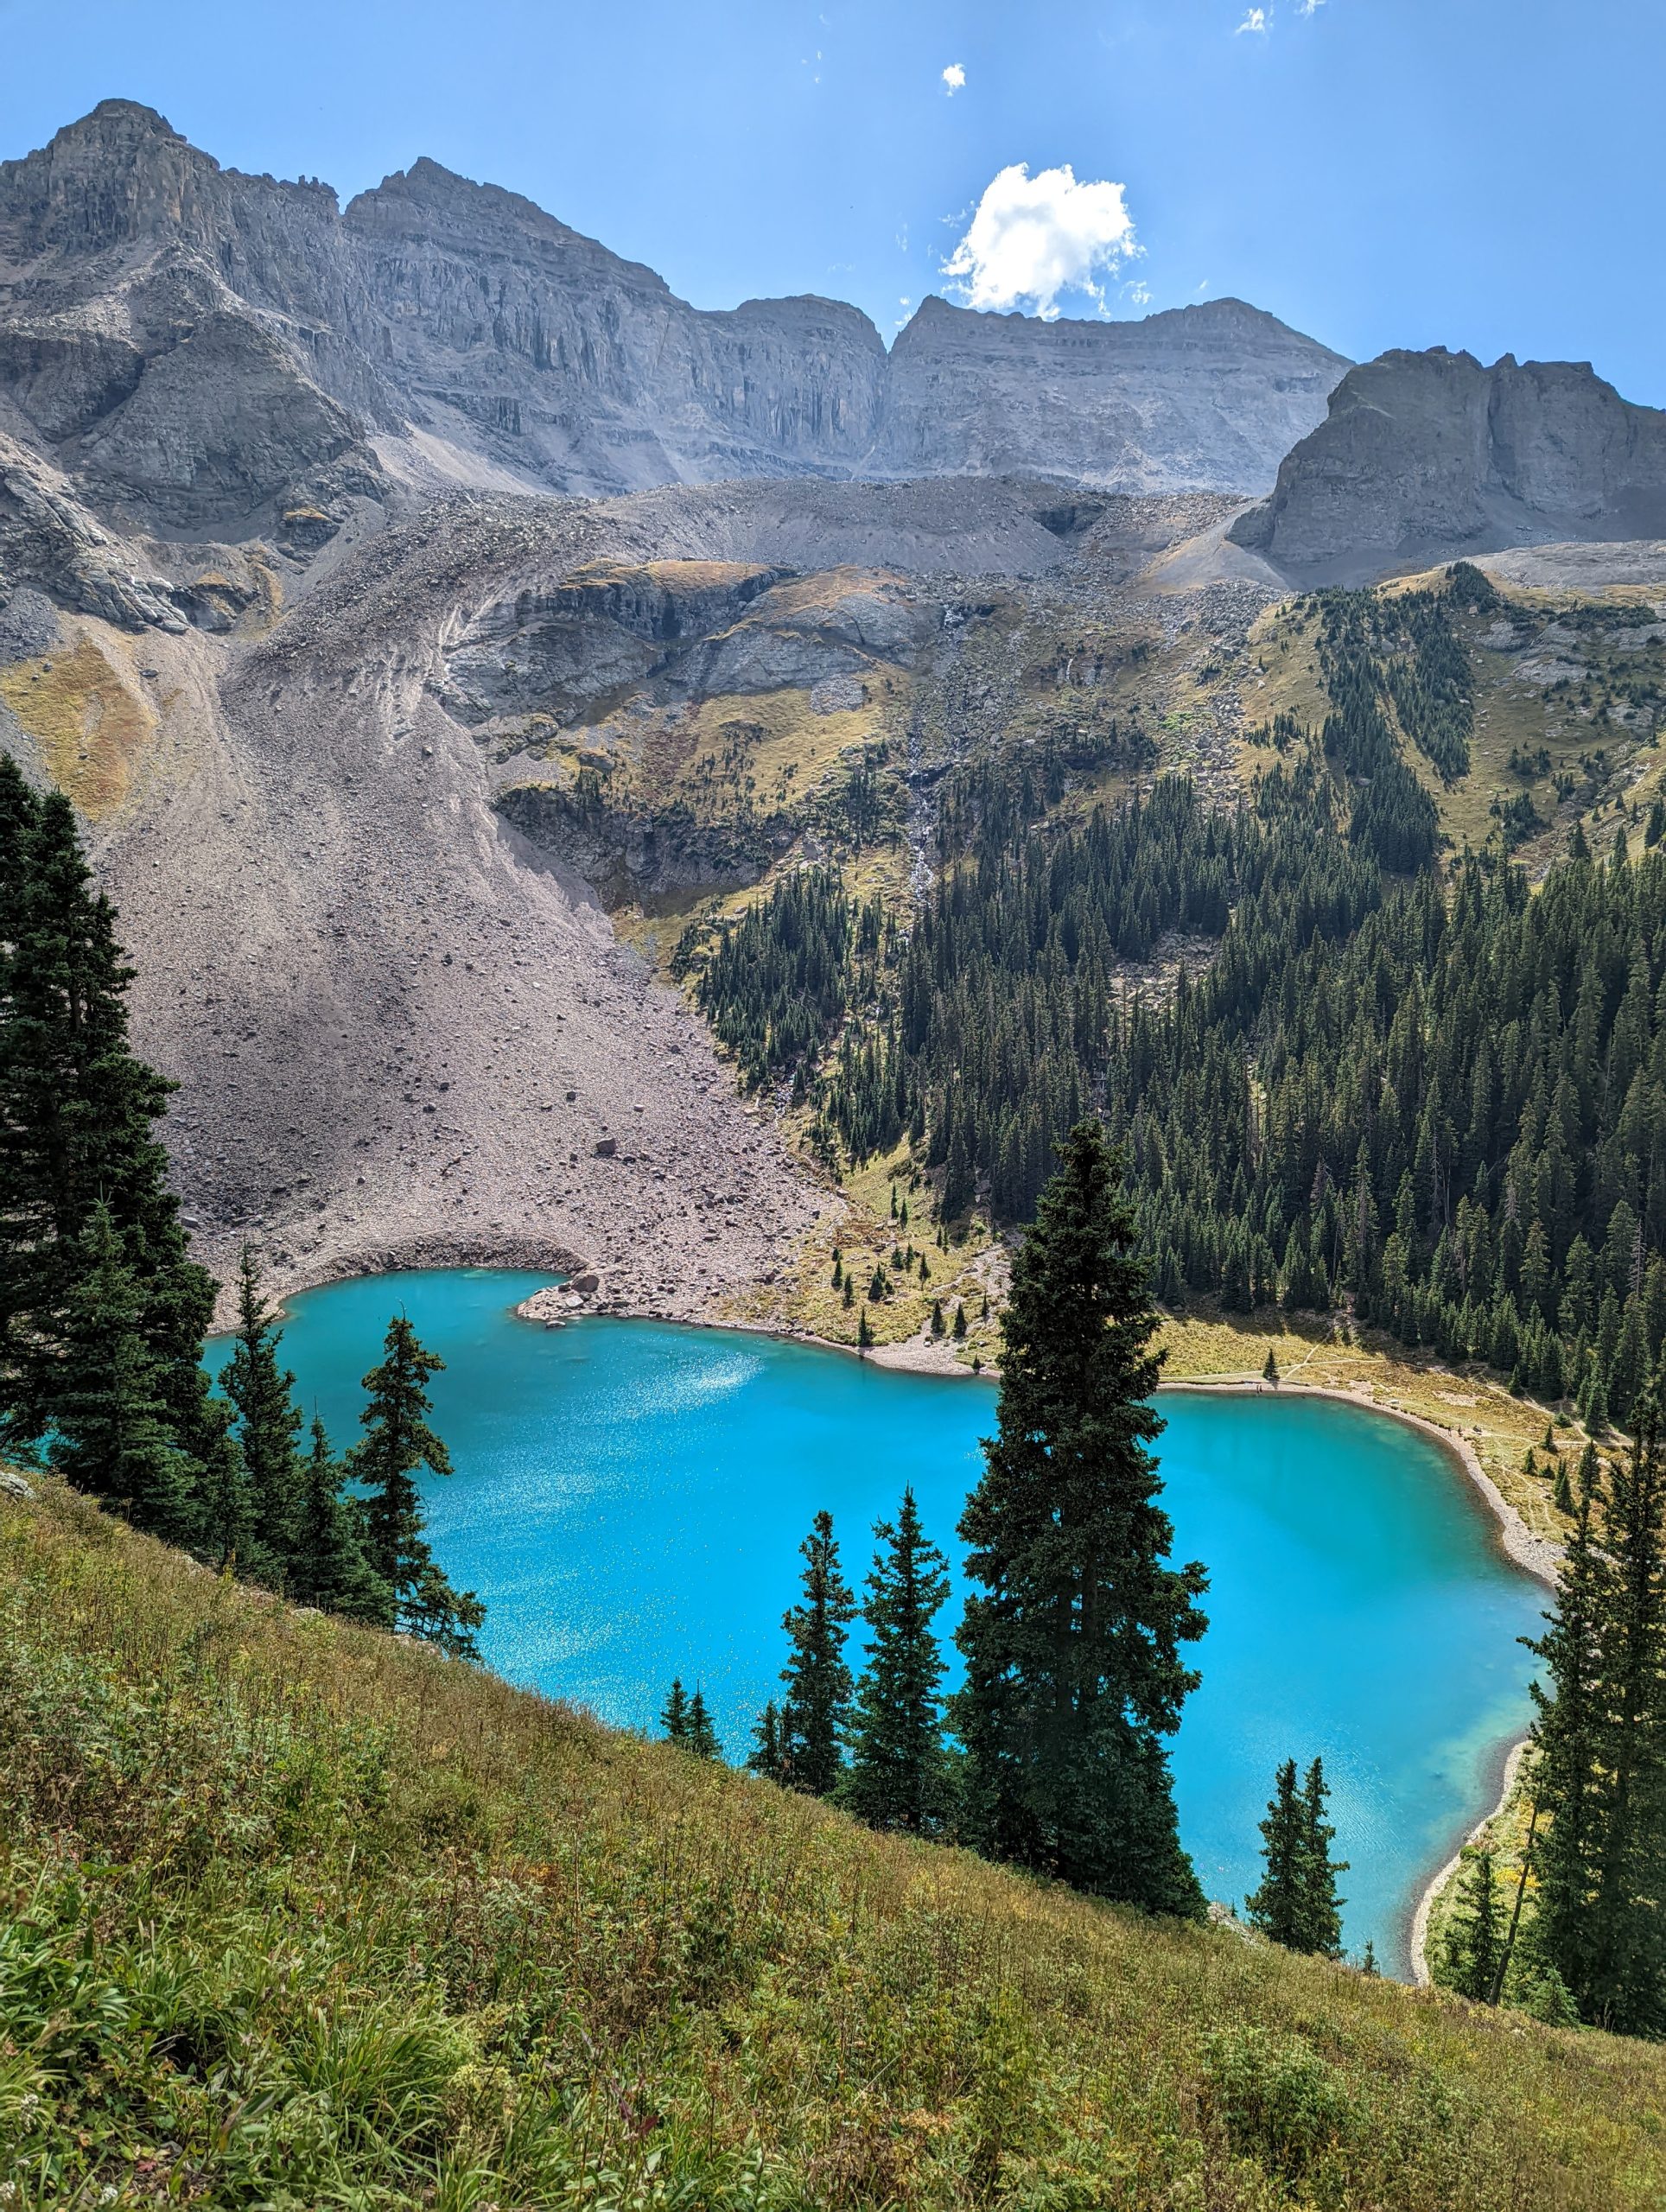
The lighting on the way up had Middle and Upper Blue Lakes appearing very dark. On the return they lived up to their names. When the sun hits the water they take on a completely different look. That really helped take my mind off the switchbacks as I descended.
You’ll want to explore those side trails again (now on your left) starting when you get to Middle Blue Lake. The color of Lower Blue Lake will also be different. This is probably when you’ll get a photo to blow up and hang in your house. Also, head back to the shore of Lower Blue Lake for a completely different view from when you saw it on the way up.
The rest of the descent goes by pretty quickly and then you’re done!
This was my first 14er (mountain over 14,000 feet) and I don’t know if I could have picked a better one. Mount Sneffels looks so awesome from afar and the idea of summiting “that” peak was so enticing. With a not-too technical but still challenging 14er and amazing lakes and mountains the whole way, this is one of the best hikes I’ve ever done.
Have you done this hike, or have questions on it? Please leave a comment below!
Leave a reply